mybatis 的入门
特别提示: mybatis 官方教程:https://mybatis.org/mybatis-3/zh/index.html )
既然要学习框架,那就要知道 什么是框架 框架 是我们软件开发中的 一套解决方案 使用框架的好处 大大提高开发效率
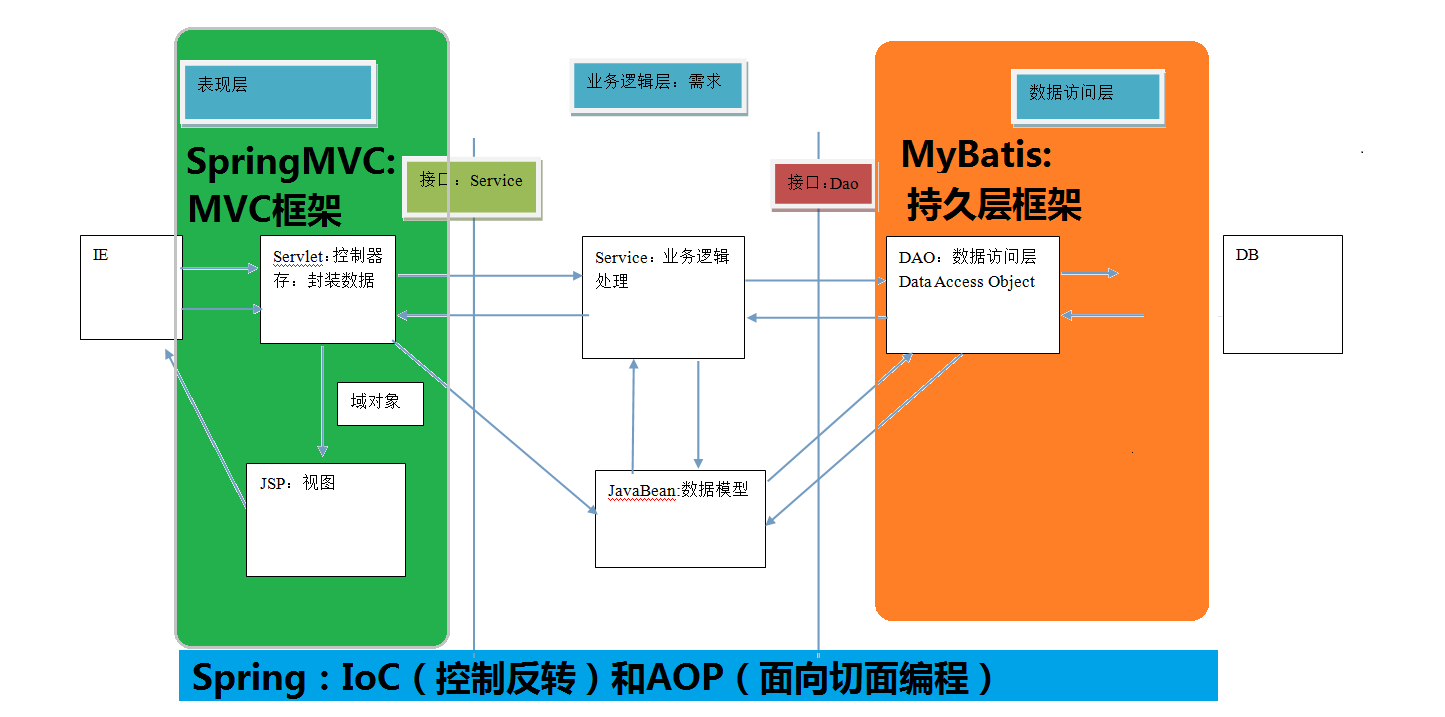
mybatis 的概述 mybatis 是一个优秀的基于 java 的持久层框架,它内部封装了 jdbc,使开发者 只需要关注 sql 语句本身
它通过 xml 或 注解 的方式将要执行的各种 statement 配置起来,并通过 java 对象和 statement 中 sql 的动态参数进行映射生成最终执行的 sql 语句,最后由 mybatis 框架执行 sql 并将结果映射为 java 对象并返回
该框架采用 ORM 思想 解决了 实体和数据库映射的问题 ORM 。 ORM 是 Object Relational Mappging 对象关系映射 把数据库表和实体类及实体类的属性对应起来
mybatis 属于持久层框架
mybatis 的环境搭建 第一步: 先创建一个数据库 数据表 复制代码执行即可
1
2
3
4
5
6
7
8
9
10
11
12
13
14
15
16
17
18
19
20
21
22
23
24
25
26
27
28
29
30
31
32
33
34
35
36
37
38
39
40
41
42
43
44
45
46
47
48
49
50
51
DROP TABLE IF EXISTS `user` ;CREATE TABLE `user` ( `id` int (11 ) NOT NULL auto_increment, `username` varchar (32 ) NOT NULL COMMENT '用户名称' , `birthday` datetime default NULL COMMENT '生日' , `sex` char (1 ) default NULL COMMENT '性别' , `address` varchar (256 ) default NULL COMMENT '地址' , PRIMARY KEY (`id` ) ) ENGINE =InnoDB DEFAULT CHARSET =utf8; insert into `user` (`id` ,`username` ,`birthday` ,`sex` ,`address` ) values (41 ,'老王' ,'2018-02-27 17:47:08' ,'男' ,'北京' ),(42 ,'小二王' ,'2018-03-02 15:09:37' ,'女' ,'北京金燕龙' ),(43 ,'小二王' ,'2018-03-04 11:34:34' ,'女' ,'北京金燕龙' ),(45 ,'传智播客' ,'2018-03-04 12:04:06' ,'男' ,'北京金燕龙' ),(46 ,'老王' ,'2018-03-07 17:37:26' ,'男' ,'北京' ),(48 ,'小马宝莉' ,'2018-03-08 11:44:00' ,'女' ,'北京修正' );DROP TABLE IF EXISTS `account` ;CREATE TABLE `account` ( `ID` int (11 ) NOT NULL COMMENT '编号' , `UID` int (11 ) default NULL COMMENT '用户编号' , `MONEY` double default NULL COMMENT '金额' , PRIMARY KEY (`ID` ), KEY `FK_Reference_8` (`UID` ), CONSTRAINT `FK_Reference_8` FOREIGN KEY (`UID` ) REFERENCES `user` (`id` ) ) ENGINE =InnoDB DEFAULT CHARSET =utf8; insert into `account` (`ID` ,`UID` ,`MONEY` ) values (1 ,41 ,1000 ),(2 ,45 ,1000 ),(3 ,41 ,2000 );DROP TABLE IF EXISTS `role` ;CREATE TABLE `role` ( `ID` int (11 ) NOT NULL COMMENT '编号' , `ROLE_NAME` varchar (30 ) default NULL COMMENT '角色名称' , `ROLE_DESC` varchar (60 ) default NULL COMMENT '角色描述' , PRIMARY KEY (`ID` ) ) ENGINE =InnoDB DEFAULT CHARSET =utf8; insert into `role` (`ID` ,`ROLE_NAME` ,`ROLE_DESC` ) values (1 ,'院长' ,'管理整个学院' ),(2 ,'总裁' ,'管理整个公司' ),(3 ,'校长' ,'管理整个学校' );DROP TABLE IF EXISTS `user_role` ;CREATE TABLE `user_role` ( `UID` int (11 ) NOT NULL COMMENT '用户编号' , `RID` int (11 ) NOT NULL COMMENT '角色编号' , PRIMARY KEY (`UID` ,`RID` ), KEY `FK_Reference_10` (`RID` ), CONSTRAINT `FK_Reference_10` FOREIGN KEY (`RID` ) REFERENCES `role` (`ID` ), CONSTRAINT `FK_Reference_9` FOREIGN KEY (`UID` ) REFERENCES `user` (`id` ) ) ENGINE =InnoDB DEFAULT CHARSET =utf8; insert into `user_role` (`UID` ,`RID` ) values (41 ,1 ),(45 ,1 ),(41 ,2 );
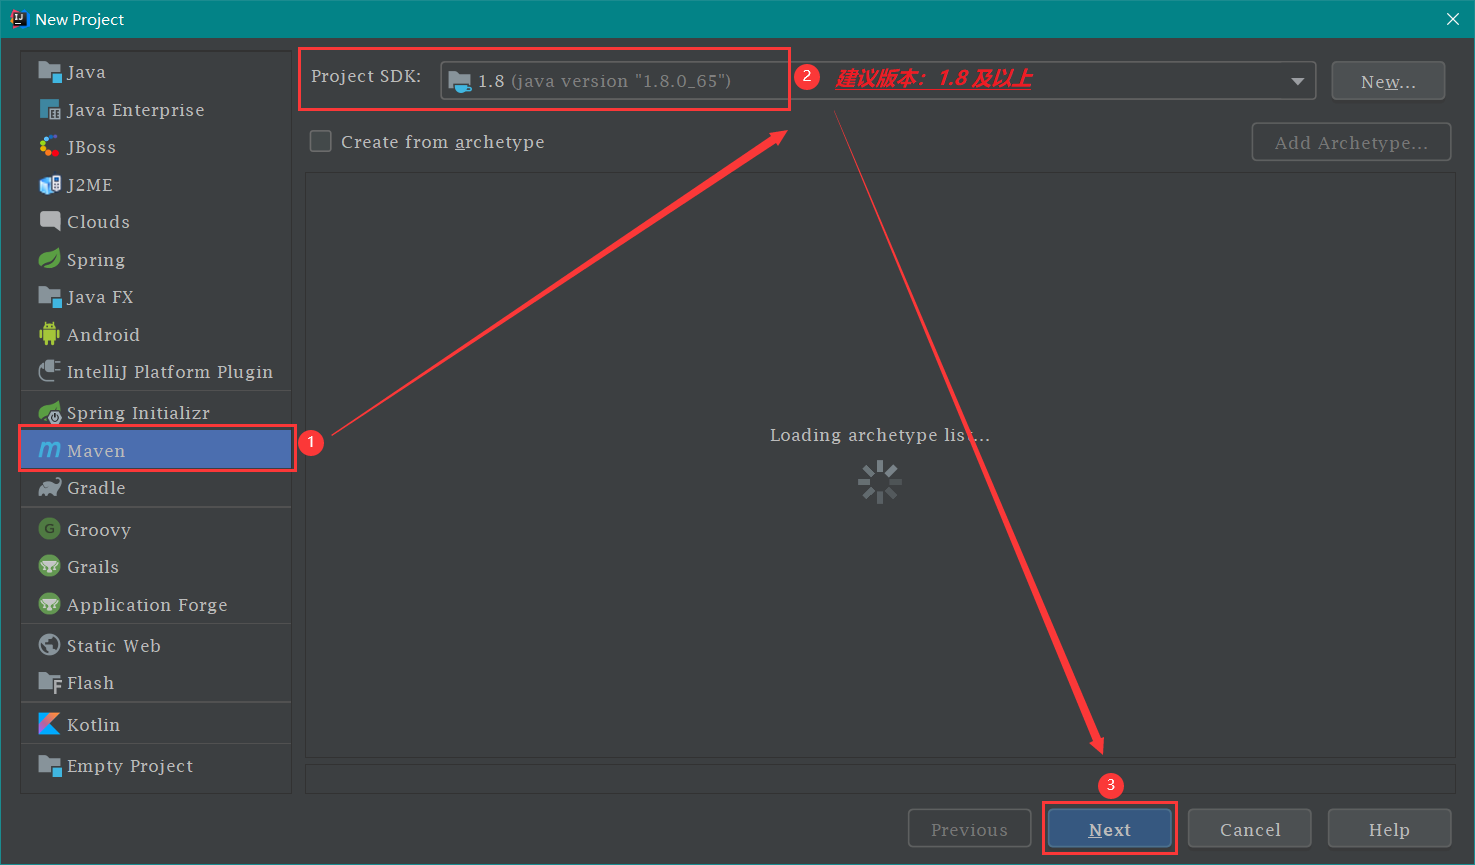
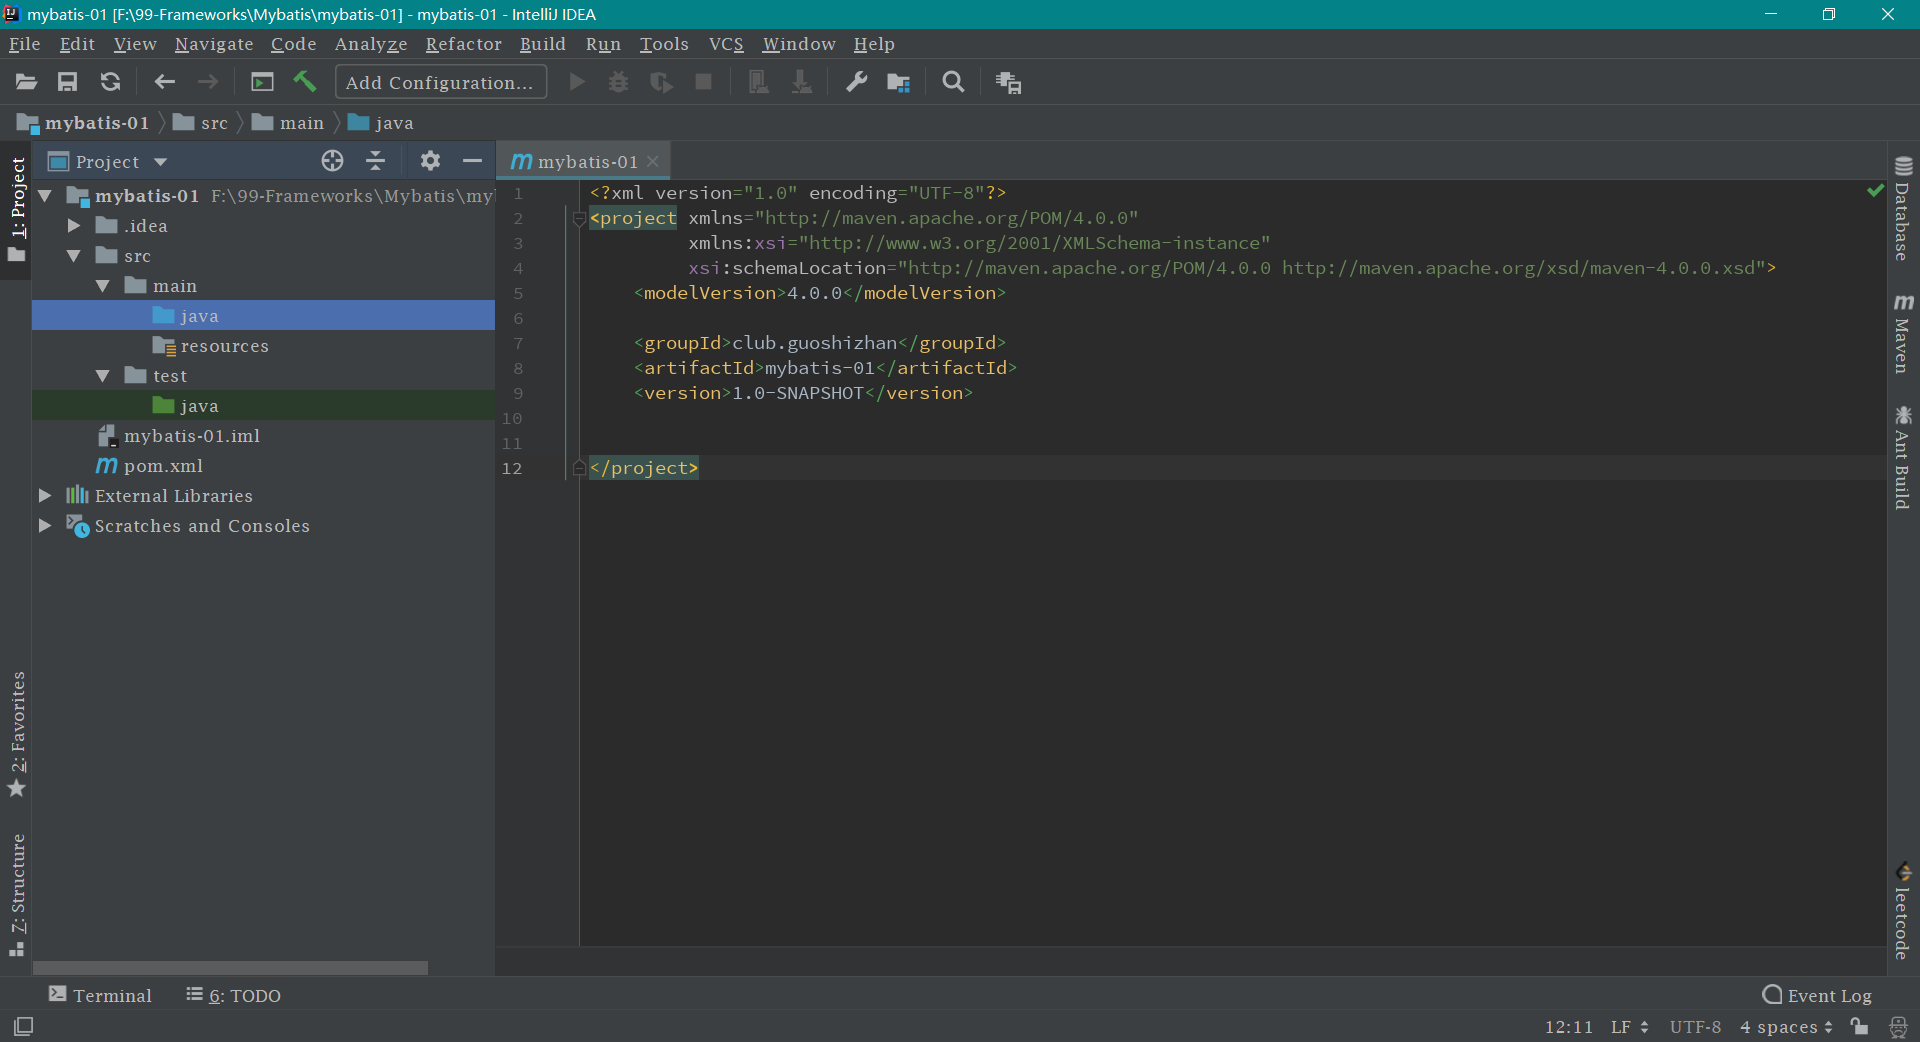
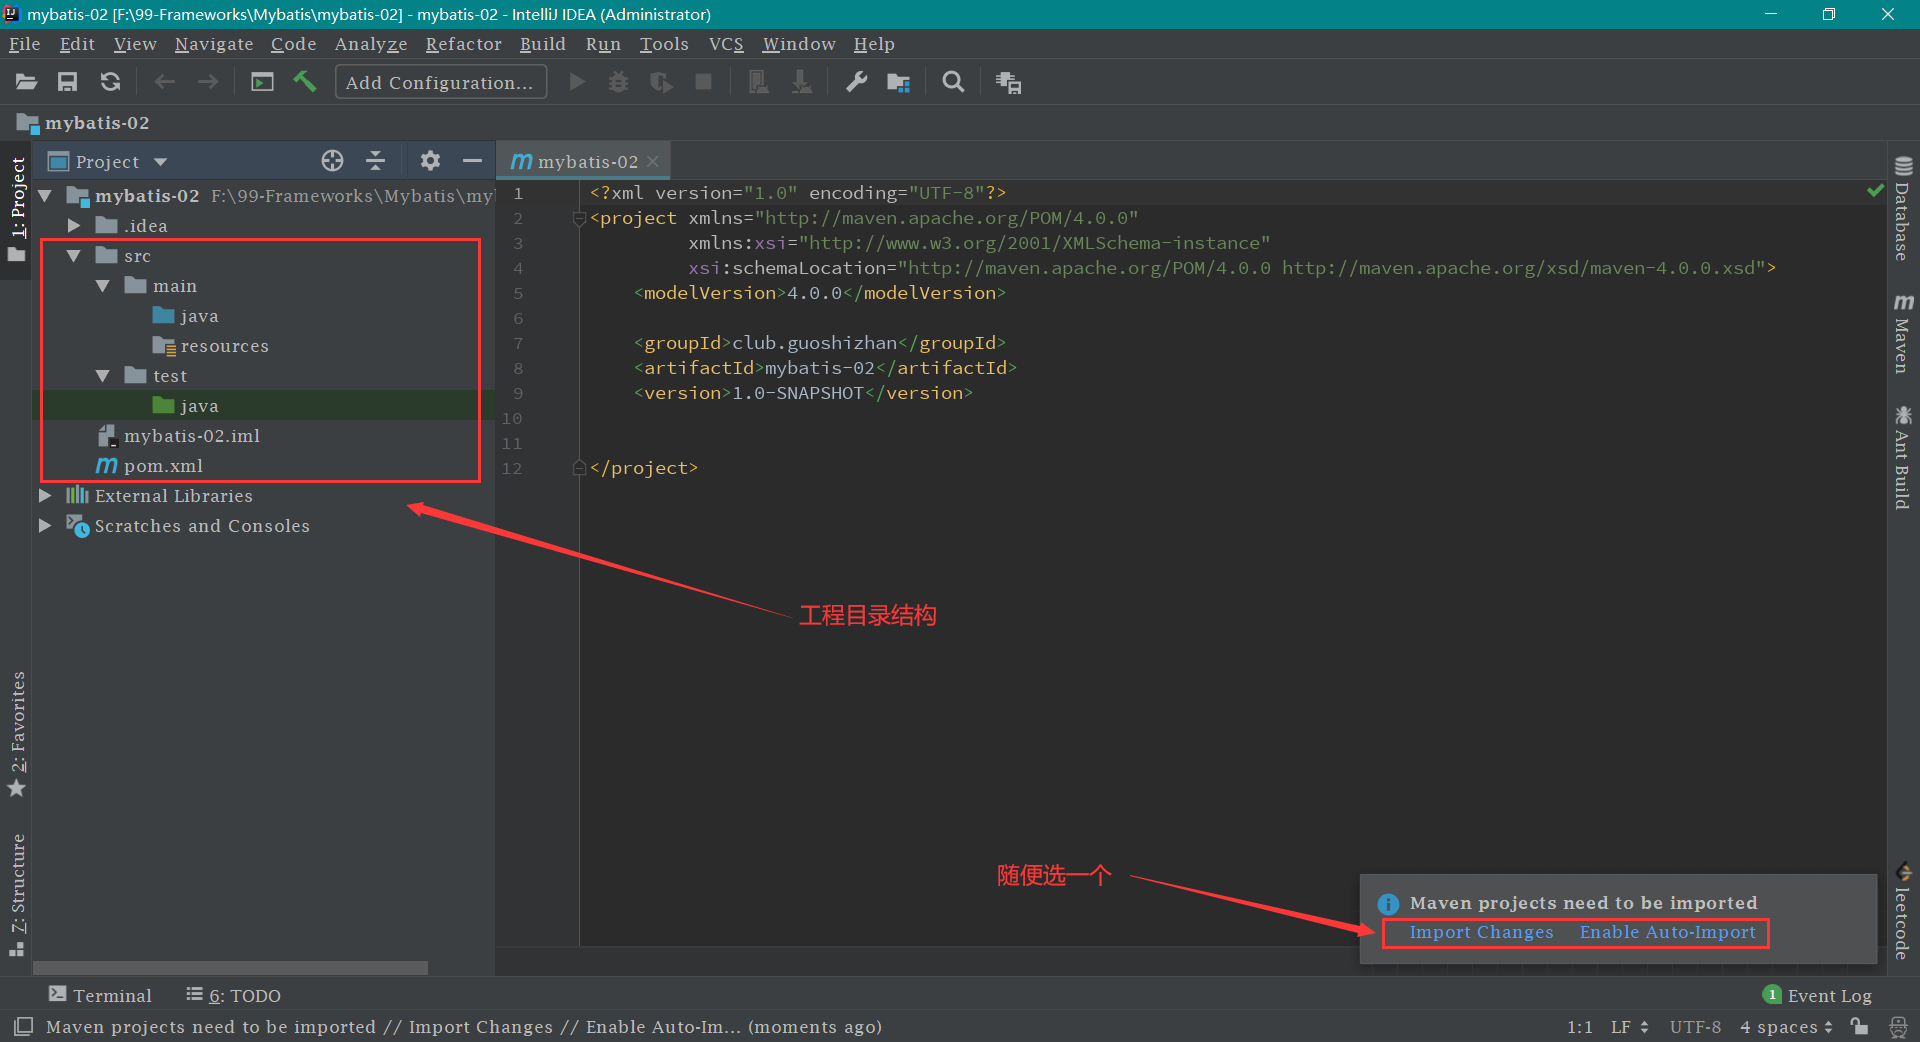
第二步: 创建一个 maven 工程
第三步: 导入相关依赖 pom.xml 文件,把以下 代码中的 <dependencies> 依赖部分 打包方式顺便加上
1
2
3
4
5
6
7
8
9
10
11
12
13
14
15
16
17
18
19
20
21
22
23
24
25
26
27
28
29
30
31
32
33
34
35
36
37
38
39
40
41
42
43
44
45
<?xml version="1.0" encoding="UTF-8"?> <project xmlns ="http://maven.apache.org/POM/4.0.0" xmlns:xsi ="http://www.w3.org/2001/XMLSchema-instance" xsi:schemaLocation ="http://maven.apache.org/POM/4.0.0 http://maven.apache.org/xsd/maven-4.0.0.xsd" > <modelVersion > 4.0.0</modelVersion > <groupId > club.guoshizhan</groupId > <artifactId > mybatis-01</artifactId > <version > 1.0-SNAPSHOT</version > <packaging > jar</packaging > <dependencies > <dependency > <groupId > org.mybatis</groupId > <artifactId > mybatis</artifactId > <version > 3.4.5</version > </dependency > <dependency > <groupId > mysql</groupId > <artifactId > mysql-connector-java</artifactId > <version > 5.1.6</version > <scope > runtime</scope > </dependency > <dependency > <groupId > log4j</groupId > <artifactId > log4j</artifactId > <version > 1.2.12</version > </dependency > <dependency > <groupId > junit</groupId > <artifactId > junit</artifactId > <version > 4.10</version > <scope > test</scope > </dependency > </dependencies > </project >
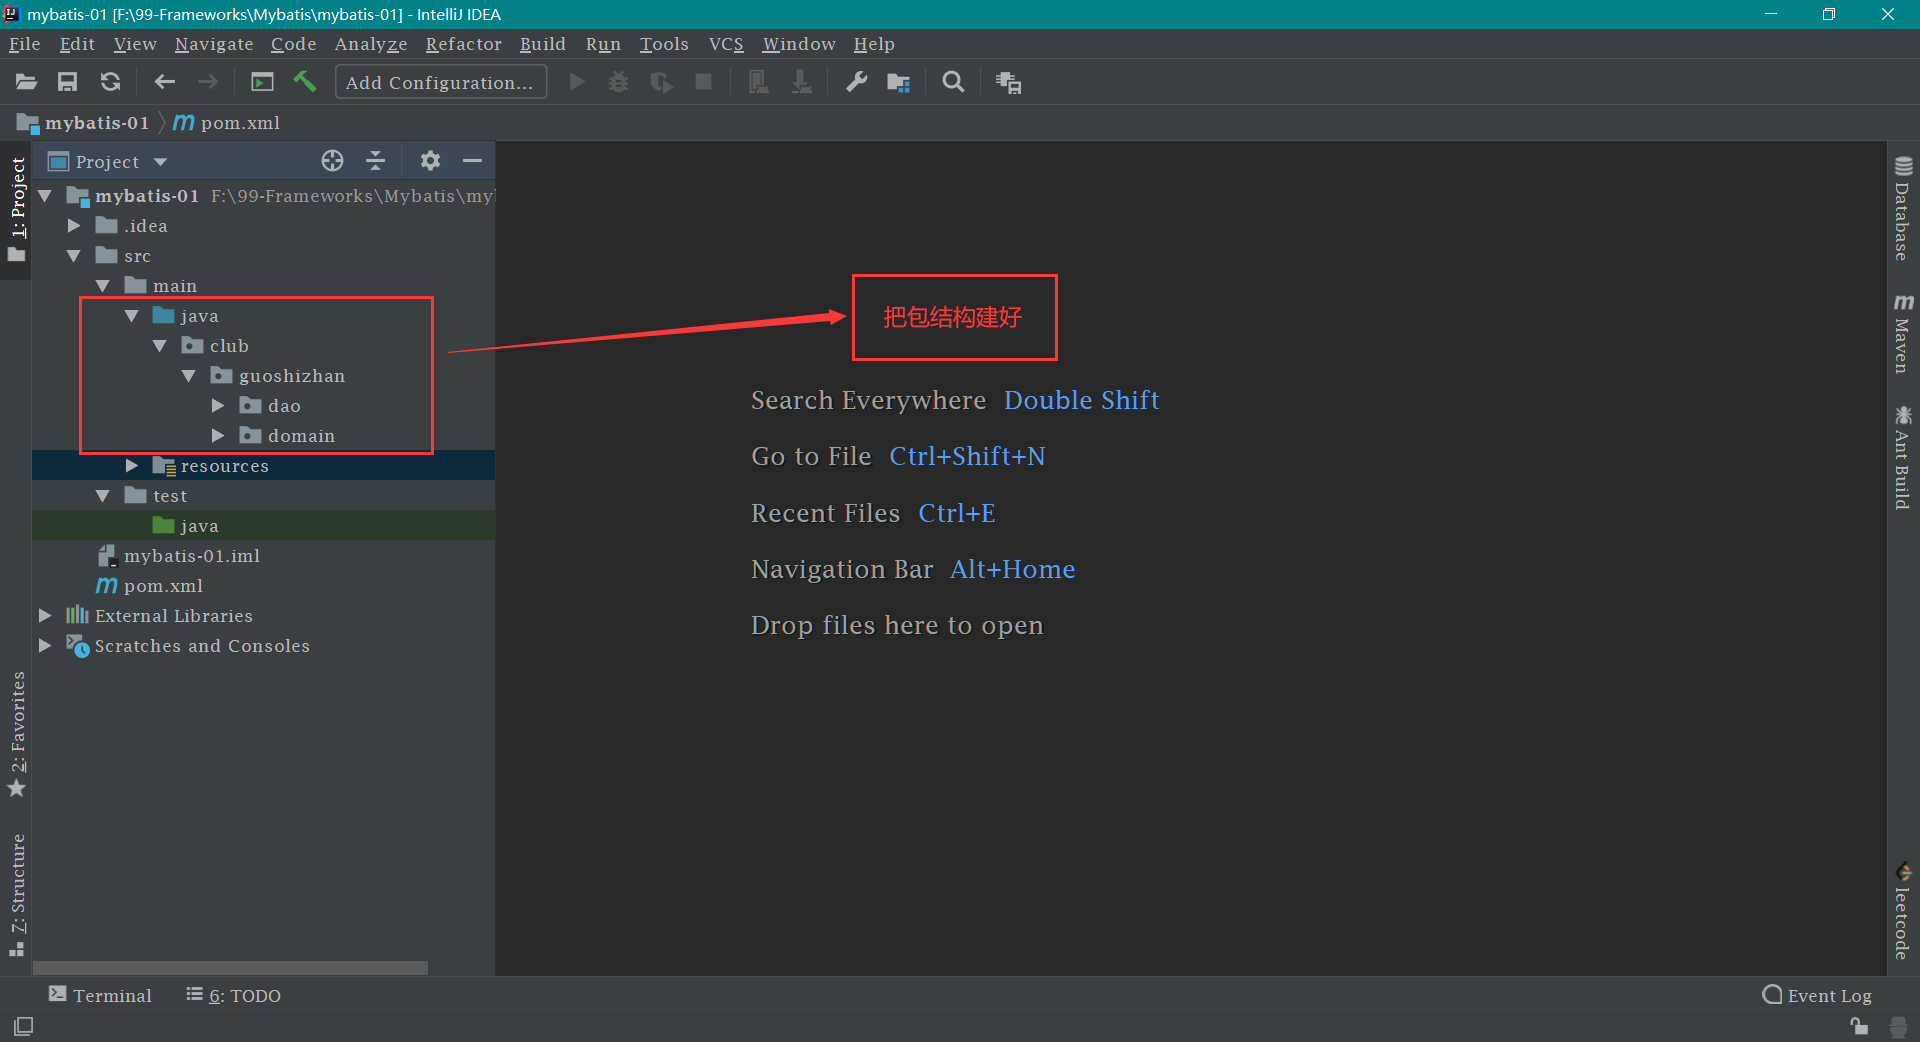
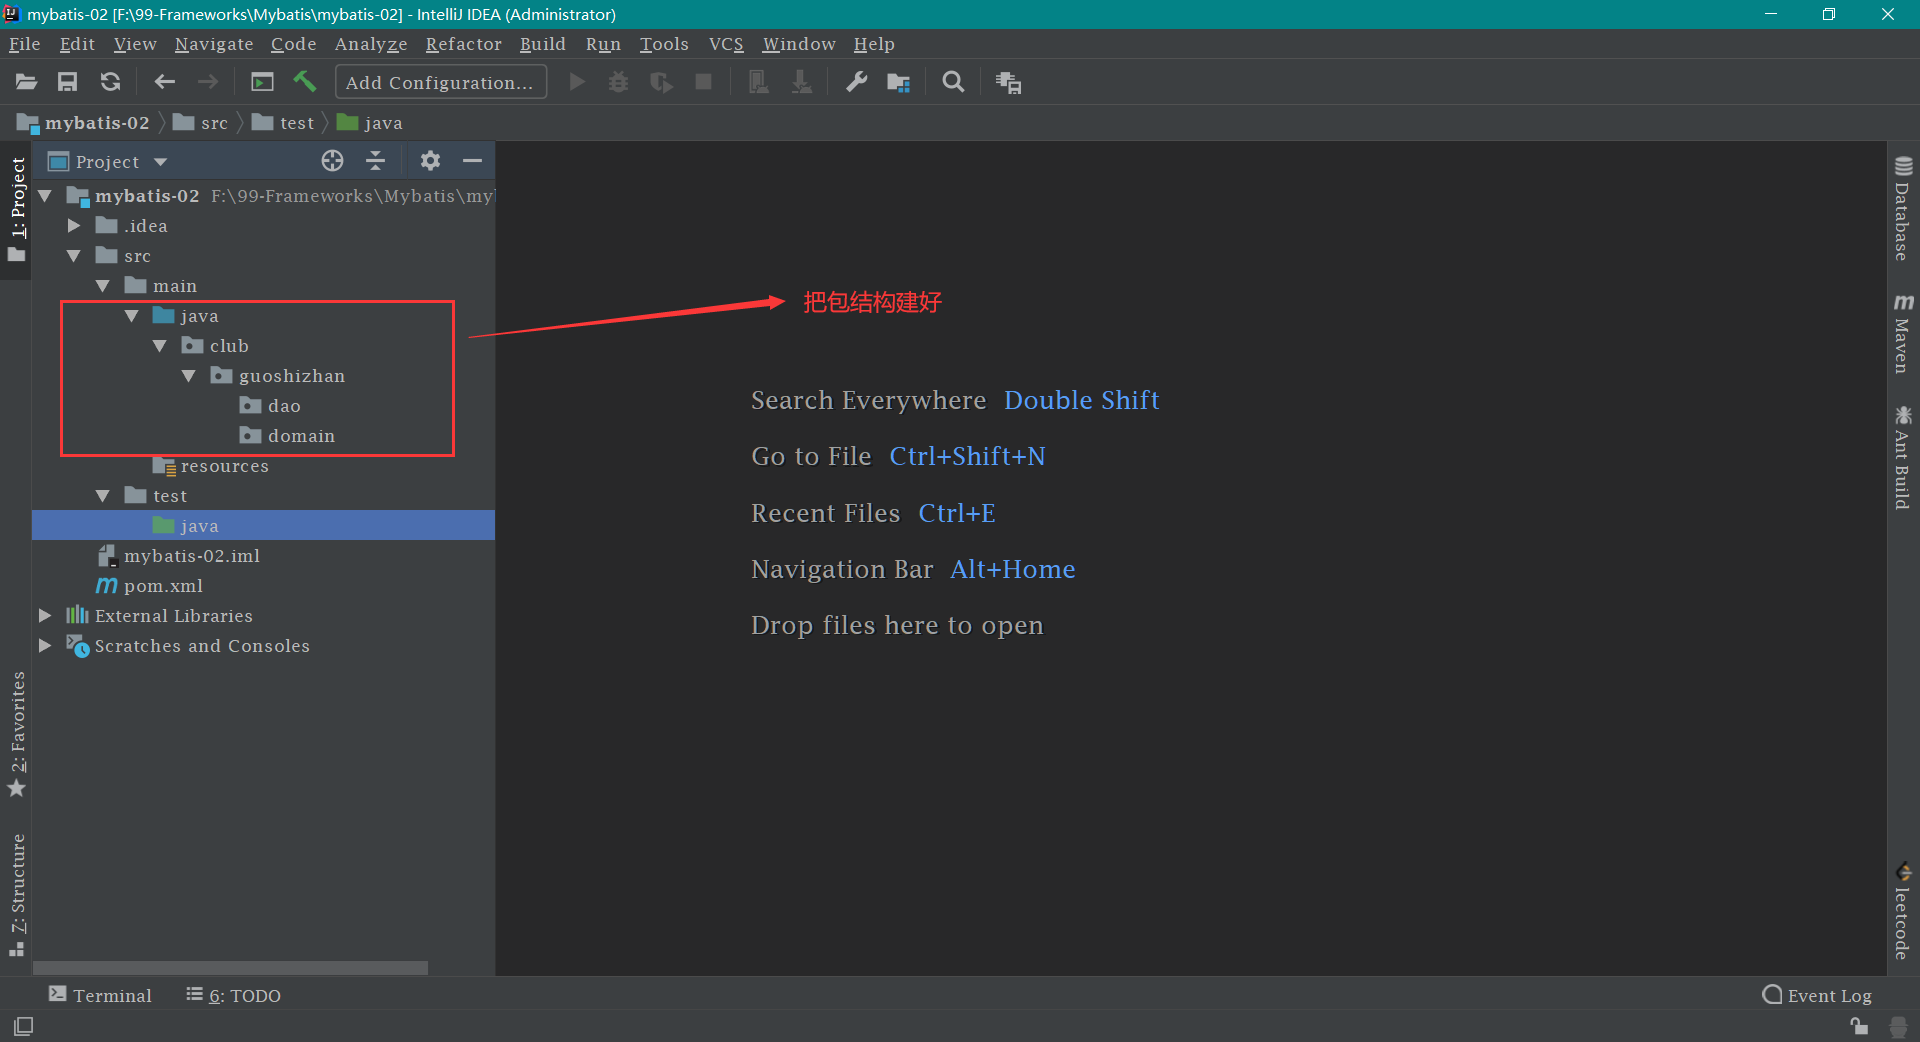
第四步: 建立包结构
第五步: 在 club/guoshizhan/domain 包下新建 User 类 ,和数据库中的 user 表 相映射。代码如下:
1
2
3
4
5
6
7
8
9
10
11
12
13
14
15
16
17
18
19
20
21
22
23
24
25
26
27
28
29
30
31
32
33
34
35
36
37
38
39
40
41
42
43
44
45
46
47
48
49
50
51
52
53
54
55
56
57
58
59
60
61
62
63
64
65
66
67
68
package club.guoshizhan.domain;import java.io.Serializable;import java.util.Date;public class User implements Serializable private Integer id; private String username; private Date birthday; private String sex; private String address; @Override public String toString () return "User{" + "id=" + id + ", username='" + username + '\'' + ", birthday=" + birthday + ", sex='" + sex + '\'' + ", address='" + address + '\'' + '}' ; } public Integer getId () return id; } public void setId (Integer id) this .id = id; } public String getUsername () return username; } public void setUsername (String username) this .username = username; } public Date getBirthday () return birthday; } public void setBirthday (Date birthday) this .birthday = birthday; } public String getSex () return sex; } public void setSex (String sex) this .sex = sex; } public String getAddress () return address; } public void setAddress (String address) this .address = address; } }
第六步: 在 club/guoshizhan/dao 包下新建 IUserDao 接口 ,然后定义方法,用于对 user 表 的增删改查。代码如下:
1
2
3
4
5
6
7
8
9
10
11
12
13
14
15
16
17
package club.guoshizhan.dao;import club.guoshizhan.domain.User;import java.util.List;public interface IUserDao List<User> findAll () ; }
第七步: 在 resources 目录 下新建 SqlMapConfig.xml 文件【文件名随意取,不一定是 SqlMapConfig】。这是 mybatis 的主配置文件,各种配置都写好了对应的注释
1
2
3
4
5
6
7
8
9
10
11
12
13
14
15
16
17
18
19
20
21
22
23
24
25
26
27
28
29
30
31
32
33
34
<?xml version="1.0" encoding="UTF-8"?> <!DOCTYPE configuration PUBLIC "-//mybatis.org//DTD Config 3.0//EN" "http://mybatis.org/dtd/mybatis-3-config.dtd" > <configuration > <environments default ="mysql" > <environment id ="mysql" > <transactionManager type ="JDBC" > </transactionManager > <dataSource type ="POOLED" > <property name ="driver" value ="com.mysql.jdbc.Driver" /> <property name ="url" value ="jdbc:mysql://localhost:3306/eesy_mybatis" /> <property name ="username" value ="root" /> <property name ="password" value ="root" /> </dataSource > </environment > </environments > <mappers > <mapper resource ="club/guoshizhan/dao/IUserDao.xml" /> </mappers > </configuration >
第八步: 编写 IUserDao.xml 文件 resources 目录 club 目录 club 目录 guoshizhan 目录 guoshizhan 目录 dao 目录 然后在 dao 目录 IUserDao.xml 文件。*** 代码如下:
IUserDao.xml 1 2 3 4 5 6 7 8 9 10 11 12 13 14 15 <?xml version="1.0" encoding="UTF-8"?> <!DOCTYPE mapper PUBLIC "-//mybatis.org//DTD Mapper 3.0//EN" "http://mybatis.org/dtd/mybatis-3-mapper.dtd" > <mapper namespace ="club.guoshizhan.dao.IUserDao" > <select id ="findAll" resultType ="club.guoshizhan.domain.User" > select * from user; </select > </mapper >
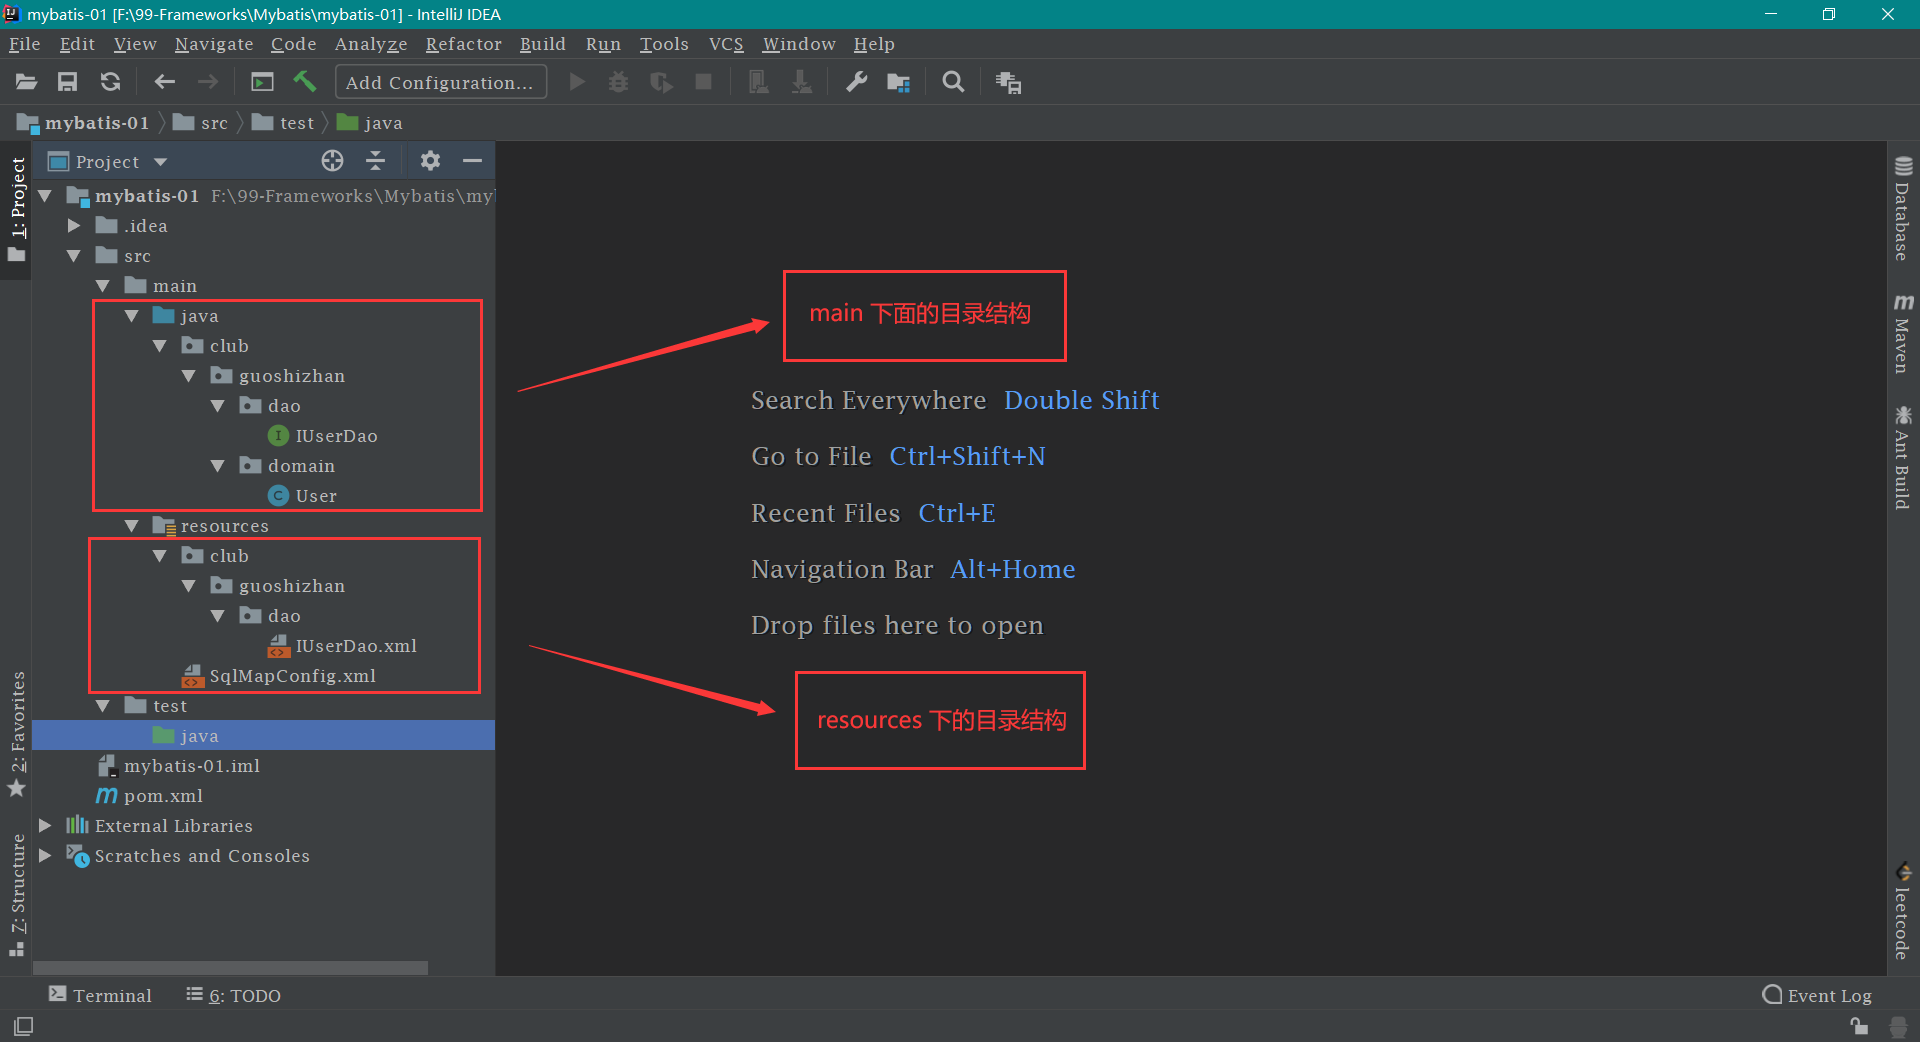
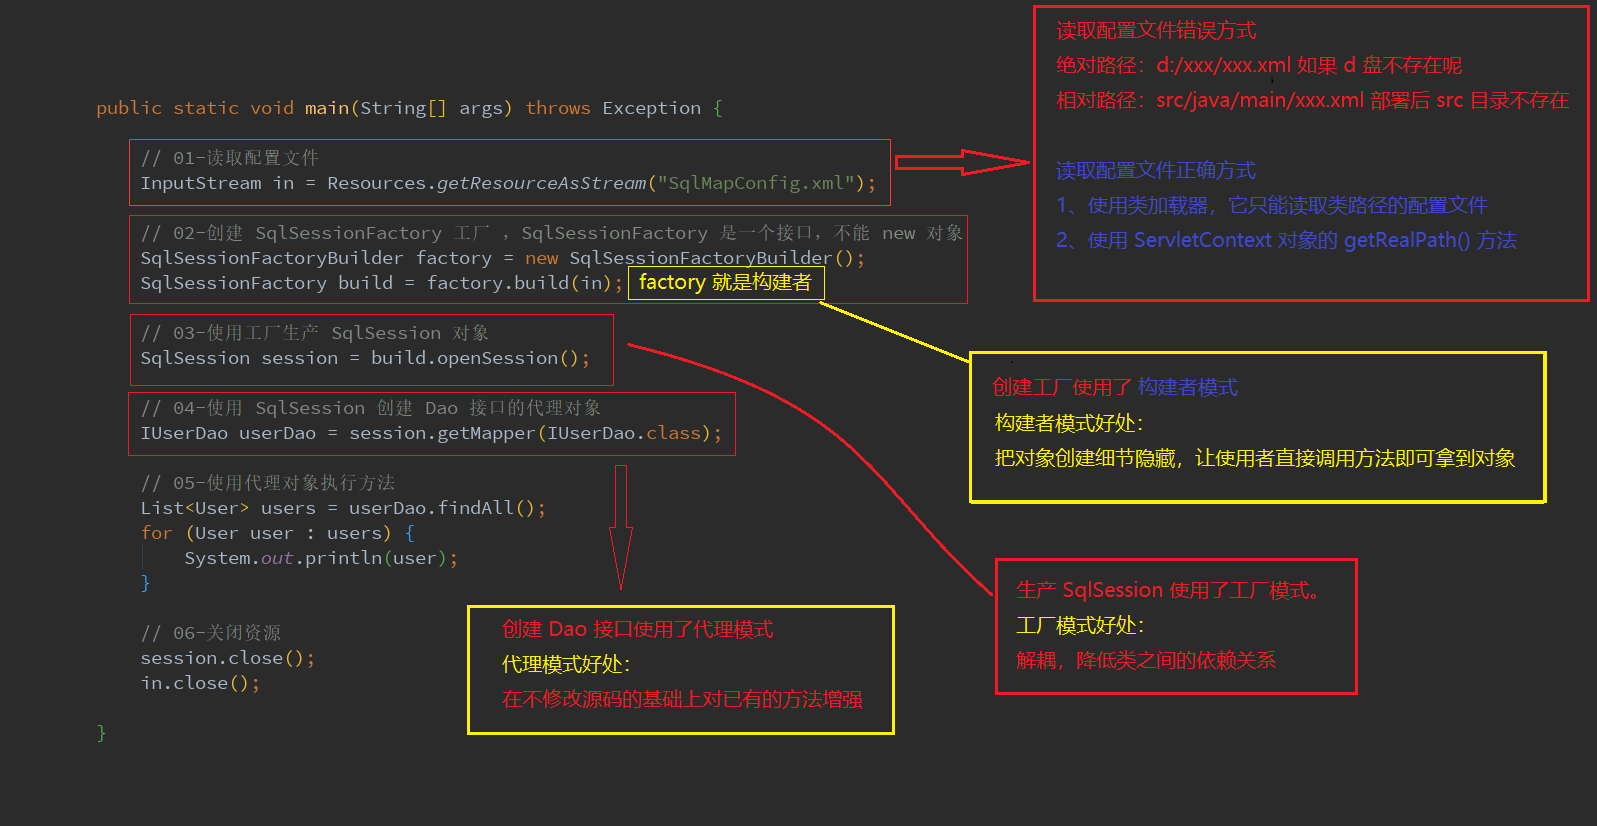
mybatis 环境搭建到此结束,搭建好之后的目录结构
mybatis 环境搭建的注意事项:
1、在 Mybatis 中,持久层的操作接口名称和映射文件也叫做 Mapper 。所以 IUserDao 和 IUserMapper 是一样的。建议使用 IUserMapper 。
2、在 IDEA 中创建目录的时候,它和包的创建是不一样的。包在创建时: club.guoshizhan.dao 是三级结构,目录在创建时: club.guoshizhan.dao 是一级目录。
3、mybatis 的映射配置文件 IUserDao.xml 的位置必须和 dao 接口的包结构相同。
4、映射配置文件的 mapper 标签 namespace 属性的取值必须是 dao 接口的全限定类名。
5、映射配置文件的操作配置(select),id 属性的取值必须是 dao 接口的方法名。
6、当遵从了第三,四,五点之后,我们在开发中就无须再写 dao 的实现类,即简化了开发。
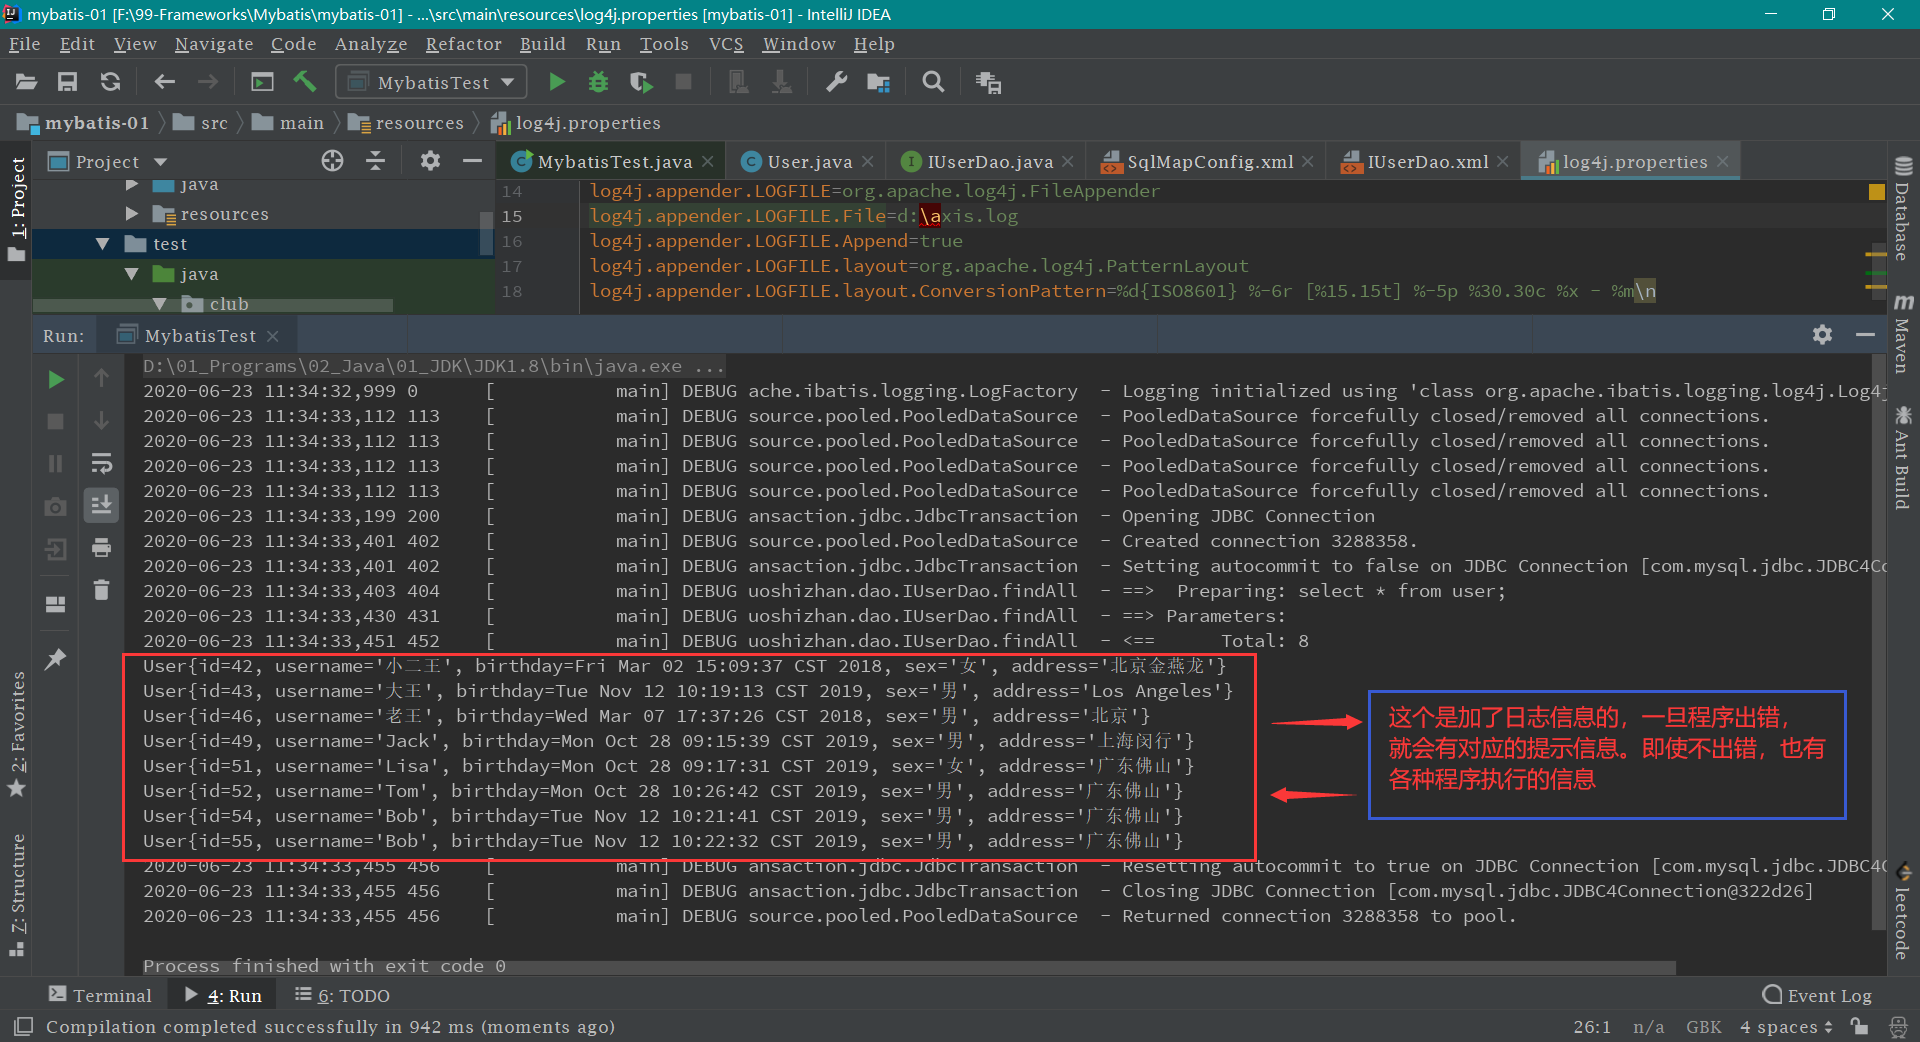
mybatis 的入门案例 第一步: 在 resources 目录下 新建 log4j.properties 日志文件
log4j.properties 1 2 3 4 5 6 7 8 9 10 11 12 13 14 15 16 17 18 log4j.rootCategory =debug, CONSOLE, LOGFILE log4j.logger.org.apache.axis.enterprise =FATAL, CONSOLE log4j.appender.CONSOLE =org.apache.log4j.ConsoleAppender log4j.appender.CONSOLE.layout =org.apache.log4j.PatternLayout log4j.appender.CONSOLE.layout.ConversionPattern =%d{ISO8601} %-6r [%15.15t] %-5p %30.30c %x - %m\n log4j.appender.LOGFILE =org.apache.log4j.FileAppender log4j.appender.LOGFILE.File =d:\axis.log log4j.appender.LOGFILE.Append =true log4j.appender.LOGFILE.layout =org.apache.log4j.PatternLayout log4j.appender.LOGFILE.layout.ConversionPattern =%d{ISO8601} %-6r [%15.15t] %-5p %30.30c %x - %m\n
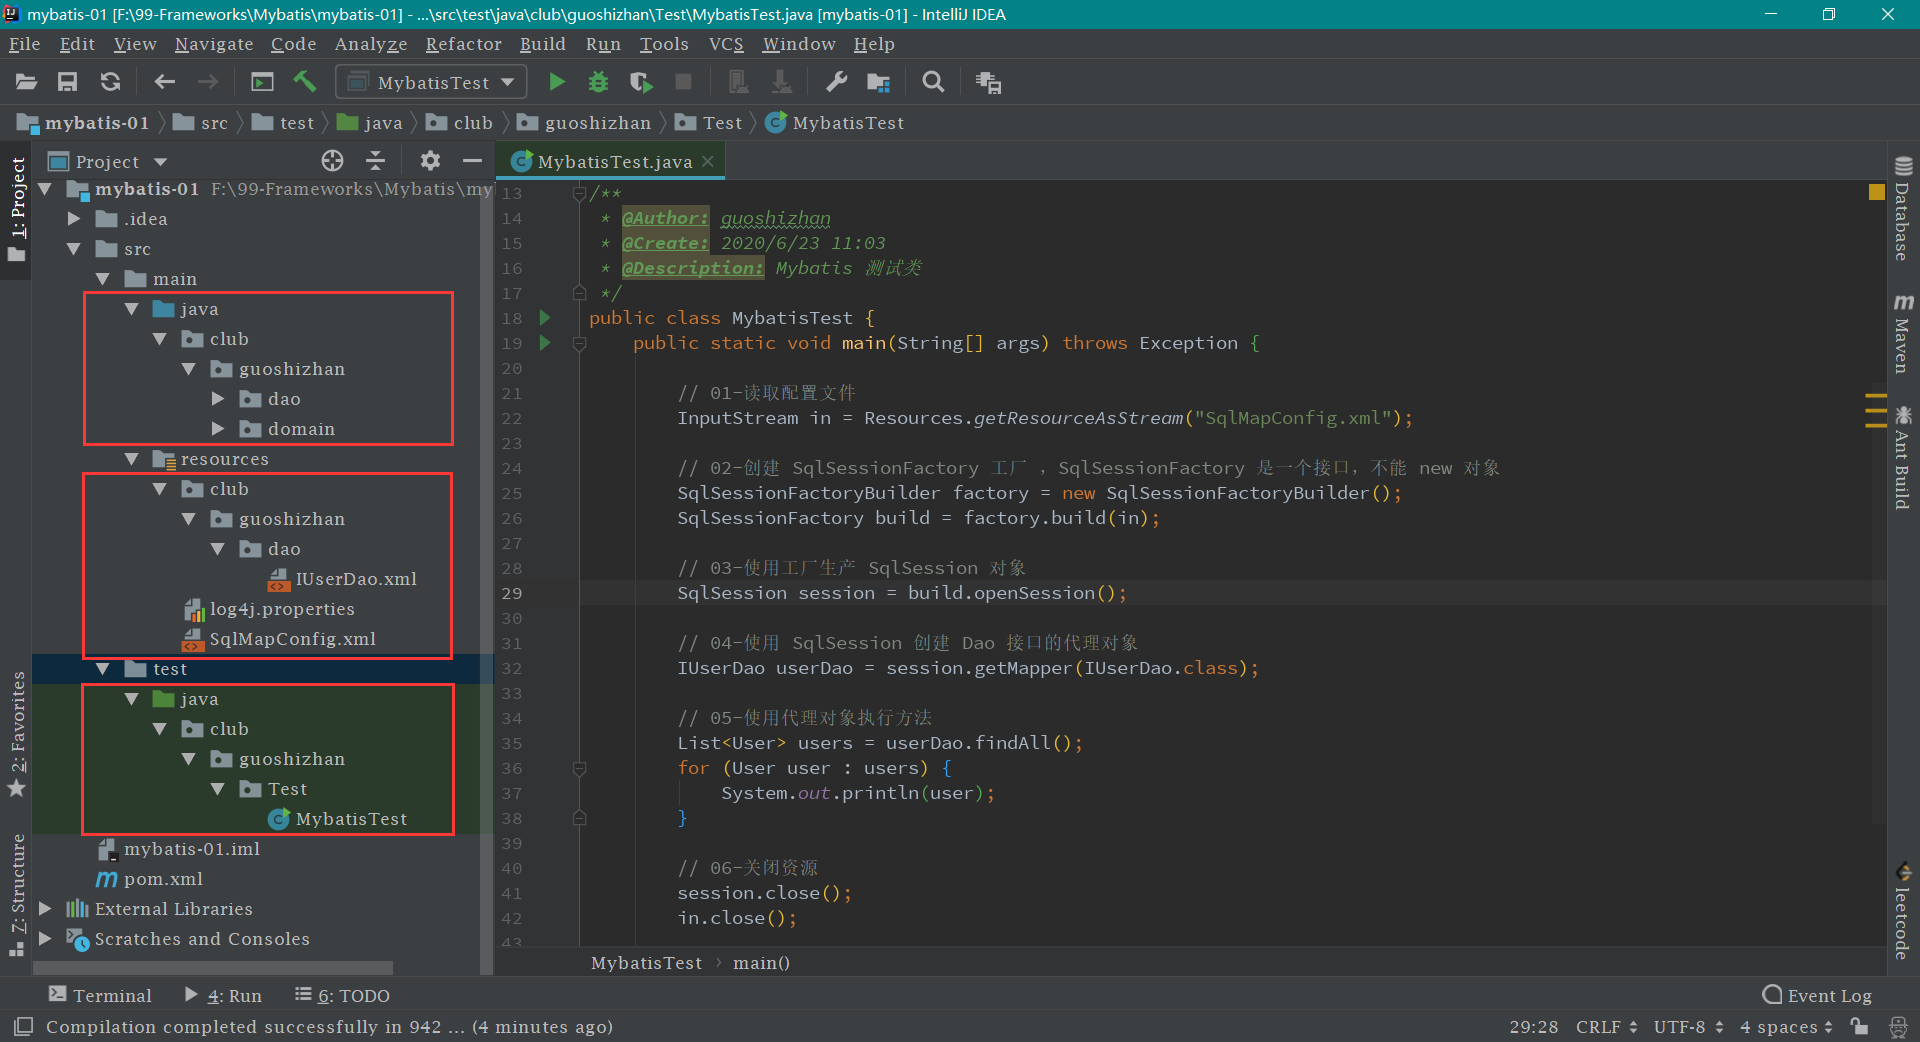
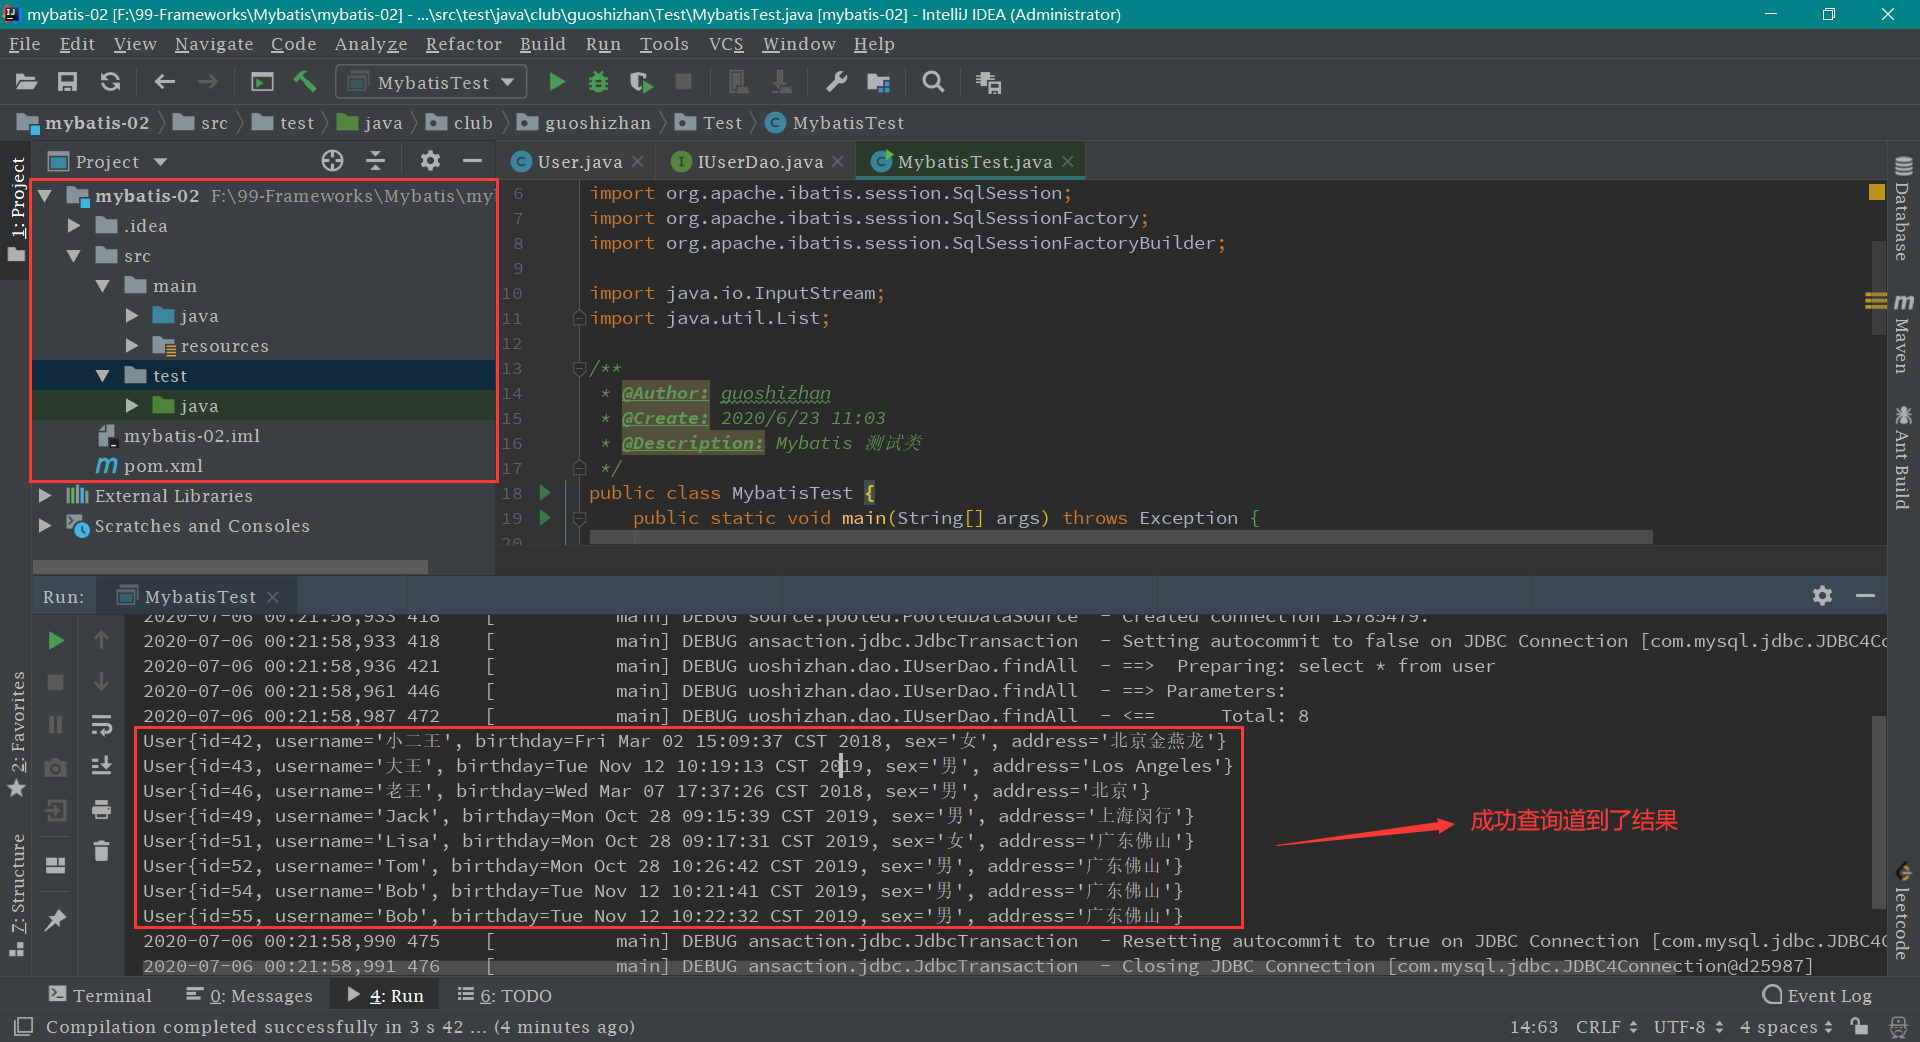
第二步: 在 test/java 目录下 新建 club.guoshizhan.Test.MybatisTest 类,这样写的目的就是让 IDEA 自动生成三级包结构。然后编写 MybatisTest 类 ,代码如下:
MybatisTest.java 1 2 3 4 5 6 7 8 9 10 11 12 13 14 15 16 17 18 19 20 21 22 23 24 25 26 27 28 29 30 31 32 33 34 35 36 37 38 39 40 41 42 43 44 45 package club.guoshizhan.Test;import club.guoshizhan.dao.IUserDao;import club.guoshizhan.domain.User;import org.apache.ibatis.io.Resources;import org.apache.ibatis.session.SqlSession;import org.apache.ibatis.session.SqlSessionFactory;import org.apache.ibatis.session.SqlSessionFactoryBuilder;import java.io.InputStream;import java.util.List;public class MybatisTest public static void main (String[] args) throws Exception InputStream in = Resources.getResourceAsStream("SqlMapConfig.xml" ); SqlSessionFactoryBuilder factory = new SqlSessionFactoryBuilder(); SqlSessionFactory build = factory.build(in); SqlSession session = build.openSession(); IUserDao userDao = session.getMapper(IUserDao.class ) ; List<User> users = userDao.findAll(); for (User user : users) { System.out.println(user); } session.close(); in.close(); } }
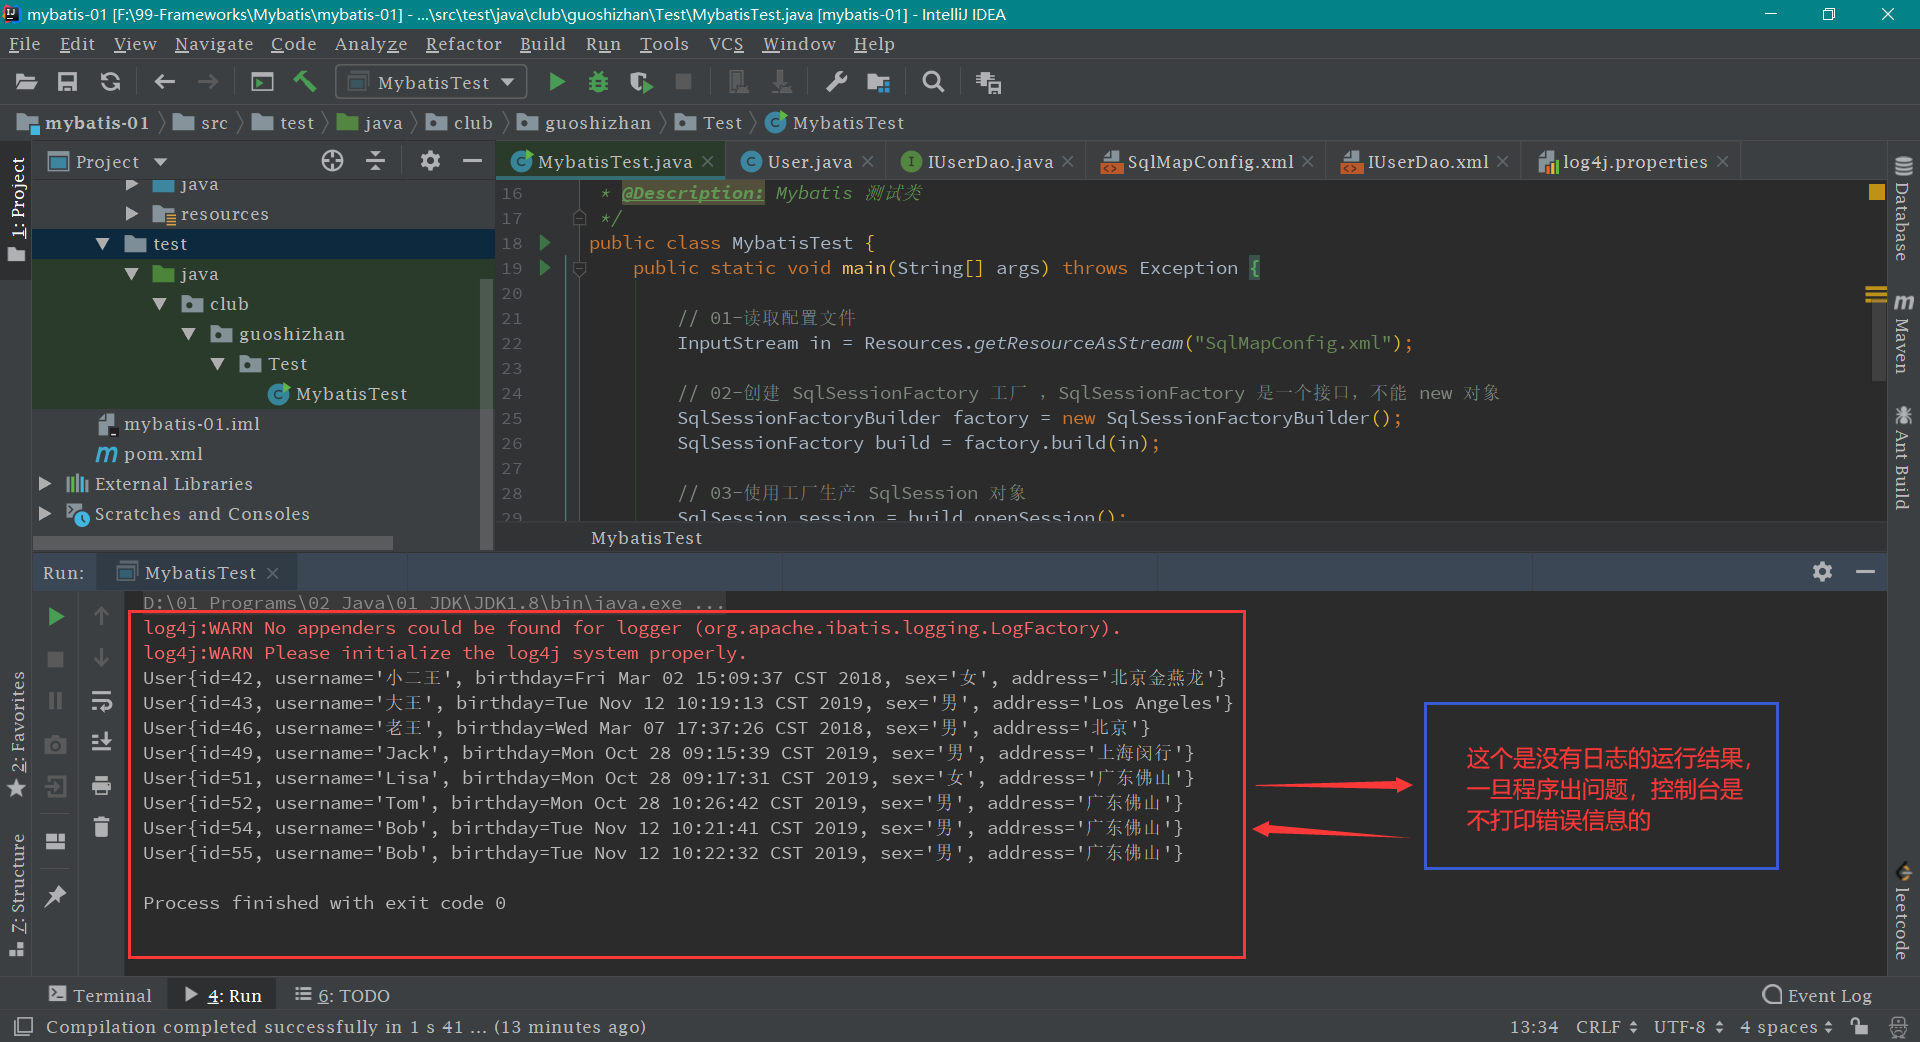
第三步: 运行 main 方法,结果如下:
mybatis 入门案例到此结束,最终的目录结构和入门案例分析
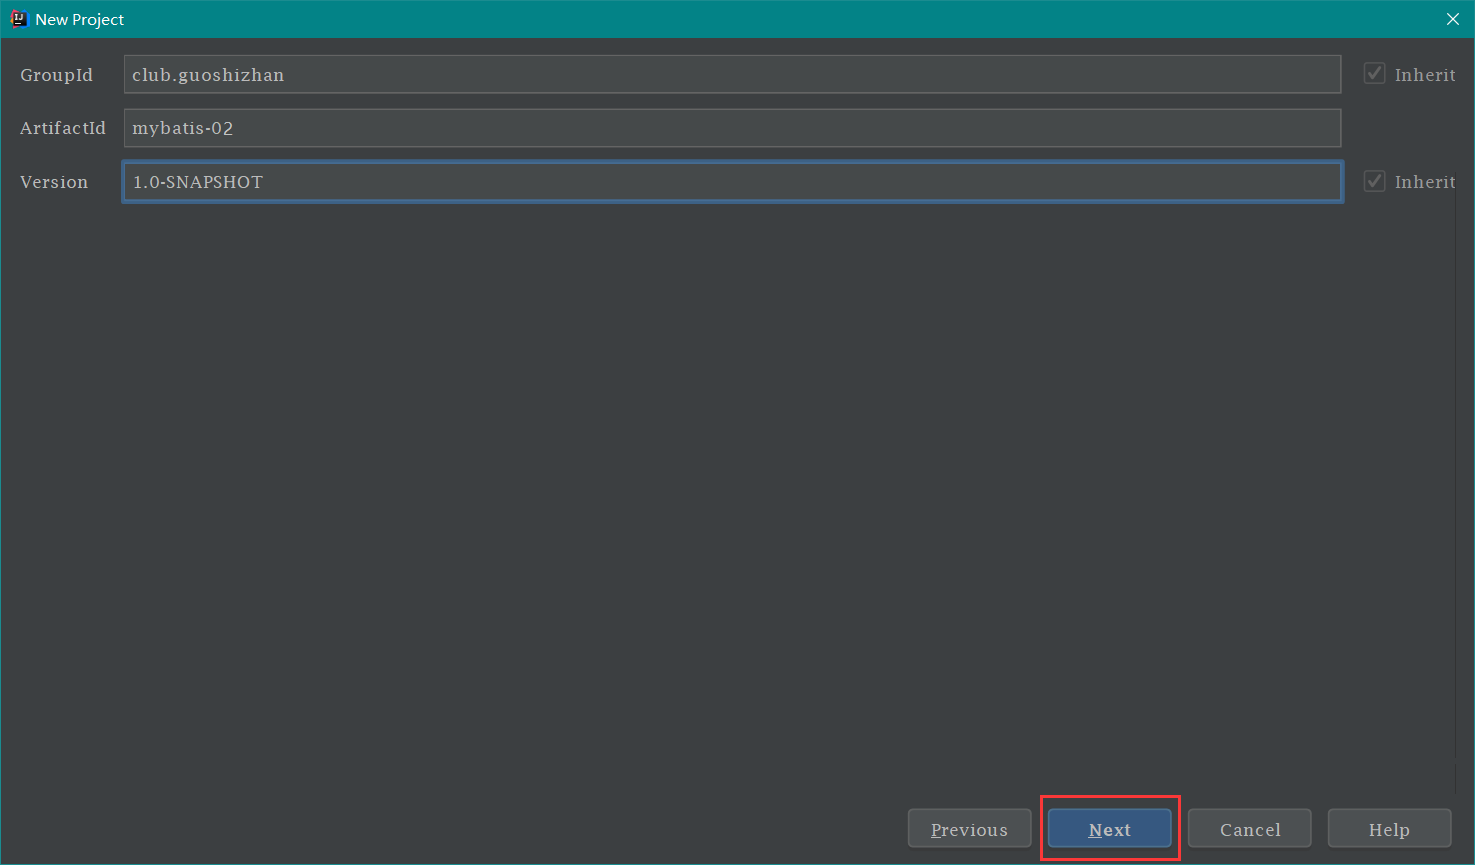
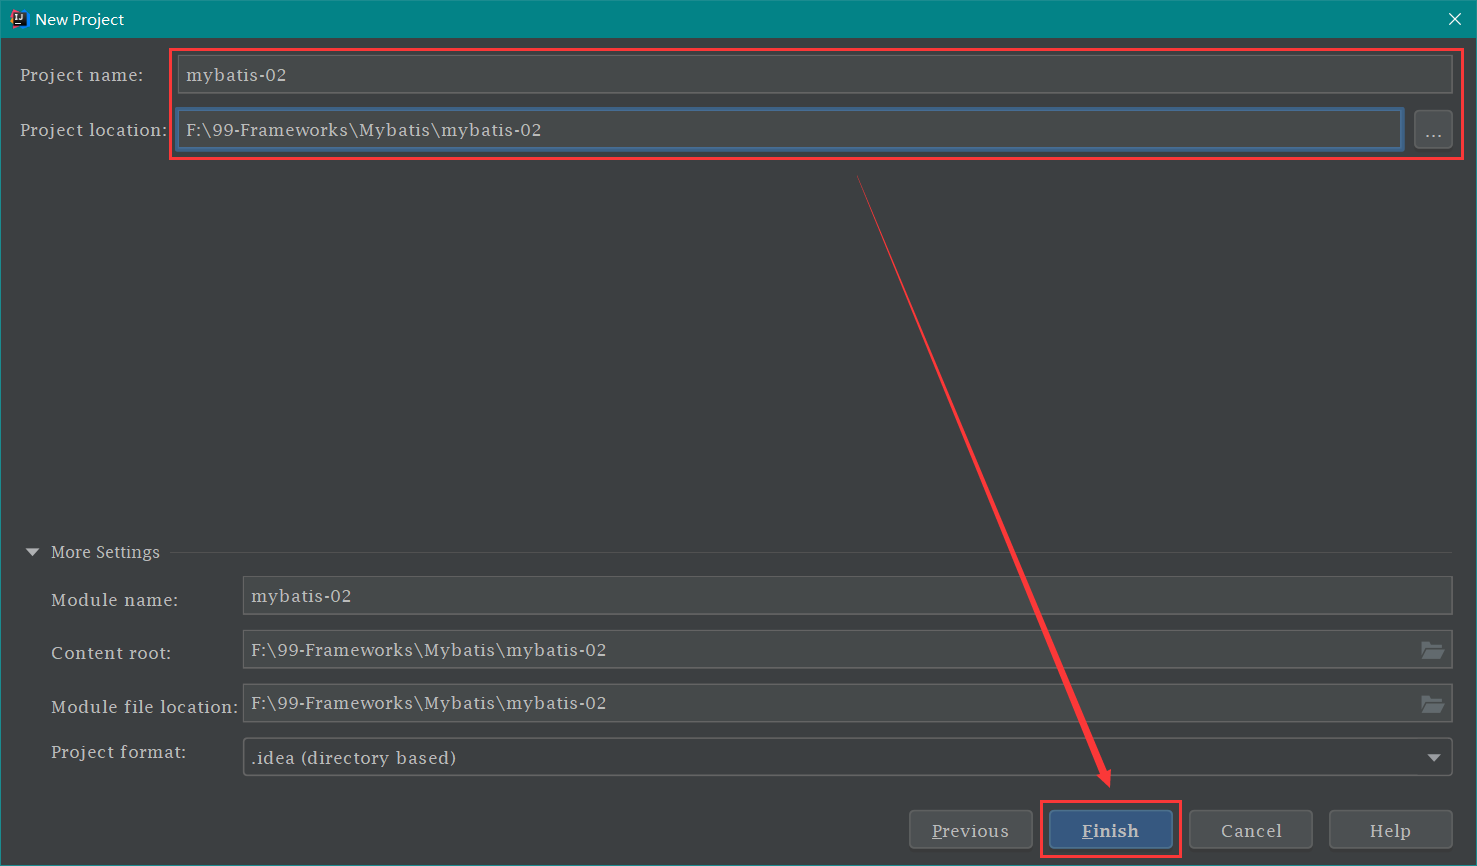
mybatis 注解案例 第一步: 创建一个 maven 工程
第二步: 导入相关依赖 pom.xml 文件,把以下 代码中的 <dependencies> 依赖部分 打包方式顺便加上
1 2 3 4 5 6 7 8 9 10 11 12 13 14 15 16 17 18 19 20 21 22 23 24 25 26 27 28 29 30 31 32 33 34 35 36 37 38 39 40 41 42 43 44 45 46 47 <?xml version="1.0" encoding="UTF-8"?> <project xmlns ="http://maven.apache.org/POM/4.0.0" xmlns:xsi ="http://www.w3.org/2001/XMLSchema-instance" xsi:schemaLocation ="http://maven.apache.org/POM/4.0.0 http://maven.apache.org/xsd/maven-4.0.0.xsd" > <modelVersion > 4.0.0</modelVersion > <groupId > club.guoshizhan</groupId > <artifactId > mybatis-02</artifactId > <version > 1.0-SNAPSHOT</version > <packaging > jar</packaging > <dependencies > <dependency > <groupId > org.mybatis</groupId > <artifactId > mybatis</artifactId > <version > 3.4.5</version > </dependency > <dependency > <groupId > mysql</groupId > <artifactId > mysql-connector-java</artifactId > <version > 5.1.6</version > <scope > runtime</scope > </dependency > <dependency > <groupId > log4j</groupId > <artifactId > log4j</artifactId > <version > 1.2.12</version > </dependency > <dependency > <groupId > junit</groupId > <artifactId > junit</artifactId > <version > 4.10</version > <scope > test</scope > </dependency > </dependencies > </project >
第三步: 建立包结构
第四步: 在 club/guoshizhan/domain 包下新建 User 类 ,和数据库中的 user 表 相映射。代码如下:
1 2 3 4 5 6 7 8 9 10 11 12 13 14 15 16 17 18 19 20 21 22 23 24 25 26 27 28 29 30 31 32 33 34 35 36 37 38 39 40 41 42 43 44 45 46 47 48 49 50 51 52 53 54 55 56 57 58 59 60 61 62 63 64 65 66 67 68 package club.guoshizhan.domain;import java.io.Serializable;import java.util.Date;public class User implements Serializable private Integer id; private String username; private Date birthday; private String sex; private String address; @Override public String toString () return "User{" + "id=" + id + ", username='" + username + '\'' + ", birthday=" + birthday + ", sex='" + sex + '\'' + ", address='" + address + '\'' + '}' ; } public Integer getId () return id; } public void setId (Integer id) this .id = id; } public String getUsername () return username; } public void setUsername (String username) this .username = username; } public Date getBirthday () return birthday; } public void setBirthday (Date birthday) this .birthday = birthday; } public String getSex () return sex; } public void setSex (String sex) this .sex = sex; } public String getAddress () return address; } public void setAddress (String address) this .address = address; } }
第五步: 在 club/guoshizhan/dao 包下新建 IUserDao 接口 ,然后定义方法,用于对 user 表 的增删改查 【此处代码可是用到了注解哦】
1 2 3 4 5 6 7 8 9 10 11 12 13 14 15 16 17 18 19 package club.guoshizhan.dao;import club.guoshizhan.domain.User;import org.apache.ibatis.annotations.Select;import java.util.List;public interface IUserDao @Select ("select * from user" ) List<User> findAll () ; }
第六步: 在 resources 目录 下新建 SqlMapConfig.xml 主配置文件,各种配置都写好了对应的注释【注意对比注释 06 和原先 xml 配置的区别】
1 2 3 4 5 6 7 8 9 10 11 12 13 14 15 16 17 18 19 20 21 22 23 24 25 26 27 28 29 30 31 32 33 34 35 36 37 38 39 40 <?xml version="1.0" encoding="UTF-8"?> <!DOCTYPE configuration PUBLIC "-//mybatis.org//DTD Config 3.0//EN" "http://mybatis.org/dtd/mybatis-3-config.dtd" > <configuration > <environments default ="mysql" > <environment id ="mysql" > <transactionManager type ="JDBC" > </transactionManager > <dataSource type ="POOLED" > <property name ="driver" value ="com.mysql.jdbc.Driver" /> <property name ="url" value ="jdbc:mysql://localhost:3306/eesy_mybatis" /> <property name ="username" value ="root" /> <property name ="password" value ="root" /> </dataSource > </environment > </environments > <mappers > <mapper class ="club.guoshizhan.dao.IUserDao" /> </mappers > </configuration >
第七步: 在 resources 目录下 新建 log4j.properties 日志文件
log4j.properties 1 2 3 4 5 6 7 8 9 10 11 12 13 14 15 16 17 18 log4j.rootCategory =debug, CONSOLE, LOGFILE log4j.logger.org.apache.axis.enterprise =FATAL, CONSOLE log4j.appender.CONSOLE =org.apache.log4j.ConsoleAppender log4j.appender.CONSOLE.layout =org.apache.log4j.PatternLayout log4j.appender.CONSOLE.layout.ConversionPattern =%d{ISO8601} %-6r [%15.15t] %-5p %30.30c %x - %m\n log4j.appender.LOGFILE =org.apache.log4j.FileAppender log4j.appender.LOGFILE.File =d:\axis.log log4j.appender.LOGFILE.Append =true log4j.appender.LOGFILE.layout =org.apache.log4j.PatternLayout log4j.appender.LOGFILE.layout.ConversionPattern =%d{ISO8601} %-6r [%15.15t] %-5p %30.30c %x - %m\n
第八步: 在 test/java 目录下 新建 club.guoshizhan.Test.MybatisTest 类,这样写的目的就是让 IDEA 自动生成三级包结构。然后编写 MybatisTest 类 ,代码如下:
MybatisTest.java 1 2 3 4 5 6 7 8 9 10 11 12 13 14 15 16 17 18 19 20 21 22 23 24 25 26 27 28 29 30 31 32 33 34 35 36 37 38 39 40 41 42 43 44 45 package club.guoshizhan.Test;import club.guoshizhan.dao.IUserDao;import club.guoshizhan.domain.User;import org.apache.ibatis.io.Resources;import org.apache.ibatis.session.SqlSession;import org.apache.ibatis.session.SqlSessionFactory;import org.apache.ibatis.session.SqlSessionFactoryBuilder;import java.io.InputStream;import java.util.List;public class MybatisTest public static void main (String[] args) throws Exception InputStream in = Resources.getResourceAsStream("SqlMapConfig.xml" ); SqlSessionFactoryBuilder factory = new SqlSessionFactoryBuilder(); SqlSessionFactory build = factory.build(in); SqlSession session = build.openSession(); IUserDao userDao = session.getMapper(IUserDao.class ) ; List<User> users = userDao.findAll(); for (User user : users) { System.out.println(user); } session.close(); in.close(); } }
第九步: 运行 MybatisTest 测试类中的 main 方法,结果如下:
注解使用总结:
1、把 IUserDao.xml 移除,在 dao 接口中的方法上使用 @Select 注解,并且指定 SQL 语句。 2、同时需要在 SqlMapConfig.xml 中的 mapper 配置时,使用 class 属性指定 dao 接口的全限定类名。
自定义 mybatis 框架 第一步: 创建一个 Maven 工程。这里就不新创建了。具体创建可参考上一小节: mybatis 注解案例
第二步: 导入相关依赖 。打开 pom.xml 文件,复制如下代码:
1 2 3 4 5 6 7 8 9 10 11 12 13 14 15 16 17 18 19 20 21 22 23 24 25 26 27 28 29 30 31 32 33 34 35 36 37 38 39 40 41 42 43 44 45 46 47 48 49 50 51 52 53 54 55 56 57 58 59 60 61 <?xml version="1.0" encoding="UTF-8"?> <project xmlns ="http://maven.apache.org/POM/4.0.0" xmlns:xsi ="http://www.w3.org/2001/XMLSchema-instance" xsi:schemaLocation ="http://maven.apache.org/POM/4.0.0 http://maven.apache.org/xsd/maven-4.0.0.xsd" > <modelVersion > 4.0.0</modelVersion > <groupId > club.guoshizhan</groupId > <artifactId > mybatis-03</artifactId > <version > 1.0-SNAPSHOT</version > <packaging > jar</packaging > <dependencies > <dependency > <groupId > mysql</groupId > <artifactId > mysql-connector-java</artifactId > <version > 5.1.6</version > <scope > runtime</scope > </dependency > <dependency > <groupId > log4j</groupId > <artifactId > log4j</artifactId > <version > 1.2.12</version > </dependency > <dependency > <groupId > junit</groupId > <artifactId > junit</artifactId > <version > 4.10</version > <scope > test</scope > </dependency > <dependency > <groupId > dom4j</groupId > <artifactId > dom4j</artifactId > <version > 1.6.1</version > </dependency > <dependency > <groupId > jaxen</groupId > <artifactId > jaxen</artifactId > <version > 1.1.6</version > </dependency > </dependencies > </project >
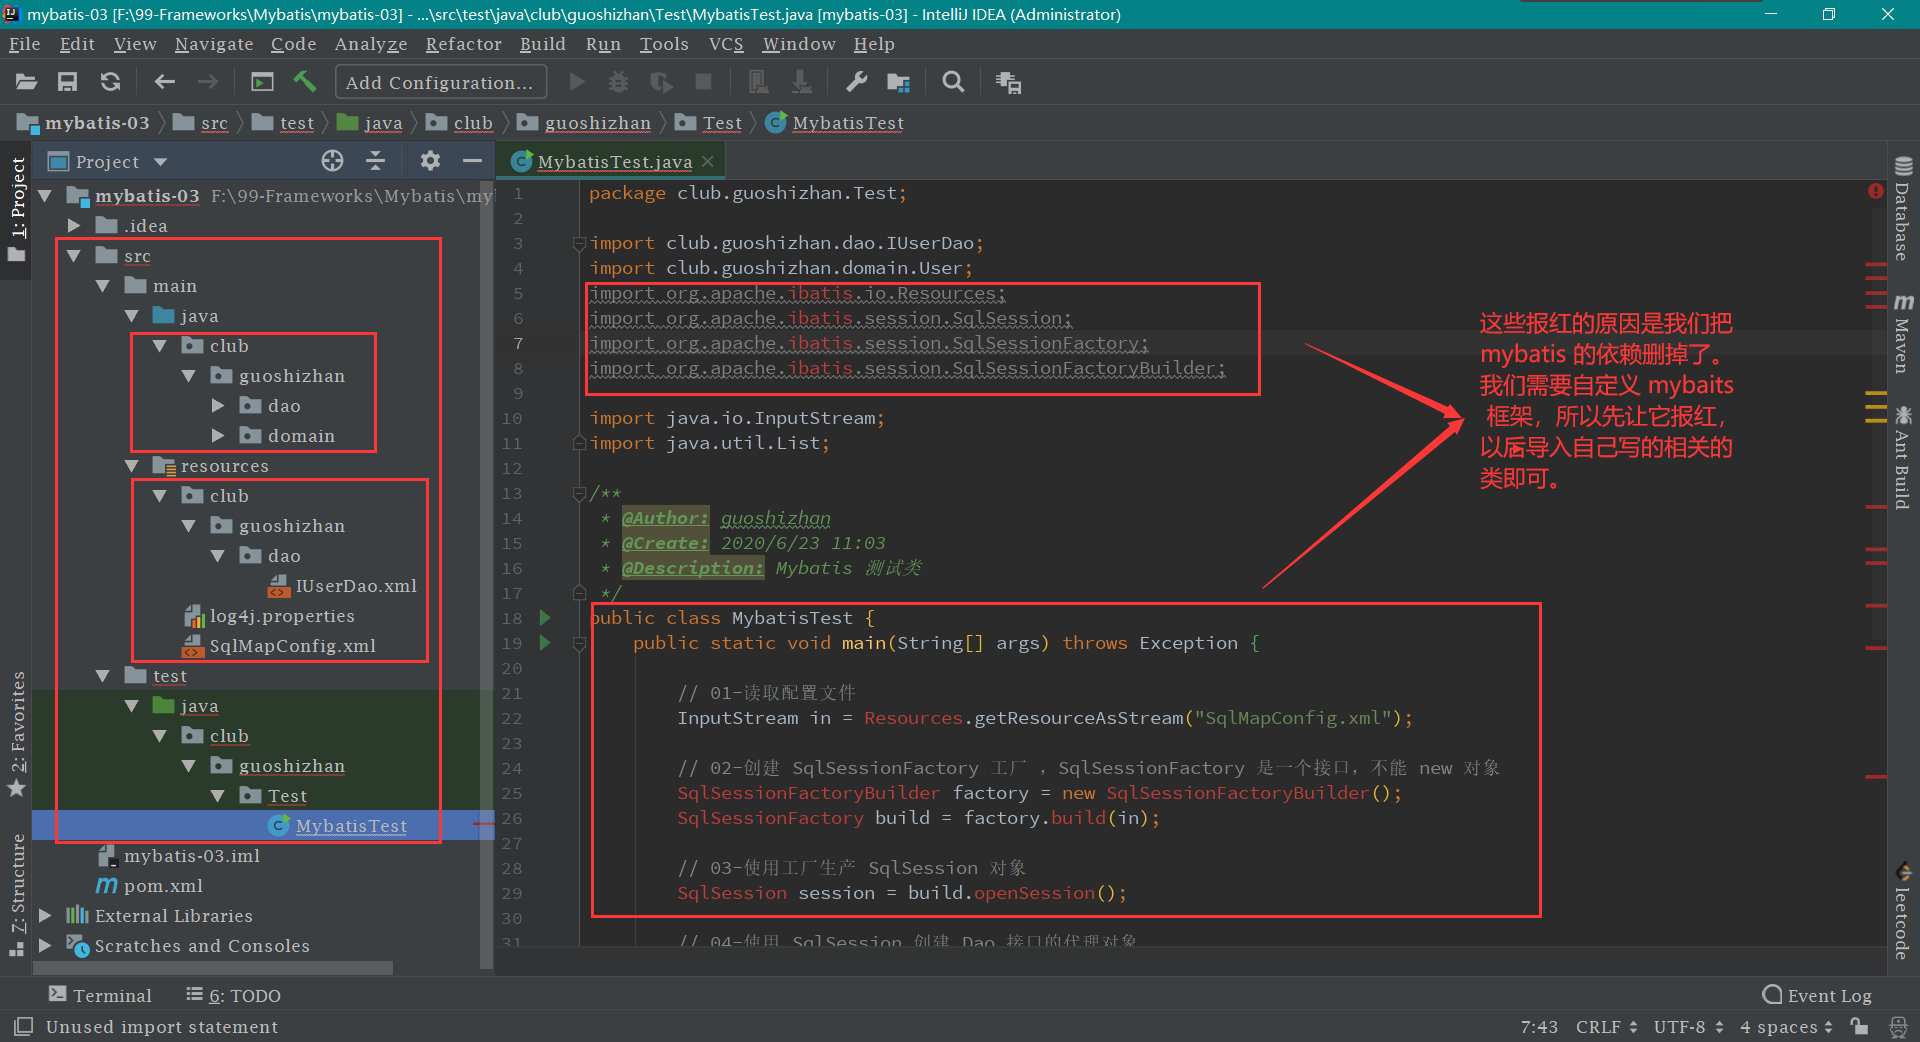
第三步: 删除工程中的 src 目录 。 src 目录 src 目录文件的压缩包 复制完成之后的工程截图如下:
第四步: 在 guoshizhan 包 mybatis 包 ,然后在 mybatis Resources 类 。该类的代码如下:
Resources.java 1 2 3 4 5 6 7 8 9 10 11 12 13 14 15 16 17 package club.guoshizhan.mybatis;import java.io.InputStream;public class Resources public static InputStream getResourceAsStream (String filePath) return Resources.class .getClassLoader ().getResourceAsStream (filePath ) ; } }
接着在 mybatis 包 下新建 SqlSession 接口 ,该接口的代码如下:
SqlSession.java 1 2 3 4 5 6 7 8 9 10 11 12 13 14 15 16 package club.guoshizhan.mybatis;public interface SqlSession <T> T getMapper (Class<T> daoInterfaceClass) ; void close () }
然后在 mybatis 包 下新建 SqlSessionFactory 接口 ,该接口的代码如下:
SqlSessionFactory.java 1 2 3 4 5 6 7 8 9 10 11 12 13 package club.guoshizhan.mybatis;public interface SqlSessionFactory SqlSession openSession () ; }
最后在 mybatis 包 下新建 SqlSessionFactoryBuilder 类 ,该类初始代码如下【后面还需完善】:
SqlSessionFactoryBuilder.java 1 2 3 4 5 6 7 8 9 10 11 12 13 14 15 16 package club.guoshizhan.mybatis;import java.io.InputStream;public class SqlSessionFactoryBuilder public SqlSessionFactory build (InputStream config) return null ; } }
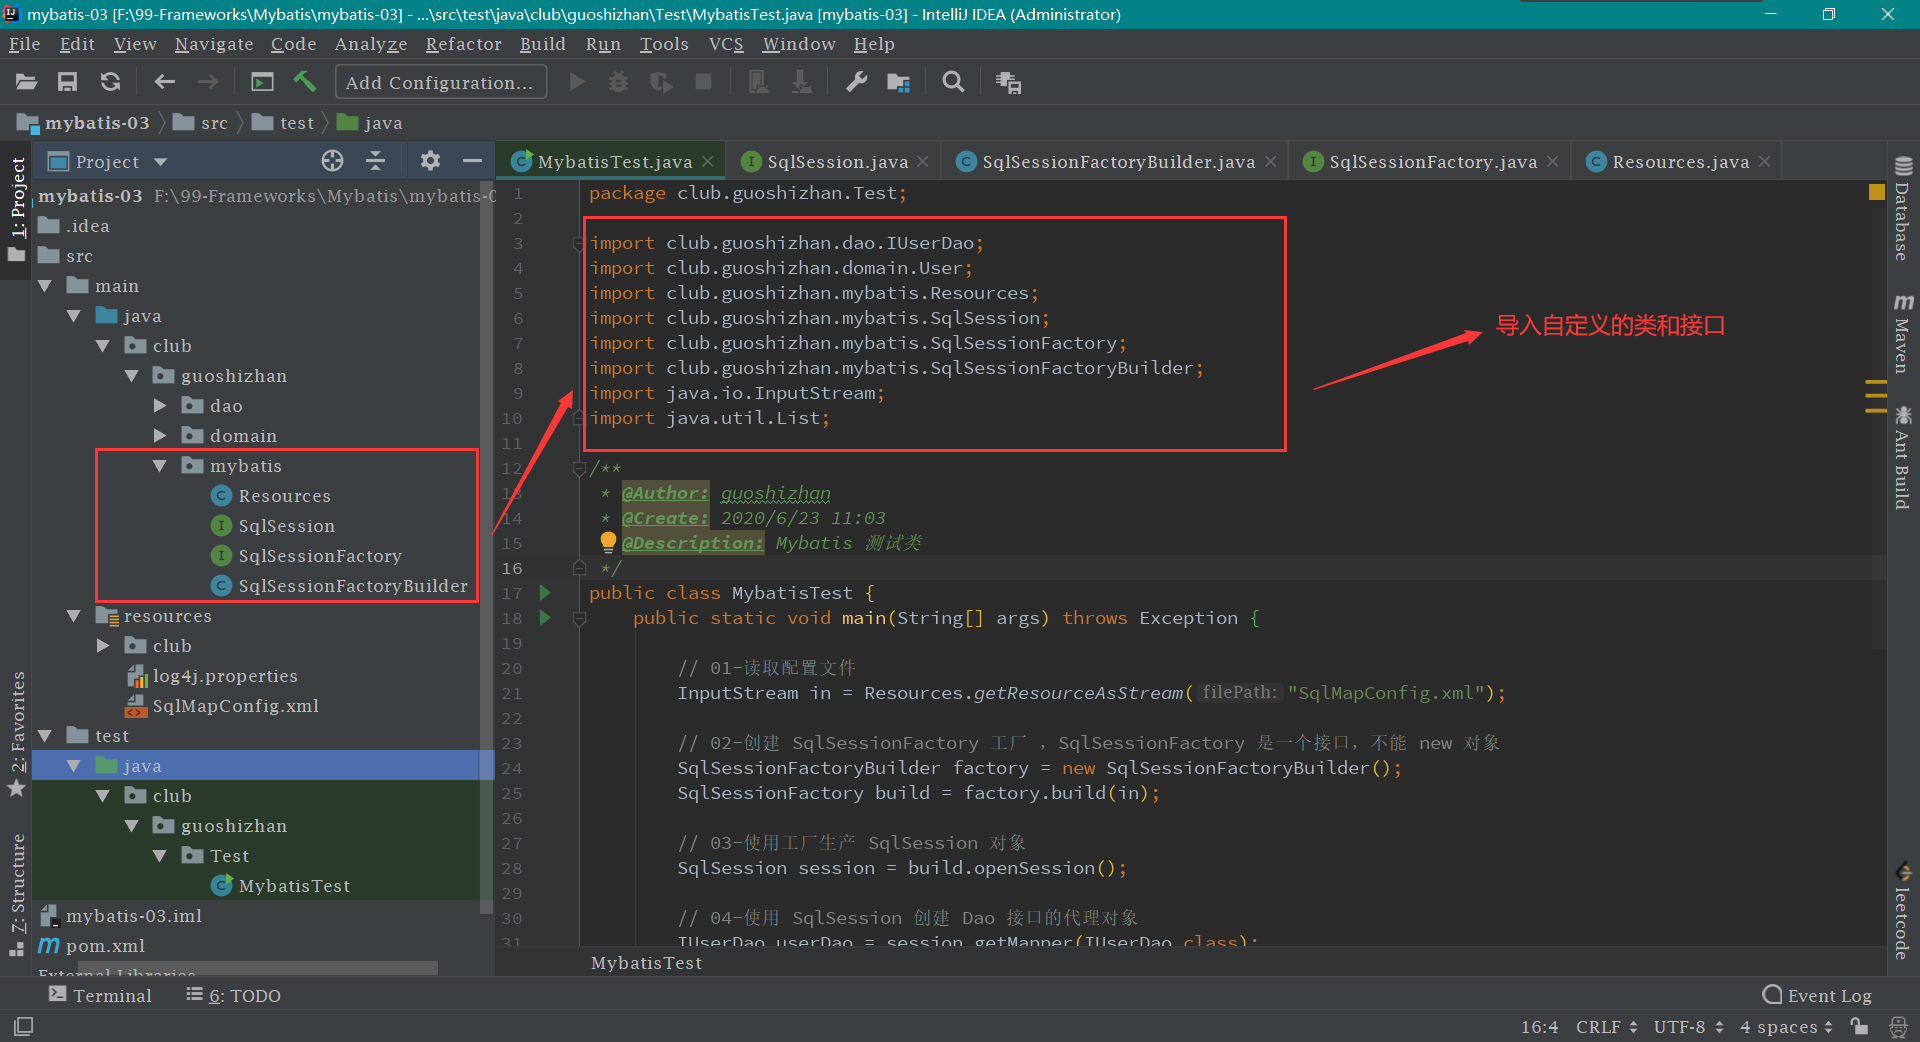
当类和接口创建好后,就去把 MybatisTest 测试类 中的报红问题解决。先删除无用的包,然后导入自定义的接口和类即可。最终 MybatisTest 测试类 代码和截图如下:
MybatisTest.java 1 2 3 4 5 6 7 8 9 10 11 12 13 14 15 16 17 18 19 20 21 22 23 24 25 26 27 28 29 30 31 32 33 34 35 36 37 38 39 40 41 42 43 44 package club.guoshizhan.Test;import club.guoshizhan.dao.IUserDao;import club.guoshizhan.domain.User;import club.guoshizhan.mybatis.Resources;import club.guoshizhan.mybatis.SqlSession;import club.guoshizhan.mybatis.SqlSessionFactory;import club.guoshizhan.mybatis.SqlSessionFactoryBuilder;import java.io.InputStream;import java.util.List;public class MybatisTest public static void main (String[] args) throws Exception InputStream in = Resources.getResourceAsStream("SqlMapConfig.xml" ); SqlSessionFactoryBuilder factory = new SqlSessionFactoryBuilder(); SqlSessionFactory build = factory.build(in); SqlSession session = build.openSession(); IUserDao userDao = session.getMapper(IUserDao.class ) ; List<User> users = userDao.findAll(); for (User user : users) { System.out.println(user); } session.close(); in.close(); } }
第五步: 解析 XML 配置文件 mybatis 包 下新建 Configuration 配置类 ,该类的代码如下:
Configuration.java 1 2 3 4 5 6 7 8 9 10 11 12 13 14 15 16 17 18 19 20 21 22 23 24 25 26 27 28 29 30 31 32 33 34 35 36 37 38 39 40 41 42 43 44 45 46 47 48 49 50 51 52 53 54 55 56 57 58 59 package club.guoshizhan.mybatis;import java.util.HashMap;import java.util.Map;public class Configuration private String driver; private String url; private String username; private String password; private Map<String, Mapper> mappers = new HashMap<>(); public Map<String, Mapper> getMappers () return mappers; } public void setMappers (Map<String, Mapper> mappers) this .mappers.putAll(mappers); } public String getDriver () return driver; } public void setDriver (String driver) this .driver = driver; } public String getUrl () return url; } public void setUrl (String url) this .url = url; } public String getUsername () return username; } public void setUsername (String username) this .username = username; } public String getPassword () return password; } public void setPassword (String password) this .password = password; } }
然后在 mybatis 包 下新建 Mapper 类 ,该类的代码如下:
Mapper.java 1 2 3 4 5 6 7 8 9 10 11 12 13 14 15 16 17 18 19 20 21 22 23 24 25 26 27 28 29 package club.guoshizhan.mybatis;public class Mapper private String queryString; private String resultType; public String getQueryString () return queryString; } public void setQueryString (String queryString) this .queryString = queryString; } public String getResultType () return resultType; } public void setResultType (String resultType) this .resultType = resultType; } }
最后在 mybatis 包 下新建 XMLConfigBuilder 类 用于解析 xml 文件
XMLConfigBuilder.java 1 2 3 4 5 6 7 8 9 10 11 12 13 14 15 16 17 18 19 20 21 22 23 24 25 26 27 28 29 30 31 32 33 34 35 36 37 38 39 40 41 42 43 44 45 46 47 48 49 50 51 52 53 54 55 56 57 58 59 60 61 62 63 64 65 66 67 68 69 70 71 72 73 74 75 76 77 78 79 80 81 82 83 84 85 86 87 88 89 90 91 92 93 94 95 96 97 98 99 100 101 102 103 104 105 106 107 108 109 110 111 112 113 114 115 116 117 118 119 120 121 122 123 124 125 126 127 128 129 130 131 132 133 134 135 136 137 138 139 140 141 142 143 144 145 146 147 148 149 150 151 152 153 154 155 156 157 158 159 160 161 162 163 164 165 166 167 168 169 170 171 172 173 174 175 176 177 178 179 180 181 182 183 184 185 186 187 188 189 190 191 192 193 194 195 196 197 198 199 200 201 202 package club.guoshizhan.mybatis;import org.dom4j.Attribute;import org.dom4j.Document;import org.dom4j.Element;import org.dom4j.io.SAXReader;import java.io.IOException;import java.io.InputStream;import java.util.HashMap;import java.util.List;import java.util.Map;public class XMLConfigBuilder public static Configuration loadConfiguration (InputStream config) try { Configuration cfg = new Configuration(); SAXReader reader = new SAXReader(); Document document = reader.read(config); Element root = document.getRootElement(); List<Element> propertyElements = root.selectNodes("//property" ); for (Element propertyElement : propertyElements) { String name = propertyElement.attributeValue("name" ); if ("driver" .equals(name)) { String driver = propertyElement.attributeValue("value" ); cfg.setDriver(driver); } if ("url" .equals(name)) { String url = propertyElement.attributeValue("value" ); cfg.setUrl(url); } if ("username" .equals(name)) { String username = propertyElement.attributeValue("value" ); cfg.setUsername(username); } if ("password" .equals(name)) { String password = propertyElement.attributeValue("value" ); cfg.setPassword(password); } } List<Element> mapperElements = root.selectNodes("//mappers/mapper" ); for (Element mapperElement : mapperElements) { Attribute attribute = mapperElement.attribute("resource" ); if (attribute != null ) { System.out.println("使用的是 XML " ); String mapperPath = attribute.getValue(); Map<String, Mapper> mappers = loadMapperConfiguration(mapperPath); cfg.setMappers(mappers); } else { } } return cfg; } catch (Exception e) { throw new RuntimeException(e); } finally { try { config.close(); } catch (Exception e) { e.printStackTrace(); } } } private static Map<String, Mapper> loadMapperConfiguration (String mapperPath) throws IOException InputStream in = null ; try { Map<String, Mapper> mappers = new HashMap<String, Mapper>(); in = Resources.getResourceAsStream(mapperPath); SAXReader reader = new SAXReader(); Document document = reader.read(in); Element root = document.getRootElement(); String namespace = root.attributeValue("namespace" ); List<Element> selectElements = root.selectNodes("//select" ); for (Element selectElement : selectElements) { String id = selectElement.attributeValue("id" ); String resultType = selectElement.attributeValue("resultType" ); String queryString = selectElement.getText(); String key = namespace + "." + id; Mapper mapper = new Mapper(); mapper.setQueryString(queryString); mapper.setResultType(resultType); mappers.put(key, mapper); } return mappers; } catch (Exception e) { throw new RuntimeException(e); } finally { in.close(); } } }
第六步: 编写工具类和代理类 mybatis 包 下新建 DataSourceUtil 类 ,该类的代码如下:
DataSourceUtil.java 1 2 3 4 5 6 7 8 9 10 11 12 13 14 15 16 17 18 19 20 21 22 23 package club.guoshizhan.mybatis;import java.sql.Connection;import java.sql.DriverManager;public class DataSourceUtil public static Connection getConnection (Configuration cfg) try { Class.forName(cfg.getDriver()); return DriverManager.getConnection(cfg.getUrl(), cfg.getUsername(), cfg.getPassword()); } catch (Exception e) { throw new RuntimeException(e); } } }
接着在 mybatis 包 下新建 Executor 类 ,该类的代码如下:
Executor.java 1 2 3 4 5 6 7 8 9 10 11 12 13 14 15 16 17 18 19 20 21 22 23 24 25 26 27 28 29 30 31 32 33 34 35 36 37 38 39 40 41 42 43 44 45 46 47 48 49 50 51 52 53 54 55 56 57 58 59 60 61 62 63 64 65 66 67 68 69 70 71 72 73 74 75 76 77 78 package club.guoshizhan.mybatis;import java.beans.PropertyDescriptor;import java.lang.reflect.Method;import java.sql.Connection;import java.sql.PreparedStatement;import java.sql.ResultSet;import java.sql.ResultSetMetaData;import java.util.ArrayList;import java.util.List;public class Executor public <E> List<E> selectList (Mapper mapper, Connection conn) { PreparedStatement pstm = null ; ResultSet rs = null ; try { String queryString = mapper.getQueryString(); String resultType = mapper.getResultType(); Class domainClass = Class.forName(resultType); pstm = conn.prepareStatement(queryString); rs = pstm.executeQuery(); List<E> list = new ArrayList<>(); while (rs.next()) { E obj = (E) domainClass.newInstance(); ResultSetMetaData rsmd = rs.getMetaData(); int columnCount = rsmd.getColumnCount(); for (int i = 1 ; i <= columnCount; i++) { String columnName = rsmd.getColumnName(i); Object columnValue = rs.getObject(columnName); PropertyDescriptor pd = new PropertyDescriptor(columnName, domainClass); Method writeMethod = pd.getWriteMethod(); writeMethod.invoke(obj, columnValue); } list.add(obj); } return list; } catch (Exception e) { throw new RuntimeException(e); } finally { release(pstm, rs); } } private void release (PreparedStatement pstm, ResultSet rs) if (rs != null ) { try { rs.close(); } catch (Exception e) { e.printStackTrace(); } } if (pstm != null ) { try { pstm.close(); } catch (Exception e) { e.printStackTrace(); } } } }
最后在 mybatis 包 下新建 MapperProxy 类 ,该类的代码如下:
MapperProxy.java 1 2 3 4 5 6 7 8 9 10 11 12 13 14 15 16 17 18 19 20 21 22 23 24 25 26 27 28 29 30 31 32 33 34 35 36 37 38 39 40 41 42 43 44 45 46 47 48 package club.guoshizhan.mybatis;import java.lang.reflect.InvocationHandler;import java.lang.reflect.Method;import java.sql.Connection;import java.util.Map;public class MapperProxy implements InvocationHandler private Map<String, Mapper> mappers; private Connection connection; public MapperProxy (Map<String, Mapper> mappers, Connection connection) this .mappers = mappers; this .connection = connection; } @Override public Object invoke (Object proxy, Method method, Object[] args) throws Throwable String methodName = method.getName(); String className = method.getDeclaringClass().getName(); String key = className + "." + methodName; Mapper mapper = mappers.get(key); if (mapper == null ) { throw new IllegalArgumentException("The args is wrong!!!" ); } return new Executor().selectList(mapper, connection); } }
第七步: 编写实现类 mybatis 包 下新建 DefaultSqlSession 类 来实现 SqlSession 接口
DefaultSqlSession.java 1 2 3 4 5 6 7 8 9 10 11 12 13 14 15 16 17 18 19 20 21 22 23 24 25 26 27 28 29 30 31 32 33 34 35 36 37 38 39 package club.guoshizhan.mybatis;import java.lang.reflect.Proxy;import java.sql.Connection;public class DefaultSqlSession implements SqlSession private Configuration cfg; private Connection conn; public DefaultSqlSession (Configuration cfg) this .cfg = cfg; conn = DataSourceUtil.getConnection(cfg); } @Override public <T> T getMapper (Class<T> daoInterfaceClass) { return (T) Proxy.newProxyInstance(daoInterfaceClass.getClassLoader(), new Class[]{daoInterfaceClass}, new MapperProxy(cfg.getMappers(), conn)); } @Override public void close () if (conn != null ) { try { conn.close(); } catch (Exception e) { e.printStackTrace(); } } } }
接着在 mybatis 包 下新建 DefaultSqlSessionFactory 类 来实现 SqlSessionFactory 接口
DefaultSqlSessionFactory.java 1 2 3 4 5 6 7 8 9 10 11 12 13 14 15 16 17 18 19 20 21 22 package club.guoshizhan.mybatis;public class DefaultSqlSessionFactory implements SqlSessionFactory private Configuration cfg; public DefaultSqlSessionFactory (Configuration cfg) this .cfg = cfg; } @Override public SqlSession openSession () return new DefaultSqlSession(cfg); } }
最后继续编写 mybatis 包 下的 SqlSessionFactoryBuilder 类 【原先没有写完】,该类的代码如下:
1 2 3 4 5 6 7 8 9 10 11 12 13 14 15 16 17 18 package club.guoshizhan.mybatis;import java.io.InputStream;public class SqlSessionFactoryBuilder public SqlSessionFactory build (InputStream config) Configuration cfg = XMLConfigBuilder.loadConfiguration(config); return new DefaultSqlSessionFactory(cfg); } }
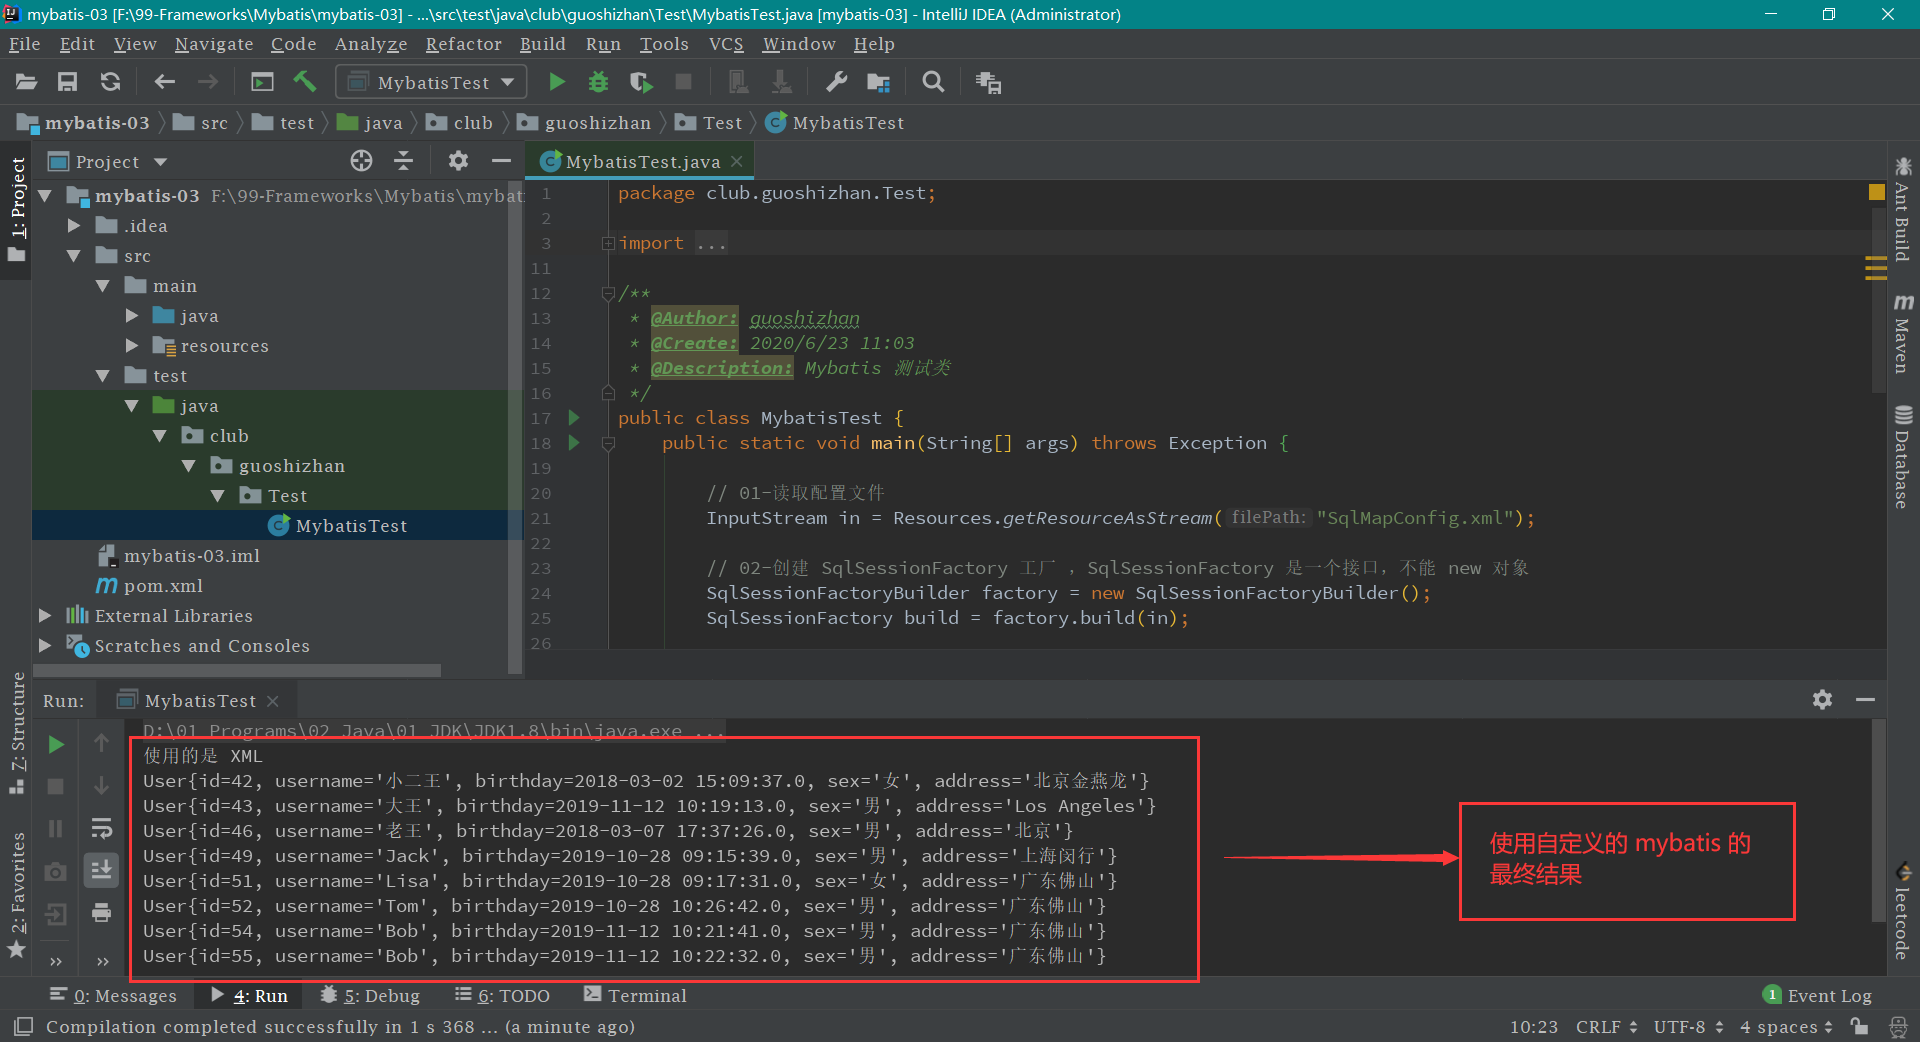
最后一步: 运行 MybatisTest 测试类中的 main 方法
附加功能: 自定义 mybatis 并支持注解 第一步: 修改 IUserDao 接口【就是加一个 Select 注解】
IUserDao.java 1 2 3 4 5 6 7 8 9 10 11 12 13 14 15 16 17 18 19 package club.guoshizhan.dao;import club.guoshizhan.domain.User;import club.guoshizhan.mybatis.Select;import java.util.List;public interface IUserDao @Select ("select * from user" ) List<User> findAll () ; }
第二步: 修改 SqlMapConfig.xml 配置文件中的 mapper 属性,将其改为 class
SqlMapConfig.xml 1 2 3 4 <mappers > <mapper class ="club.guoshizhan.dao.IUserDao" /> </mappers >
第三步: 新建 Select 注解类 mybatis 包 下新建 Select 注解 。代码如下:
Select.java 1 2 3 4 5 6 7 8 9 10 11 12 13 14 15 16 17 18 19 20 package club.guoshizhan.mybatis;import java.lang.annotation.ElementType;import java.lang.annotation.Retention;import java.lang.annotation.RetentionPolicy;import java.lang.annotation.Target;@Retention (RetentionPolicy.RUNTIME)@Target (ElementType.METHOD)public @interface Select { String value () ; }
第四步: 修改 XMLConfigBuilder 类 即把原先注释的部分放开【原先注解部分被注释掉了】
XMLConfigBuilder.java 1 2 3 4 5 6 7 8 9 10 11 12 13 14 15 16 17 18 19 20 21 22 23 24 25 26 27 28 29 30 31 32 33 34 35 36 37 38 39 40 41 42 43 44 45 46 47 48 49 50 51 52 53 54 55 56 57 58 59 60 61 62 63 64 65 66 67 68 69 70 71 72 73 74 75 76 77 78 79 80 81 82 83 84 85 86 87 88 89 90 91 92 93 94 95 96 97 98 99 100 101 102 103 104 105 106 107 108 109 110 111 112 113 114 115 116 117 118 119 120 121 122 123 124 125 126 127 128 129 130 131 132 133 134 135 136 137 138 139 140 141 142 143 144 145 146 147 148 149 150 151 152 153 154 155 156 157 158 159 160 161 162 163 164 165 166 167 168 169 170 171 172 173 174 175 176 177 178 179 180 181 182 183 184 185 186 187 188 189 190 191 192 193 194 195 196 197 198 199 200 201 202 203 204 205 package club.guoshizhan.mybatis;import org.dom4j.Attribute;import org.dom4j.Document;import org.dom4j.Element;import org.dom4j.io.SAXReader;import java.io.IOException;import java.io.InputStream;import java.lang.reflect.Method;import java.lang.reflect.ParameterizedType;import java.lang.reflect.Type;import java.util.HashMap;import java.util.List;import java.util.Map;public class XMLConfigBuilder public static Configuration loadConfiguration (InputStream config) try { Configuration cfg = new Configuration(); SAXReader reader = new SAXReader(); Document document = reader.read(config); Element root = document.getRootElement(); List<Element> propertyElements = root.selectNodes("//property" ); for (Element propertyElement : propertyElements) { String name = propertyElement.attributeValue("name" ); if ("driver" .equals(name)) { String driver = propertyElement.attributeValue("value" ); cfg.setDriver(driver); } if ("url" .equals(name)) { String url = propertyElement.attributeValue("value" ); cfg.setUrl(url); } if ("username" .equals(name)) { String username = propertyElement.attributeValue("value" ); cfg.setUsername(username); } if ("password" .equals(name)) { String password = propertyElement.attributeValue("value" ); cfg.setPassword(password); } } List<Element> mapperElements = root.selectNodes("//mappers/mapper" ); for (Element mapperElement : mapperElements) { Attribute attribute = mapperElement.attribute("resource" ); if (attribute != null ) { System.out.println("使用的是 XML " ); String mapperPath = attribute.getValue(); Map<String, Mapper> mappers = loadMapperConfiguration(mapperPath); cfg.setMappers(mappers); } else { System.out.println("使用的是注解" ); String daoClassPath = mapperElement.attributeValue("class" ); Map<String, Mapper> mappers = loadMapperAnnotation(daoClassPath); cfg.setMappers(mappers); } } return cfg; } catch (Exception e) { throw new RuntimeException(e); } finally { try { config.close(); } catch (Exception e) { e.printStackTrace(); } } } private static Map<String, Mapper> loadMapperConfiguration (String mapperPath) throws IOException InputStream in = null ; try { Map<String, Mapper> mappers = new HashMap<String, Mapper>(); in = Resources.getResourceAsStream(mapperPath); SAXReader reader = new SAXReader(); Document document = reader.read(in); Element root = document.getRootElement(); String namespace = root.attributeValue("namespace" ); List<Element> selectElements = root.selectNodes("//select" ); for (Element selectElement : selectElements) { String id = selectElement.attributeValue("id" ); String resultType = selectElement.attributeValue("resultType" ); String queryString = selectElement.getText(); String key = namespace + "." + id; Mapper mapper = new Mapper(); mapper.setQueryString(queryString); mapper.setResultType(resultType); mappers.put(key, mapper); } return mappers; } catch (Exception e) { throw new RuntimeException(e); } finally { in.close(); } } private static Map<String, Mapper> loadMapperAnnotation (String daoClassPath) throws Exception Map<String, Mapper> mappers = new HashMap<String, Mapper>(); Class daoClass = Class.forName(daoClassPath); Method[] methods = daoClass.getMethods(); for (Method method : methods) { boolean isAnnotated = method.isAnnotationPresent(Select.class ) ; if (isAnnotated) { Mapper mapper = new Mapper(); Select selectAnno = method.getAnnotation(Select.class ) ; String queryString = selectAnno.value(); mapper.setQueryString(queryString); Type type = method.getGenericReturnType(); if (type instanceof ParameterizedType) { ParameterizedType ptype = (ParameterizedType) type; Type[] types = ptype.getActualTypeArguments(); Class domainClass = (Class) types[0 ]; String resultType = domainClass.getName(); mapper.setResultType(resultType); } String methodName = method.getName(); String className = method.getDeclaringClass().getName(); String key = className + "." + methodName; mappers.put(key, mapper); } } return mappers; } }
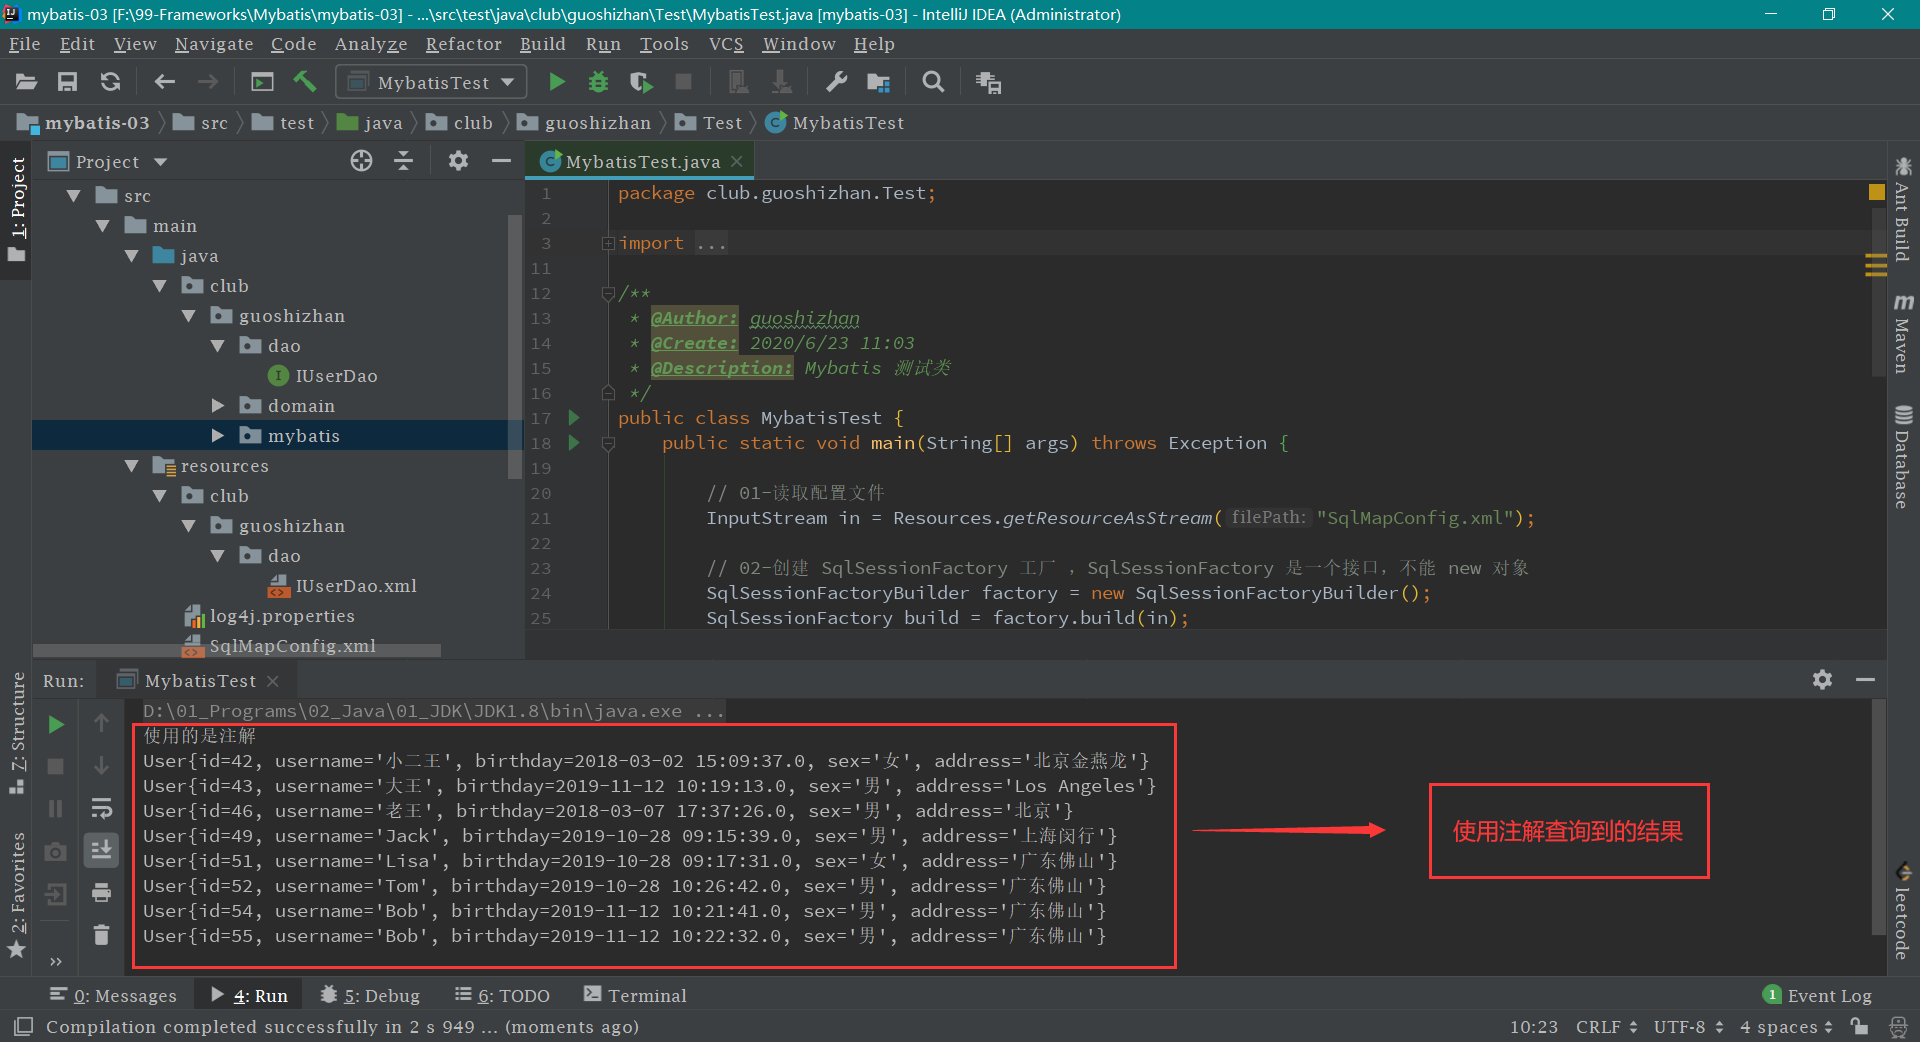
最后一步: 运行 MybatisTest 测试类中的 main 方法
mybatis 的基本使用 mybatis 的单表操作 这部分内容主要是用 mybatis 实现对数据库的 添加、删除、修改、查询 操作,使用在第一次搭建环境时候的代码 mybatis-01 (主要是省时间,就不再重新搭建环境了)
mybatis 保存操作 第一步: 编写 IUserDao 类,新加 保存用户 的方法。
IUserDao.java 1 2 3 4 5 6 7 8 9 10 11 12 13 14 15 16 17 18 19 20 package club.guoshizhan.dao;import club.guoshizhan.domain.User;import java.util.List;public interface IUserDao List<User> findAll () ; void saveUser (User user) }
第二步: 编写 IUserDao.xml 文件,新加 保存用户 的 SQL 语句(使用 insert 标签的)。
IUserDao.xml 1 2 3 4 5 6 7 8 9 10 11 12 13 14 15 16 17 18 19 20 <?xml version="1.0" encoding="UTF-8"?> <!DOCTYPE mapper PUBLIC "-//mybatis.org//DTD Mapper 3.0//EN" "http://mybatis.org/dtd/mybatis-3-mapper.dtd" > <mapper namespace ="club.guoshizhan.dao.IUserDao" > <select id ="findAll" resultType ="club.guoshizhan.domain.User" > select * from user; </select > <insert id ="saveUser" parameterType ="club.guoshizhan.domain.User" > insert into user(username,birthday,sex,address) values (#{username},#{birthday},#{sex},#{address}) </insert > </mapper >
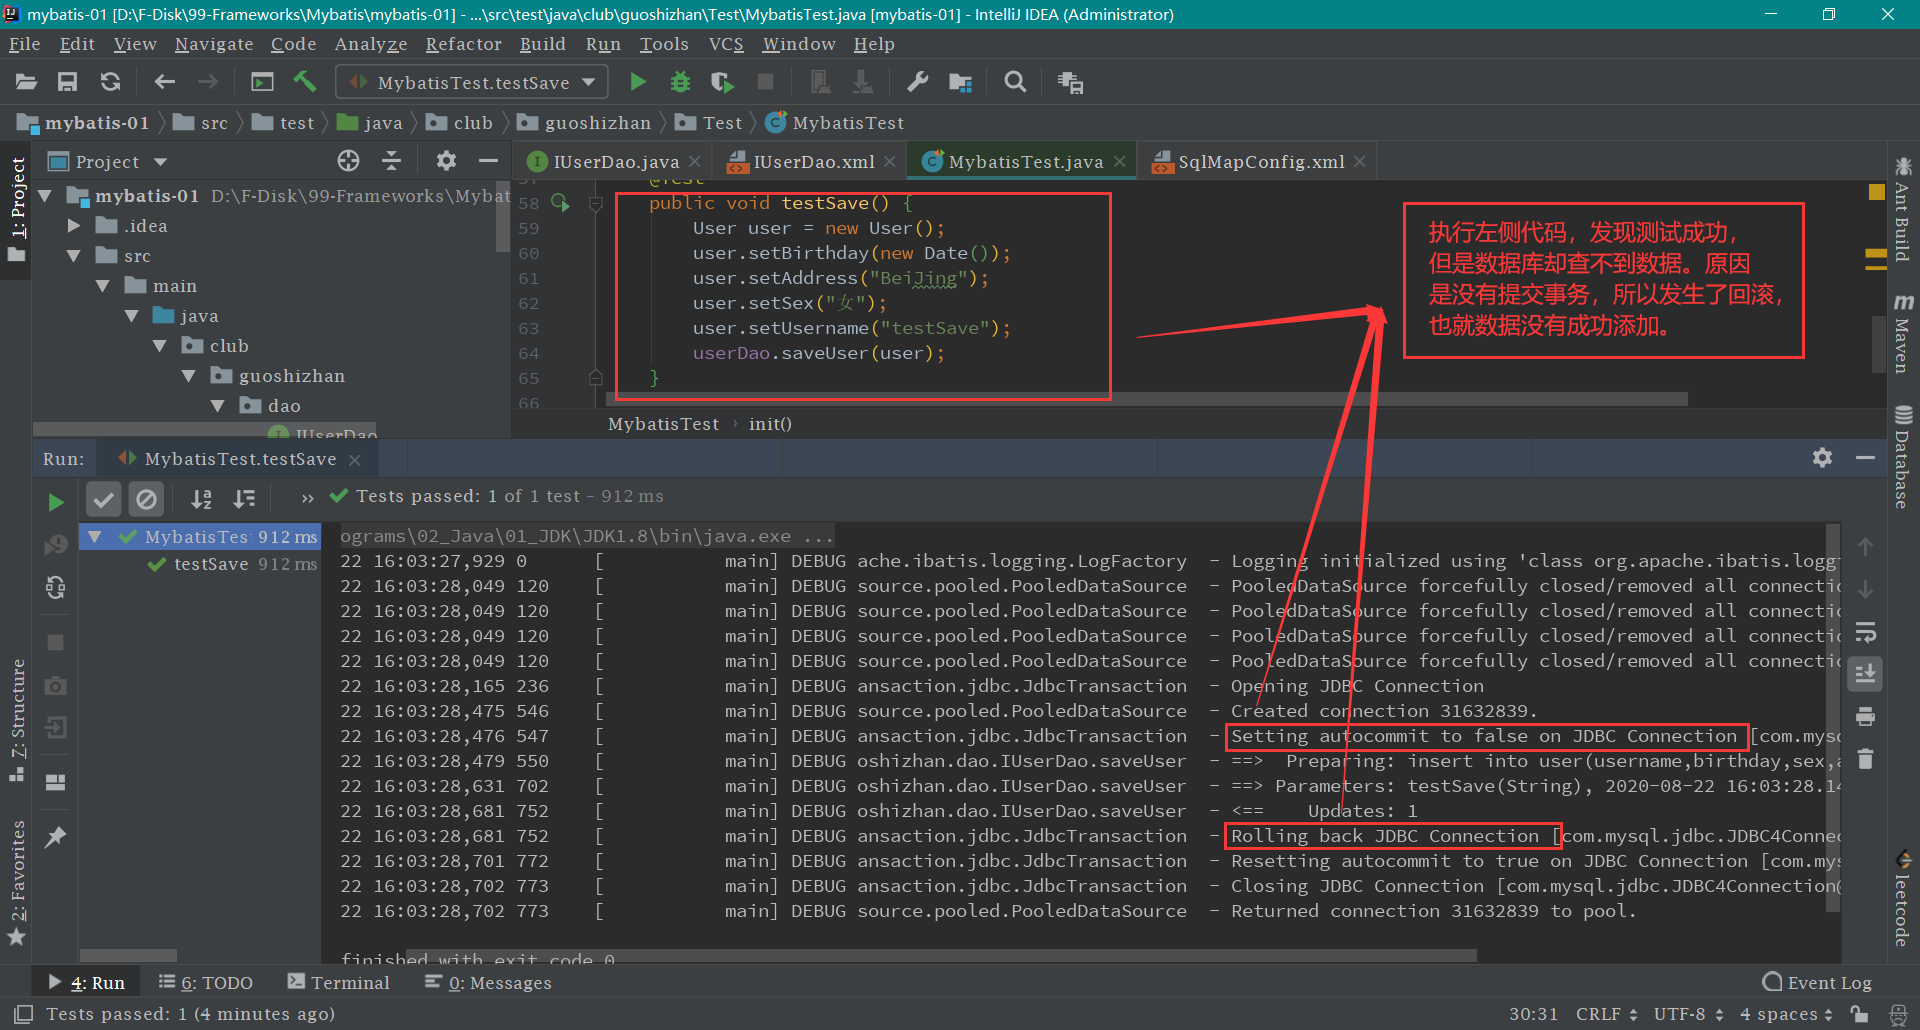
第三步: 编写 MybatisTest 测试类,然后执行 testSave 方法即可。
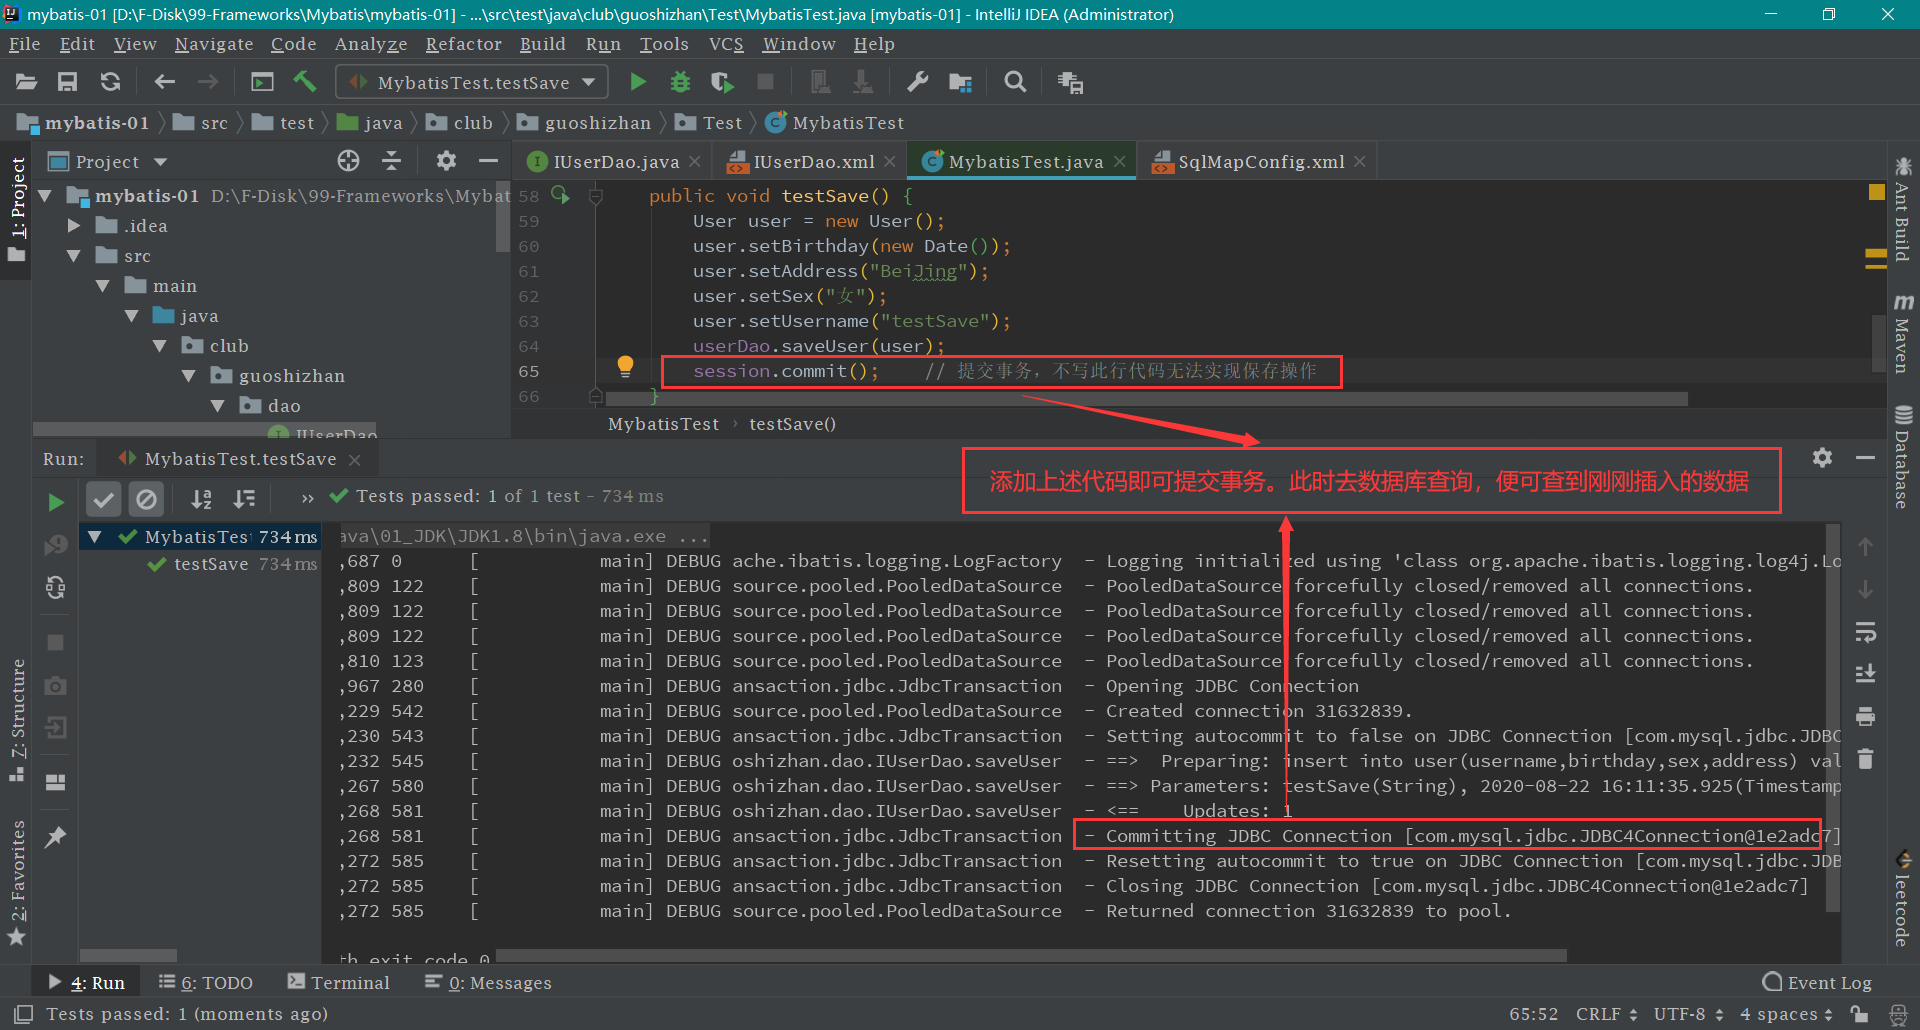
MybatisTest.java 1 2 3 4 5 6 7 8 9 10 11 12 13 14 15 16 17 18 19 20 21 22 23 24 25 26 27 28 29 30 31 32 33 34 35 36 37 38 39 40 41 42 43 44 45 46 47 48 49 50 51 52 53 54 55 56 57 58 59 60 61 62 63 64 65 66 67 68 69 70 71 72 73 74 75 76 package club.guoshizhan.Test;import club.guoshizhan.dao.IUserDao;import club.guoshizhan.domain.User;import org.apache.ibatis.io.Resources;import org.apache.ibatis.session.SqlSession;import org.apache.ibatis.session.SqlSessionFactory;import org.apache.ibatis.session.SqlSessionFactoryBuilder;import org.junit.After;import org.junit.Before;import org.junit.Test;import java.io.IOException;import java.io.InputStream;import java.util.Date;import java.util.List;public class MybatisTest private InputStream in; private SqlSessionFactory factory; private SqlSession session; private IUserDao userDao; @Before public void init () throws Exception in = Resources.getResourceAsStream("SqlMapConfig.xml" ); factory = new SqlSessionFactoryBuilder().build(in); session = factory.openSession(); userDao = session.getMapper(IUserDao.class ) ; } @Test public void testFindAll () List<User> users = userDao.findAll(); for (User user : users) { System.out.println(user); } } @Test public void testSave () User user = new User(); user.setBirthday(new Date()); user.setAddress("BeiJing" ); user.setSex("女" ); user.setUsername("testSave" ); userDao.saveUser(user); session.commit(); } @After public void destory () throws IOException session.close(); in.close(); } }
如果没有加提交事务那行代码,那么虽然测试成功,但是数据库是查不到数据的。
加上提交事务的代码,保存操作才可成功。
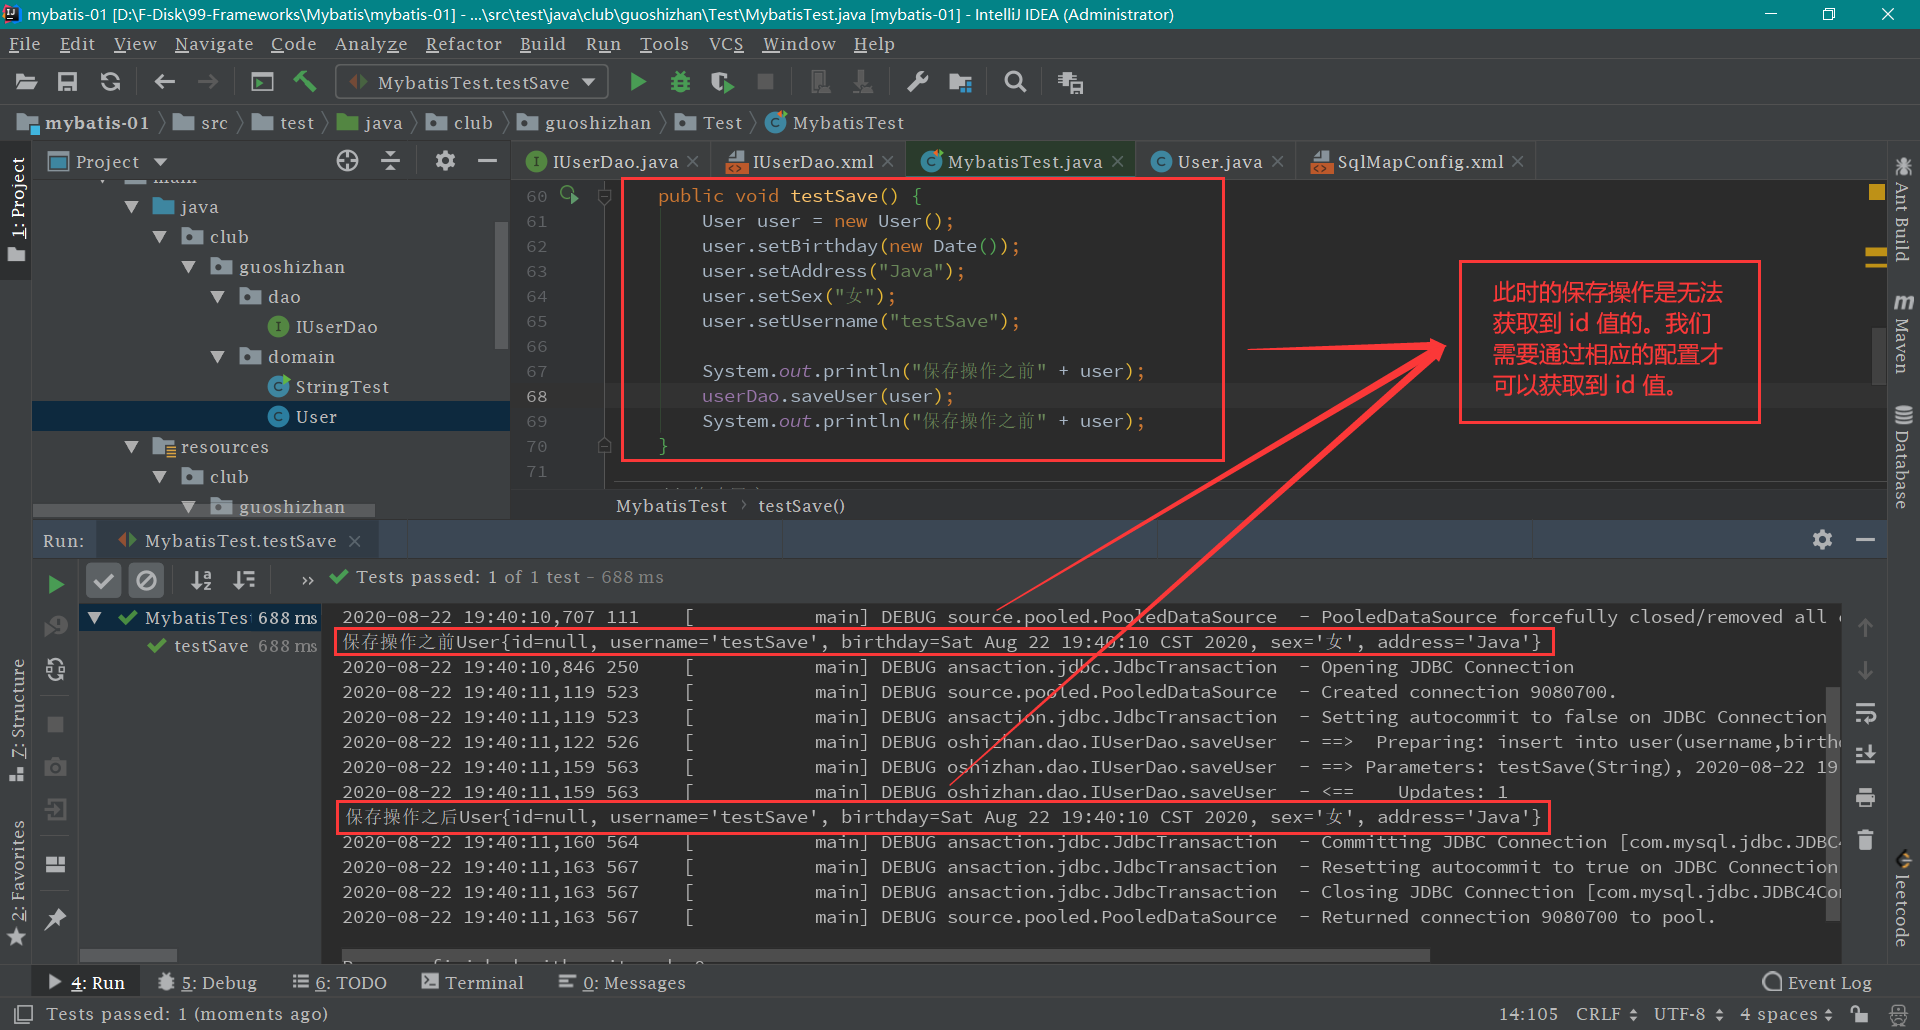
附加内容,细节操作: 保存操作虽然成功了,但是我们无法获取到保存数据的 id 值。
如果我一定要获取保存数据的 id 值,那怎么办呢? IUserDao.xml 文件中的 保存操作 使用以下代码覆盖原先的 SQL 语句即可(使用 insert 标签的)。
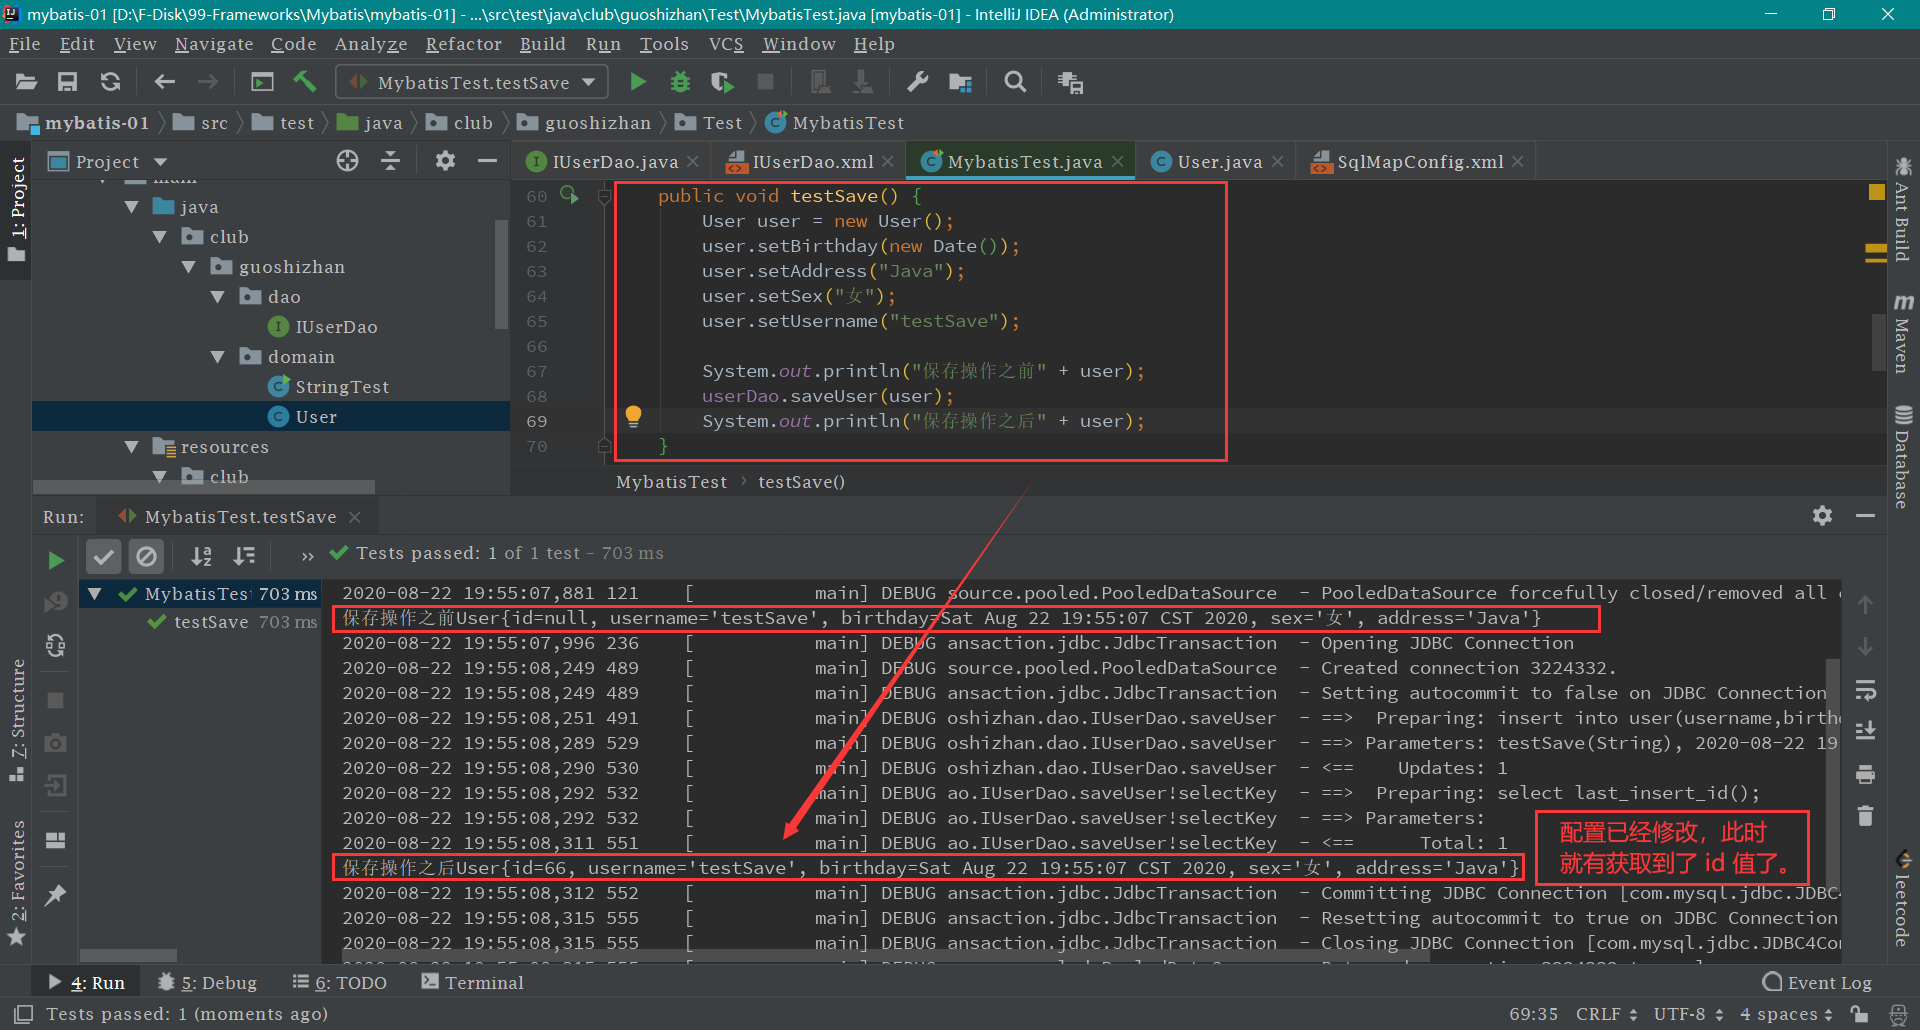
IUserDao.xml 1 2 3 4 5 6 7 8 9 <insert id ="saveUser" parameterType ="club.guoshizhan.domain.User" > <selectKey keyProperty ="id" keyColumn ="id" resultType ="Integer" order ="AFTER" > select last_insert_id(); </selectKey > insert into user(username,birthday,sex,address) values (#{username},#{birthday},#{sex},#{address}) </insert >
编写完配置之后,我们运行 testSave 方法,这个时候我们就获取到了保存数据的 id 值。
TIPS: mybatis 的 保存操作
mybatis 修改操作 第一步: 编写 IUserDao 类,新加 修改用户 的方法。
IUserDao.java 1 2 3 4 5 6 7 8 9 10 11 12 13 14 15 16 17 18 19 20 21 22 23 package club.guoshizhan.dao;import club.guoshizhan.domain.User;import java.util.List;public interface IUserDao List<User> findAll () ; void saveUser (User user) void updateUser (User user) }
第二步: 编写 IUserDao.xml 文件,新加 修改用户 的 SQL 语句(使用 update 标签的)。
IUserDao.xml 1 2 3 4 5 6 7 8 9 10 11 12 13 14 15 16 17 18 19 20 21 22 23 24 25 26 <?xml version="1.0" encoding="UTF-8"?> <!DOCTYPE mapper PUBLIC "-//mybatis.org//DTD Mapper 3.0//EN" "http://mybatis.org/dtd/mybatis-3-mapper.dtd" > <mapper namespace ="club.guoshizhan.dao.IUserDao" > <select id ="findAll" resultType ="club.guoshizhan.domain.User" > select * from user; </select > <insert id ="saveUser" parameterType ="club.guoshizhan.domain.User" > insert into user(username,birthday,sex,address) values (#{username},#{birthday},#{sex},#{address}) </insert > <update id ="updateUser" parameterType ="club.guoshizhan.domain.User" > update user set username=#{username},birthday=#{birthday},sex=#{sex},address=#{address} where id=#{id} </update > </mapper >
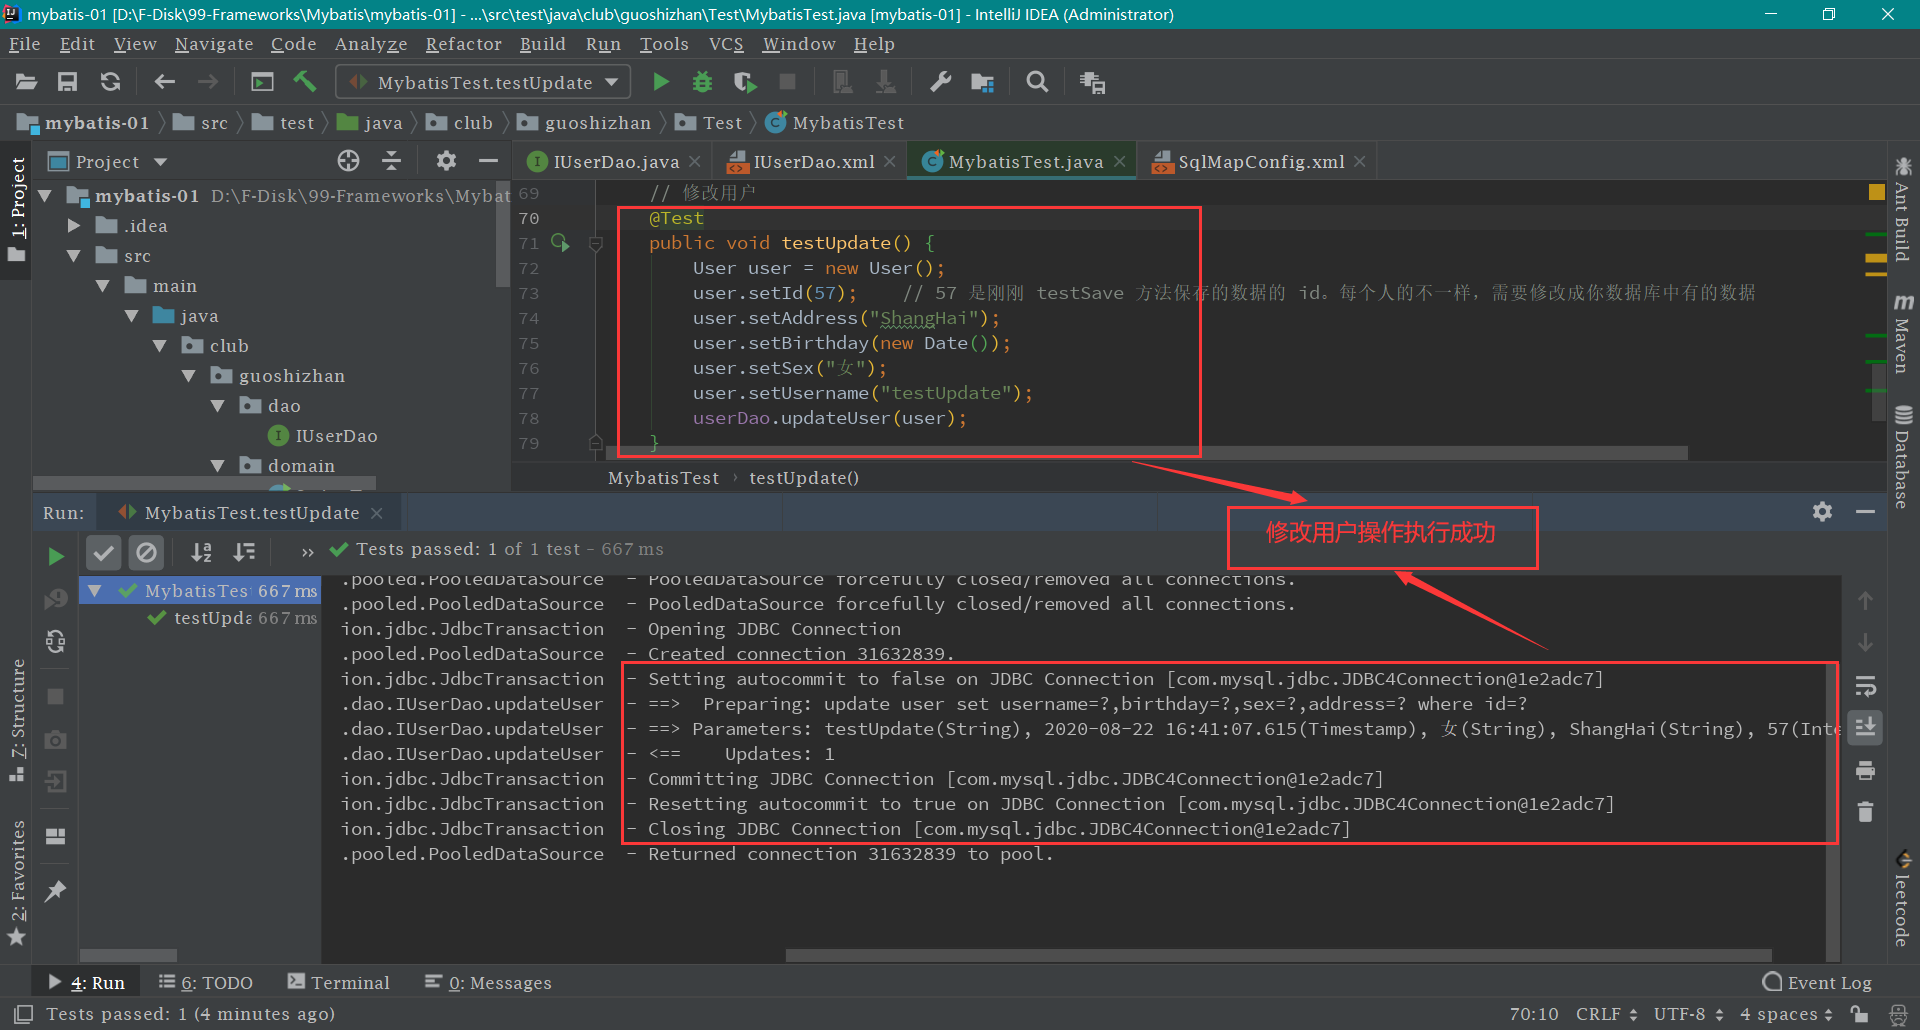
第三步: 编写 MybatisTest 测试类,然后执行 testUpdate 方法即可。
1 2 3 4 5 6 7 8 9 10 11 12 13 14 15 16 17 18 19 20 21 22 23 24 25 26 27 28 29 30 31 32 33 34 35 36 37 38 39 40 41 42 43 44 45 46 47 48 49 50 51 52 53 54 55 56 57 58 59 60 61 62 63 64 65 66 67 68 69 70 71 72 73 74 75 76 77 78 79 80 81 82 83 84 85 86 87 88 89 90 package club.guoshizhan.Test;import club.guoshizhan.dao.IUserDao;import club.guoshizhan.domain.User;import org.apache.ibatis.io.Resources;import org.apache.ibatis.session.SqlSession;import org.apache.ibatis.session.SqlSessionFactory;import org.apache.ibatis.session.SqlSessionFactoryBuilder;import org.junit.After;import org.junit.Before;import org.junit.Test;import java.io.IOException;import java.io.InputStream;import java.util.Date;import java.util.List;public class MybatisTest private InputStream in; private SqlSessionFactory factory; private SqlSession session; private IUserDao userDao; @Before public void init () throws Exception in = Resources.getResourceAsStream("SqlMapConfig.xml" ); factory = new SqlSessionFactoryBuilder().build(in); session = factory.openSession(); userDao = session.getMapper(IUserDao.class ) ; } @Test public void testFindAll () List<User> users = userDao.findAll(); for (User user : users) { System.out.println(user); } } @Test public void testSave () User user = new User(); user.setBirthday(new Date()); user.setAddress("BeiJing" ); user.setSex("女" ); user.setUsername("testSave" ); userDao.saveUser(user); } @Test public void testUpdate () User user = new User(); user.setId(57 ); user.setAddress("ShangHai" ); user.setBirthday(new Date()); user.setSex("女" ); user.setUsername("testUpdate" ); userDao.updateUser(user); } @After public void destory () throws IOException session.commit(); session.close(); in.close(); } }
执行 testUpdate 方法,
TIPS: mybatis 的 修改操作
mybatis 删除操作 第一步: 编写 IUserDao 类,新加 根据 id 删除用户 的方法。
IUserDao.java 1 2 3 4 5 6 7 8 9 10 11 12 13 14 15 16 17 18 19 20 21 22 23 24 25 26 package club.guoshizhan.dao;import club.guoshizhan.domain.User;import java.util.List;public interface IUserDao List<User> findAll () ; void saveUser (User user) void updateUser (User user) void deleteUser (Integer id) }
第二步: 编写 IUserDao.xml 文件,新加 根据 id 删除用户 的 SQL 语句(使用 delete 标签的)。
IUserDao.xml 1 2 3 4 5 6 7 8 9 10 11 12 13 14 15 16 17 18 19 20 21 22 23 24 25 26 27 28 29 30 31 <?xml version="1.0" encoding="UTF-8"?> <!DOCTYPE mapper PUBLIC "-//mybatis.org//DTD Mapper 3.0//EN" "http://mybatis.org/dtd/mybatis-3-mapper.dtd" > <mapper namespace ="club.guoshizhan.dao.IUserDao" > <select id ="findAll" resultType ="club.guoshizhan.domain.User" > select * from user; </select > <insert id ="saveUser" parameterType ="club.guoshizhan.domain.User" > insert into user(username,birthday,sex,address) values (#{username},#{birthday},#{sex},#{address}) </insert > <update id ="updateUser" parameterType ="club.guoshizhan.domain.User" > update user set username=#{username},birthday=#{birthday},sex=#{sex},address=#{address} where id=#{id} </update > <delete id ="deleteUser" parameterType ="Integer" > delete from user where id=#{id} </delete > </mapper >
第三步: 编写 MybatisTest 测试类,然后执行 testDelete 方法即可实现删除操作。
IUserDao.java 1 2 3 4 5 6 7 8 9 10 11 12 13 14 15 16 17 18 19 20 21 22 23 24 25 26 27 28 29 30 31 32 33 34 35 36 37 38 39 40 41 42 43 44 45 46 47 48 49 50 51 52 53 54 55 56 57 58 59 60 61 62 63 64 65 66 67 68 69 70 71 72 73 74 75 76 77 78 79 80 81 82 83 84 85 86 87 88 89 90 91 92 93 94 95 96 package club.guoshizhan.Test;import club.guoshizhan.dao.IUserDao;import club.guoshizhan.domain.User;import org.apache.ibatis.io.Resources;import org.apache.ibatis.session.SqlSession;import org.apache.ibatis.session.SqlSessionFactory;import org.apache.ibatis.session.SqlSessionFactoryBuilder;import org.junit.After;import org.junit.Before;import org.junit.Test;import java.io.IOException;import java.io.InputStream;import java.util.Date;import java.util.List;public class MybatisTest private InputStream in; private SqlSessionFactory factory; private SqlSession session; private IUserDao userDao; @Before public void init () throws Exception in = Resources.getResourceAsStream("SqlMapConfig.xml" ); factory = new SqlSessionFactoryBuilder().build(in); session = factory.openSession(); userDao = session.getMapper(IUserDao.class ) ; } @Test public void testFindAll () List<User> users = userDao.findAll(); for (User user : users) { System.out.println(user); } } @Test public void testSave () User user = new User(); user.setBirthday(new Date()); user.setAddress("BeiJing" ); user.setSex("女" ); user.setUsername("testSave" ); userDao.saveUser(user); } @Test public void testUpdate () User user = new User(); user.setId(57 ); user.setAddress("ShangHai" ); user.setBirthday(new Date()); user.setSex("女" ); user.setUsername("testUpdate" ); userDao.updateUser(user); } @Test public void testDelete () userDao.deleteUser(57 ); } @After public void destory () throws IOException session.commit(); session.close(); in.close(); } }
TIPS: mybatis 的 删除操作
mybatis 查询操作 第一步: 编写 IUserDao 类,新加 根据 id 查询用户 的方法。
IUserDao.java 1 2 3 4 5 6 7 8 9 10 11 12 13 14 15 16 17 18 19 20 21 22 23 24 25 26 27 28 29 package club.guoshizhan.dao;import club.guoshizhan.domain.User;import java.util.List;public interface IUserDao List<User> findAll () ; void saveUser (User user) void updateUser (User user) void deleteUser (Integer id) User findById (Integer userId) ; }
第二步: 编写 IUserDao.xml 文件,新加 根据 id 查询用户 的 SQL 语句(使用 select 标签的)。
IUserDao.xml 1 2 3 4 5 6 7 8 9 10 11 12 13 14 15 16 17 18 19 20 21 22 23 24 25 26 27 28 29 30 31 32 33 34 35 36 <?xml version="1.0" encoding="UTF-8"?> <!DOCTYPE mapper PUBLIC "-//mybatis.org//DTD Mapper 3.0//EN" "http://mybatis.org/dtd/mybatis-3-mapper.dtd" > <mapper namespace ="club.guoshizhan.dao.IUserDao" > <select id ="findAll" resultType ="club.guoshizhan.domain.User" > select * from user; </select > <insert id ="saveUser" parameterType ="club.guoshizhan.domain.User" > insert into user(username,birthday,sex,address) values (#{username},#{birthday},#{sex},#{address}) </insert > <update id ="updateUser" parameterType ="club.guoshizhan.domain.User" > update user set username=#{username},birthday=#{birthday},sex=#{sex},address=#{address} where id=#{id} </update > <delete id ="deleteUser" parameterType ="Integer" > delete from user where id=#{id} </delete > <select id ="findById" parameterType ="Integer" resultType ="club.guoshizhan.domain.User" > select * from user where id=#{aaabbbccc} </select > </mapper >
第三步: 编写 MybatisTest 测试类,然后执行 testFindById 方法即可。
1 2 3 4 5 6 7 8 9 10 11 12 13 14 15 16 17 18 19 20 21 22 23 24 25 26 27 28 29 30 31 32 33 34 35 36 37 38 39 40 41 42 43 44 45 46 47 48 49 50 51 52 53 54 55 56 57 58 59 60 61 62 63 64 65 66 67 68 69 70 71 72 73 74 75 76 77 78 79 80 81 82 83 84 85 86 87 88 89 90 91 92 93 94 95 96 97 98 99 100 101 102 103 package club.guoshizhan.Test;import club.guoshizhan.dao.IUserDao;import club.guoshizhan.domain.User;import org.apache.ibatis.io.Resources;import org.apache.ibatis.session.SqlSession;import org.apache.ibatis.session.SqlSessionFactory;import org.apache.ibatis.session.SqlSessionFactoryBuilder;import org.junit.After;import org.junit.Before;import org.junit.Test;import java.io.IOException;import java.io.InputStream;import java.util.Date;import java.util.List;public class MybatisTest private InputStream in; private SqlSessionFactory factory; private SqlSession session; private IUserDao userDao; @Before public void init () throws Exception in = Resources.getResourceAsStream("SqlMapConfig.xml" ); factory = new SqlSessionFactoryBuilder().build(in); session = factory.openSession(); userDao = session.getMapper(IUserDao.class ) ; } @Test public void testFindAll () List<User> users = userDao.findAll(); for (User user : users) { System.out.println(user); } } @Test public void testSave () User user = new User(); user.setBirthday(new Date()); user.setAddress("BeiJing" ); user.setSex("女" ); user.setUsername("testSave" ); userDao.saveUser(user); } @Test public void testUpdate () User user = new User(); user.setId(57 ); user.setAddress("ShangHai" ); user.setBirthday(new Date()); user.setSex("女" ); user.setUsername("testUpdate" ); userDao.updateUser(user); } @Test public void testDelete () userDao.deleteUser(57 ); } @Test public void testFindById () User user = userDao.findById(55 ); System.out.println(user); } @After public void destory () throws IOException session.commit(); session.close(); in.close(); } }
执行 testFindById 方法便可查询到结果了,这里就不截图了。那么问题来了,如果我需要模糊查询改怎么做呢?安排!!! 第一步: 编写 IUserDao 类,新加 模糊查询用户 的方法。
IUserDao.java 1 2 3 4 5 6 7 8 9 10 11 12 13 14 15 16 17 18 19 20 21 22 23 24 25 26 27 28 29 30 31 32 package club.guoshizhan.dao;import club.guoshizhan.domain.User;import java.util.List;public interface IUserDao List<User> findAll () ; void saveUser (User user) void updateUser (User user) void deleteUser (Integer id) User findById (Integer userId) ; List<User> findByName (String username) ; }
第二步: 编写 IUserDao.xml 文件,新加 模糊查询用户 的 SQL 语句(使用 select 标签的)。
IUserDao.xml 1 2 3 4 5 6 7 8 9 10 11 12 13 14 15 16 17 18 19 20 21 22 23 24 25 26 27 28 29 30 31 32 33 34 35 36 37 38 39 40 41 42 43 44 45 46 <?xml version="1.0" encoding="UTF-8"?> <!DOCTYPE mapper PUBLIC "-//mybatis.org//DTD Mapper 3.0//EN" "http://mybatis.org/dtd/mybatis-3-mapper.dtd" > <mapper namespace ="club.guoshizhan.dao.IUserDao" > <select id ="findAll" resultType ="club.guoshizhan.domain.User" > select * from user; </select > <insert id ="saveUser" parameterType ="club.guoshizhan.domain.User" > insert into user(username,birthday,sex,address) values (#{username},#{birthday},#{sex},#{address}) </insert > <update id ="updateUser" parameterType ="club.guoshizhan.domain.User" > update user set username=#{username},birthday=#{birthday},sex=#{sex},address=#{address} where id=#{id} </update > <delete id ="deleteUser" parameterType ="Integer" > delete from user where id=#{id} </delete > <select id ="findById" parameterType ="Integer" resultType ="club.guoshizhan.domain.User" > select * from user where id=#{aaabbbccc} </select > <select id ="findByName" parameterType ="String" resultType ="club.guoshizhan.domain.User" > -- 如果使用下列语句实现模糊查询,那么需要在测试类的代码中添加上 % 符号,否则查询不出来。 -- 注意:此处执行的 SQL 语句用的是占位符方式(带有预处理方式),可以防止 SQL 注入,更安全 select * from user where username like #{name} -- 如果使用下列语句实现模糊查询,那么在测试类的代码中就不需要加上 % 了。注意:此处执行的 SQL 语句用的是拼接方式,不安全 -- 下列语句中的 value 是固定的,不能写成其他的名字,这个是在源码规定好的,详情请参考 TextSqlNode 类 -- select * from user where username like '%${value}%' </select > </mapper >
第三步: 编写 MybatisTest 测试类,然后执行 testFindByName 方法即可。
MybatisTest.java 1 2 3 4 5 6 7 8 9 10 11 12 13 14 15 16 17 18 19 20 21 22 23 24 25 26 27 28 29 30 31 32 33 34 35 36 37 38 39 40 41 42 43 44 45 46 47 48 49 50 51 52 53 54 55 56 57 58 59 60 61 62 63 64 65 66 67 68 69 70 71 72 73 74 75 76 77 78 79 80 81 82 83 84 85 86 87 88 89 90 91 92 93 94 95 96 97 98 99 100 101 102 103 104 105 106 107 108 109 110 111 112 113 package club.guoshizhan.Test;import club.guoshizhan.dao.IUserDao;import club.guoshizhan.domain.User;import org.apache.ibatis.io.Resources;import org.apache.ibatis.session.SqlSession;import org.apache.ibatis.session.SqlSessionFactory;import org.apache.ibatis.session.SqlSessionFactoryBuilder;import org.junit.After;import org.junit.Before;import org.junit.Test;import java.io.IOException;import java.io.InputStream;import java.util.Date;import java.util.List;public class MybatisTest private InputStream in; private SqlSessionFactory factory; private SqlSession session; private IUserDao userDao; @Before public void init () throws Exception in = Resources.getResourceAsStream("SqlMapConfig.xml" ); factory = new SqlSessionFactoryBuilder().build(in); session = factory.openSession(); userDao = session.getMapper(IUserDao.class ) ; } @Test public void testFindAll () List<User> users = userDao.findAll(); for (User user : users) { System.out.println(user); } } @Test public void testSave () User user = new User(); user.setBirthday(new Date()); user.setAddress("BeiJing" ); user.setSex("女" ); user.setUsername("testSave" ); userDao.saveUser(user); } @Test public void testUpdate () User user = new User(); user.setId(57 ); user.setAddress("ShangHai" ); user.setBirthday(new Date()); user.setSex("女" ); user.setUsername("testUpdate" ); userDao.updateUser(user); } @Test public void testDelete () userDao.deleteUser(57 ); } @Test public void testFindById () User user = userDao.findById(55 ); System.out.println(user); } @Test public void testFindByName () List<User> users = userDao.findByName("%王%" ); for (User user : users) { System.out.println(user); } } @After public void destory () throws IOException session.commit(); session.close(); in.close(); } }
TIPS: mybatis 的 查询操作
mybatis 的参数和返回值 mybatis 的参数 我们先看如下代码,了解一下 mybatis 的参数位置:
1 2 3 <update id ="updateUser" parameterType ="club.guoshizhan.domain.User" > update user set username=#{username},birthday=#{birthday},sex=#{sex},address=#{address} where id=#{id} </update >
在上述代码中,parameterType 就是 mybatis 的参数类型,它的值有多种类型。
1 2 3 4 5 6 7 8 9 10 11 12 13 14 15 16 + 基本类型 + 引用类型 + 实体类型(POJO 实体类) + POJO 的包装类 + 它是通过对象的取值方法来获取数据。在写法上把 get 给省略了。 + 比如:我们获取用户的名称 + 类中的写法:user.getUsername(); + OGNL 表达式写法:user.username + mybatis 中为什么能直接写 username,而不用 user. 呢?因为在 parameterType 中已经提供了属性所属的类,所以此时不需要写对象名
开发中通过 POJO 传递查询条件,查询条件是综合的查询条件, 使用 POJO 包装对象(POJO 类中包含 POJO)传递输入参数。 根据用户名查询用户信息,查询条件放到 QueryVo 的 user 属性中。
第一步: 在 domain 包下新建 QueryVo 类。
QueryVo.java 1 2 3 4 5 6 7 8 9 10 11 12 13 14 15 16 17 18 19 20 package club.guoshizhan.domain;public class QueryVo private User user; public User getUser () return user; } public void setUser (User user) this .user = user; } }
第二步: 编写 IUserDao 类,新加 QueryVo 中的条件查询用户 的方法。
IUserDao.java 1 2 3 4 5 6 7 8 9 10 11 12 13 14 15 16 17 18 19 20 21 22 23 24 25 26 27 28 29 30 31 32 33 34 35 36 package club.guoshizhan.dao;import club.guoshizhan.domain.QueryVo;import club.guoshizhan.domain.User;import java.util.List;public interface IUserDao List<User> findAll () ; void saveUser (User user) void updateUser (User user) void deleteUser (Integer id) User findById (Integer userId) ; List<User> findByName (String username) ; List<User> findByVo (QueryVo vo) ; }
第三步: 把以下代码加入到 IUserDao.xml 文件的 mapper 标签内。
IUserDao.xml 1 2 3 4 <select id ="findByVo" parameterType ="club.guoshizhan.domain.QueryVo" resultType ="club.guoshizhan.domain.User" > select * from user where username like #{user.username} </select >
第四步: 把以下的测试代码加入到 MybatisTest 类中,然后运行即可。
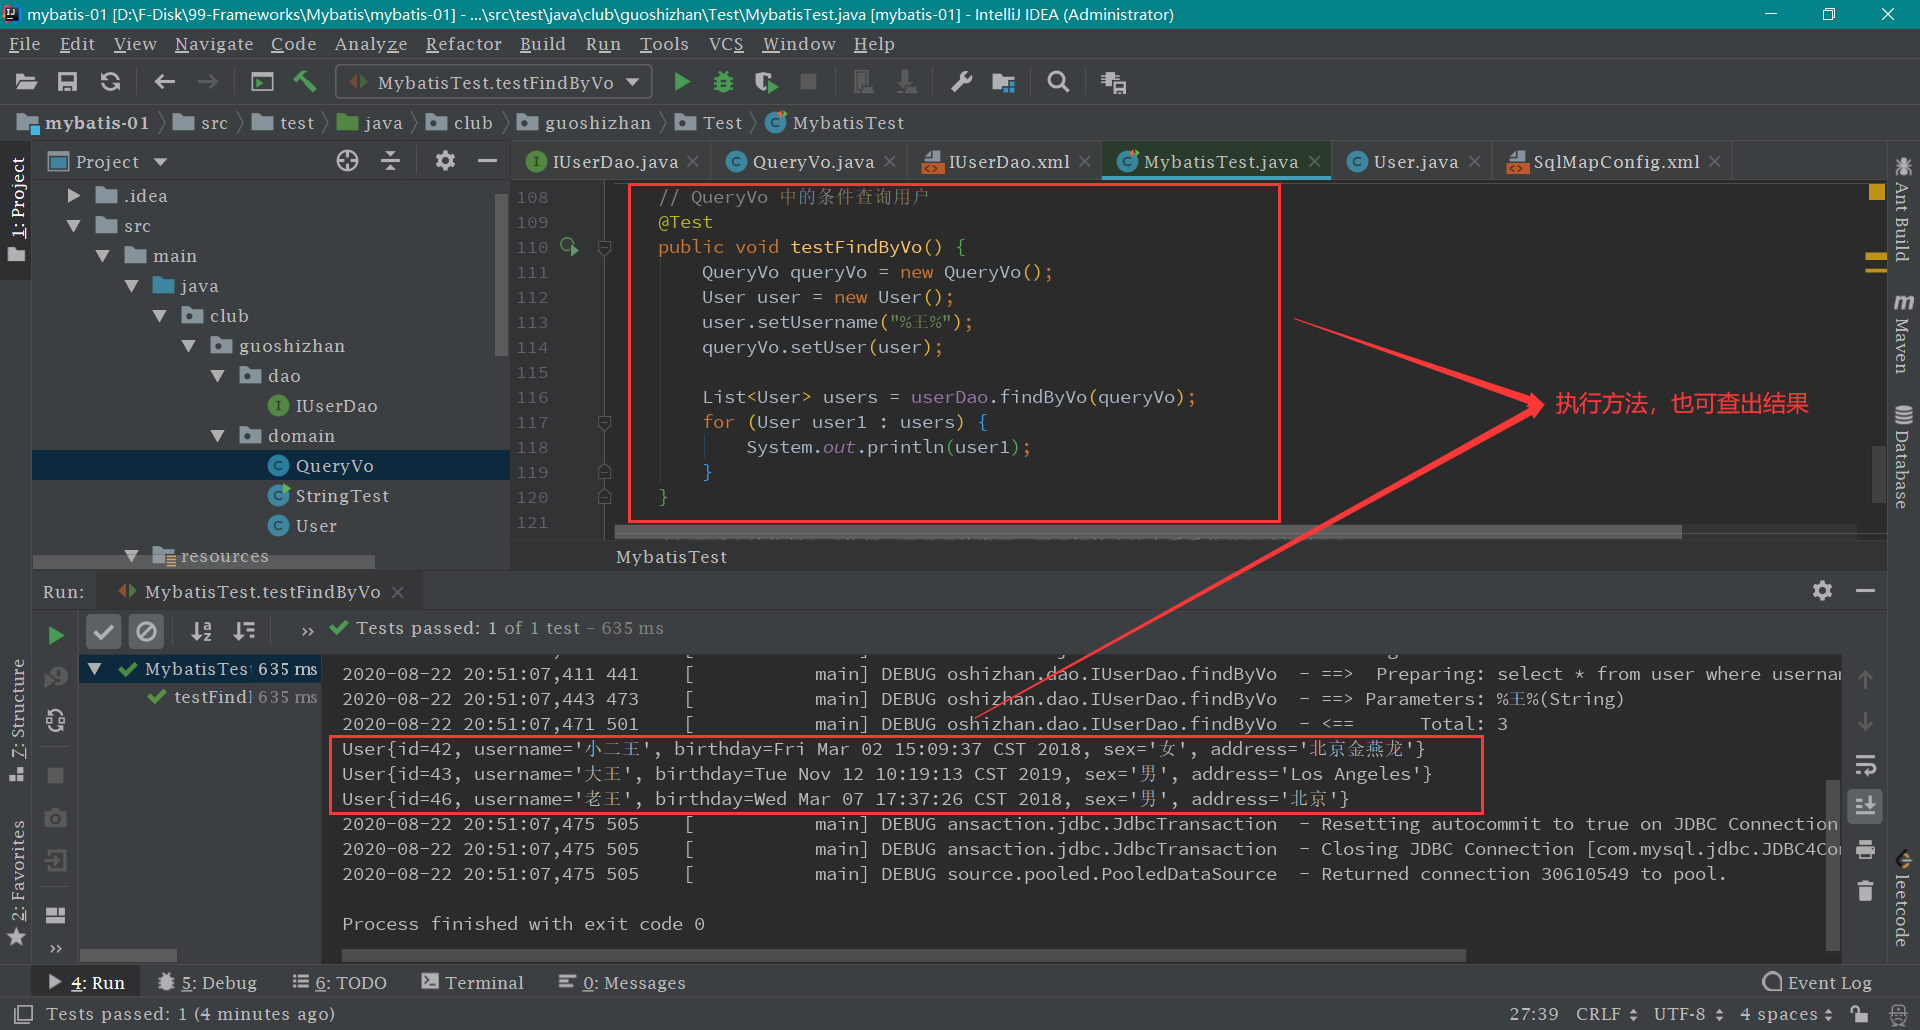
MybatisTest.java 1 2 3 4 5 6 7 8 9 10 11 12 13 @Test public void testFindByVo () QueryVo queryVo = new QueryVo(); User user = new User(); user.setUsername("%王%" ); queryVo.setUser(user); List<User> users = userDao.findByVo(queryVo); for (User user1 : users) { System.out.println(user1); } }
第五步: 执行 testFindByVo 方法。
TIPS: mybatis 的参数
mybatis 的返回值 我们先看如下代码,了解一下 mybatis 的返回值位置:
1 2 3 <select id ="findAll" resultType ="club.guoshizhan.domain.User" > select * from user; </select >
在上述代码中,resultType 就是 mybatis 的返回值类型,它的值有多种类型。
1 2 3 4 5 6 7 8 9 + 基本类型 + 引用类型 + 实体类型(POJO 实体类) + 实体类型列表(说白了就是集合。例如 List<User>)
在我们编写实体类 User 时,我们需要把 User 类的变量名和数据库中的字段名保持一致。那么问题来了,如果不一致,会有什么后果呢?
User.java 1 2 3 4 5 6 7 8 9 10 11 12 13 14 15 16 17 18 19 20 21 22 23 24 25 26 27 28 29 30 31 32 33 34 35 36 37 38 39 40 41 42 43 44 45 46 47 48 49 50 51 52 53 54 55 56 57 58 59 60 61 62 63 64 65 66 67 68 package club.guoshizhan.domain;import java.io.Serializable;import java.util.Date;public class User implements Serializable private Integer userId; private String userName; private Date userBirthday; private String userSex; private String userAddress; public Integer getUserId () return userId; } public void setUserId (Integer userId) this .userId = userId; } public String getUserName () return userName; } public void setUserName (String userName) this .userName = userName; } public Date getUserBirthday () return userBirthday; } public void setUserBirthday (Date userBirthday) this .userBirthday = userBirthday; } public String getUserSex () return userSex; } public void setUserSex (String userSex) this .userSex = userSex; } public String getUserAddress () return userAddress; } public void setUserAddress (String userAddress) this .userAddress = userAddress; } @Override public String toString () return "User{" + "userId=" + userId + ", userName='" + userName + '\'' + ", userBirthday=" + userBirthday + ", userSex='" + userSex + '\'' + ", userAddress='" + userAddress + '\'' + '}' ; } }
当我们修改完之后,测试类就报错了。这个没有关系,修改一下就好了(自行修改),这个错误是可以看见的错误。那么不可见的错误出现在哪呢?它在 IUserDao.xml 文件中。以下将以文件中的部分代码举例。
1 2 3 4 5 6 7 8 9 <insert id ="saveUser" parameterType ="club.guoshizhan.domain.User" > <selectKey keyProperty ="id" keyColumn ="id" resultType ="Integer" order ="AFTER" > select last_insert_id(); </selectKey > insert into user(username,birthday,sex,address) values (#{username},#{birthday},#{sex},#{address}) </insert >
上述介绍完之后,我们就修改一下 IUserDao.xml 文件(修改部分,其他照着例子完成修改)。
1 2 3 4 5 6 7 8 <insert id ="saveUser" parameterType ="club.guoshizhan.domain.User" > <selectKey keyProperty ="userId" keyColumn ="id" resultType ="Integer" order ="AFTER" > select last_insert_id(); </selectKey > insert into user(username,birthday,sex,address) values (#{userName},#{userBirthday},#{userSex},#{userAddress}) </insert >
上述做了局部修改,其他修改都差不多,我就不过多讲述。修改完成后去测试类进行测试,发现了问题: 增删改的测试没有问题。查询出问题。查询结果不能封装到对象里面,只有 userName 一个属性可以封装成功,其他属性都为 null。
问题的原因: 之所以 userName 有值,其他属性没有值,原因有两个:第一,MySQL 在 windows 中不区分大小写(如果在 Linux 中,userName 也为 null,因为 Linux 中 MySQL 严格区分大小写)。第二,实体类属性和数据库字段需要对的上才可封装。
问题的解决方案一: 我们可以通过起别名的方式进行封装(在 IUserDao.xml 中操作)。
1 2 3 <select id ="findAll" resultType ="club.guoshizhan.domain.User" > select id as userId,username As userName,birthday as userBirthday,address as userAddress,sex as userSex from user; </select >
问题的解决方案二: 我们还可以通过配置的方式进行封装(在 IUserDao.xml 中操作)。
1 2 3 4 5 6 7 8 9 10 11 12 13 14 15 16 <resultMap id ="userMap" type ="club.guoshizhan.domain.User" > <id property ="userId" column ="id" > </id > <result property ="userName" column ="username" > </result > <result property ="userSex" column ="sex" > </result > <result property ="userBirthday" column ="birthday" > </result > <result property ="userAddress" column ="address" > </result > </resultMap > <select id ="findAll" resultMap ="userMap" > select * from user; </select >
上述两种解决方案都可以解决封装不成功的问题 这两种方案各有利弊: 配置的方式效率不如起别名的高,但是对于代码的维护和修改,配置的方式是更方便的。
TIPS: mybatis 的返回值
mybatis 自定义 dao 实现类 上述的 mybatis 的修改操作完成之后,把代码都复原一下(复原到 mybatis 的返回值这一小结之前),这便于以下的操作。 mybatis 是使用代理 dao 的方式实现增删改查操作,那如果不使用这种方式,而是我们自己写实现类,那该怎么做呢?
第一步: 查看我们的 IUserDao 接口。
IUserDao.java 1 2 3 4 5 6 7 8 9 10 11 12 13 14 15 16 17 18 19 20 21 22 23 24 25 26 27 28 29 30 31 32 package club.guoshizhan.dao;import club.guoshizhan.domain.User;import java.util.List;public interface IUserDao List<User> findAll () ; void saveUser (User user) void updateUser (User user) void deleteUser (Integer id) User findById (Integer userId) ; List<User> findByName (String username) ; }
第二步: 在 dao 包下新建 IUserDao 接口的实现类 UserDaoImpl ,这个就是我们的自定义实现类。
UserDaoImpl.java 1 2 3 4 5 6 7 8 9 10 11 12 13 14 15 16 17 18 19 20 21 22 23 24 25 26 27 28 29 30 31 32 33 34 35 36 37 38 39 40 41 42 43 44 45 46 47 48 49 50 51 52 53 54 55 56 57 58 59 60 61 62 63 64 65 66 67 68 69 70 71 72 73 74 75 76 77 78 79 80 81 82 83 84 85 86 87 88 89 90 91 package club.guoshizhan.dao;import club.guoshizhan.domain.User;import org.apache.ibatis.session.SqlSession;import org.apache.ibatis.session.SqlSessionFactory;import java.util.List;public class UserDaoImpl implements IUserDao private SqlSessionFactory factory; public UserDaoImpl (SqlSessionFactory factory) this .factory = factory; } @Override public List<User> findAll () SqlSession session = factory.openSession(); List<User> user = session.selectList("club.guoshizhan.dao.IUserDao.findAll" ); session.close(); return user; } @Override public void saveUser (User user) SqlSession session = factory.openSession(); session.insert("club.guoshizhan.dao.IUserDao.saveUser" , user); session.commit(); session.close(); } @Override public void updateUser (User user) SqlSession session = factory.openSession(); session.update("club.guoshizhan.dao.IUserDao.updateUser" , user); session.commit(); session.close(); } @Override public void deleteUser (Integer id) SqlSession session = factory.openSession(); session.delete("club.guoshizhan.dao.IUserDao.deleteUser" , id); session.commit(); session.close(); } @Override public User findById (Integer userId) SqlSession session = factory.openSession(); User user = session.selectOne("club.guoshizhan.dao.IUserDao.findById" , userId); session.close(); return user; } @Override public List<User> findByName (String username) SqlSession session = factory.openSession(); List<User> user = session.selectList("club.guoshizhan.dao.IUserDao.findByName" , username); session.close(); return user; } }
第三步: 查看我们的配置文件 IUserDao.xml ,看看是否编写正确
IUserDao.xml 1 2 3 4 5 6 7 8 9 10 11 12 13 14 15 16 17 18 19 20 21 22 23 24 25 26 27 28 29 30 31 32 33 34 35 36 37 38 39 40 41 42 43 44 45 46 47 <?xml version="1.0" encoding="UTF-8"?> <!DOCTYPE mapper PUBLIC "-//mybatis.org//DTD Mapper 3.0//EN" "http://mybatis.org/dtd/mybatis-3-mapper.dtd" > <mapper namespace ="club.guoshizhan.dao.IUserDao" > <select id ="findAll" resultType ="club.guoshizhan.domain.User" > select * from user; </select > <insert id ="saveUser" parameterType ="club.guoshizhan.domain.User" > <selectKey keyProperty ="id" keyColumn ="id" resultType ="Integer" order ="AFTER" > select last_insert_id(); </selectKey > insert into user(username,birthday,sex,address) values (#{username},#{birthday},#{sex},#{address}) </insert > <update id ="updateUser" parameterType ="club.guoshizhan.domain.User" > update user set username=#{username},birthday=#{birthday},sex=#{sex},address=#{address} where id=#{id} </update > <delete id ="deleteUser" parameterType ="Integer" > delete from user where id=#{id} </delete > <select id ="findById" parameterType ="Integer" resultType ="club.guoshizhan.domain.User" > select * from user where id=#{aaabbbccc} </select > <select id ="findByName" parameterType ="String" resultType ="club.guoshizhan.domain.User" > -- 如果使用下列语句实现模糊查询,那么 % 需要在测试类的代码中添加上,否则查询不出来 -- 注意:此处执行的 SQL 语句用的是占位符方式,可以防止 SQL 注入,更安全 select * from user where username like #{name} </select > </mapper >
第四步: 编写我们的 MybatisTest 测试类(此类在 init 方法和 destory 方法中稍有改动)。
MybatisTest.java 1 2 3 4 5 6 7 8 9 10 11 12 13 14 15 16 17 18 19 20 21 22 23 24 25 26 27 28 29 30 31 32 33 34 35 36 37 38 39 40 41 42 43 44 45 46 47 48 49 50 51 52 53 54 55 56 57 58 59 60 61 62 63 64 65 66 67 68 69 70 71 72 73 74 75 76 77 78 79 80 81 82 83 84 85 86 87 88 89 90 91 92 93 94 95 96 97 98 99 100 101 102 103 104 105 106 107 108 109 package club.guoshizhan.Test;import club.guoshizhan.dao.IUserDao;import club.guoshizhan.dao.UserDaoImpl;import club.guoshizhan.domain.User;import org.apache.ibatis.io.Resources;import org.apache.ibatis.session.SqlSessionFactory;import org.apache.ibatis.session.SqlSessionFactoryBuilder;import org.junit.After;import org.junit.Before;import org.junit.Test;import java.io.IOException;import java.io.InputStream;import java.util.Date;import java.util.List;public class MybatisTest private InputStream in; private IUserDao userDao; @Before public void init () throws Exception in = Resources.getResourceAsStream("SqlMapConfig.xml" ); SqlSessionFactory factory = new SqlSessionFactoryBuilder().build(in); userDao = new UserDaoImpl(factory); } @Test public void testFindAll () List<User> users = userDao.findAll(); for (User user : users) { System.out.println(user); } } @Test public void testSave () User user = new User(); user.setBirthday(new Date()); user.setAddress("Java" ); user.setSex("女" ); user.setUsername("testSave" ); System.out.println("保存操作之前" + user); userDao.saveUser(user); System.out.println("保存操作之后" + user); } @Test public void testUpdate () User user = new User(); user.setId(67 ); user.setAddress("ShangHai" ); user.setBirthday(new Date()); user.setSex("女" ); user.setUsername("testUpdate" ); userDao.updateUser(user); } @Test public void testDelete () userDao.deleteUser(68 ); } @Test public void testFindById () User user = userDao.findById(55 ); System.out.println(user); } @Test public void testFindByName () List<User> users = userDao.findByName("%王%" ); for (User user : users) { System.out.println(user); } } @After public void destory () throws IOException in.close(); } }
TIPS: 运行每一个方法,结果都是一样的(我的没有报错,和原来完全一样),这里就不截图了。自定义 dao 实现类
mybatis 的基本配置 properties 标签 properties 标签主要用于加载配置(例如数据库的配置文件),使用起来更为灵活。 propertis 标签 mybatis 的配置文件(SqlMapConfig.xml)
SqlMapConfig.xml 1 2 3 4 5 6 7 8 9 10 11 12 13 14 15 16 17 18 19 20 21 22 23 24 25 26 27 28 29 30 <?xml version="1.0" encoding="UTF-8"?> <!DOCTYPE configuration PUBLIC "-//mybatis.org//DTD Config 3.0//EN" "http://mybatis.org/dtd/mybatis-3-config.dtd" > <configuration > <environments default ="mysql" > <environment id ="mysql" > <transactionManager type ="JDBC" > </transactionManager > <dataSource type ="POOLED" > <property name ="driver" value ="com.mysql.jdbc.Driver" /> <property name ="url" value ="jdbc:mysql://localhost:3306/eesy_mybatis" /> <property name ="username" value ="root" /> <property name ="password" value ="root" /> </dataSource > </environment > </environments > <mappers > <mapper resource ="club/guoshizhan/dao/IUserDao.xml" /> </mappers > </configuration >
看完上述配置之后,我们使用 properties 标签 改造一下(用法和详情都写在注释中了)。
SqlMapConfig.xml 1 2 3 4 5 6 7 8 9 10 11 12 13 14 15 16 17 18 19 20 21 22 23 24 25 26 27 28 29 30 31 32 33 34 <?xml version="1.0" encoding="UTF-8"?> <!DOCTYPE configuration PUBLIC "-//mybatis.org//DTD Config 3.0//EN" "http://mybatis.org/dtd/mybatis-3-config.dtd" > <configuration > <properties > <property name ="driver" value ="com.mysql.jdbc.Driver" /> <property name ="url" value ="jdbc:mysql://localhost:3306/eesy_mybatis" /> <property name ="username" value ="root" /> <property name ="password" value ="root" /> </properties > <environments default ="mysql" > <environment id ="mysql" > <transactionManager type ="JDBC" > </transactionManager > <dataSource type ="POOLED" > <property name ="driver" value ="${driver}" /> <property name ="url" value ="${url}" /> <property name ="username" value ="${username}" /> <property name ="password" value ="${password}" /> </dataSource > </environment > </environments > <mappers > <mapper resource ="club/guoshizhan/dao/IUserDao.xml" /> </mappers > </configuration >
配置完后,我们去测试类执行各种方法,也是一样可以的。但是,有没有发现, properties 标签不是多此一举吗?的确,如果像上述配置那样,那就是多此一举。
第一步: 在 resources 目录下新建 jdbcConfig.properties 数据库配置文件,把以下代码复制到里面:
jdbcConfig.properties 1 2 3 4 5 jdbc.driver =com.mysql.jdbc.Driver jdbc.url =jdbc:mysql://localhost:3306/eesy_mybatis jdbc.username =root jdbc.password =root
第二步: 重新编写 SqlMapConfig.xml 配置文件(properties 标签的用法都在里面)。
SqlMapConfig.xml 1 2 3 4 5 6 7 8 9 10 11 12 13 14 15 16 17 18 19 20 21 22 23 24 25 26 27 28 29 30 31 32 33 34 35 36 37 38 39 40 41 42 43 <?xml version="1.0" encoding="UTF-8"?> <!DOCTYPE configuration PUBLIC "-//mybatis.org//DTD Config 3.0//EN" "http://mybatis.org/dtd/mybatis-3-config.dtd" > <configuration > <properties resource ="jdbcConfig.properties" > </properties > <environments default ="mysql" > <environment id ="mysql" > <transactionManager type ="JDBC" > </transactionManager > <dataSource type ="POOLED" > <property name ="driver" value ="${jdbc.driver}" /> <property name ="url" value ="${jdbc.url}" /> <property name ="username" value ="${jdbc.username}" /> <property name ="password" value ="${jdbc.password}" /> </dataSource > </environment > </environments > <mappers > <mapper resource ="club/guoshizhan/dao/IUserDao.xml" /> </mappers > </configuration >
TIPS: 最后,我们只需要执行测试类进行测试即可。properties 标签
typeAliases 标签 typeAliases 标签主要用于起别名,方便我们的代码编写,从而提高效率。
1 2 3 4 5 6 7 8 9 <update id ="updateUser" parameterType ="club.guoshizhan.domain.User" > update user set username=#{username},birthday=#{birthday},sex=#{sex},address=#{address} where id=#{id} </update > <delete id ="deleteUser" parameterType ="Integer" > delete from user where id=#{id} </delete >
那么我们想给的实体类指定别名怎么做?
1 2 3 4 5 6 7 8 9 10 11 12 13 14 15 16 17 18 19 20 21 22 23 24 25 26 27 28 29 30 31 32 33 34 <?xml version="1.0" encoding="UTF-8"?> <!DOCTYPE configuration PUBLIC "-//mybatis.org//DTD Config 3.0//EN" "http://mybatis.org/dtd/mybatis-3-config.dtd" > <configuration > <properties resource ="jdbcConfig.properties" > </properties > <typeAliases > <typeAlias type ="club.guoshizhan.domain.User" alias ="User" > </typeAlias > </typeAliases > <environments default ="mysql" > <environment id ="mysql" > <transactionManager type ="JDBC" > </transactionManager > <dataSource type ="POOLED" > <property name ="driver" value ="${jdbc.driver}" /> <property name ="url" value ="${jdbc.url}" /> <property name ="username" value ="${jdbc.username}" /> <property name ="password" value ="${jdbc.password}" /> </dataSource > </environment > </environments > <mappers > <mapper resource ="club/guoshizhan/dao/IUserDao.xml" /> </mappers > </configuration >
配置完成之后,我们再编写我们的 IUserDao.xml 的部分代码(起完别名之后,参数类型可以用别名,也可以不用)。
1 2 3 4 <update id ="updateUser" parameterType ="User" > update user set username=#{username},birthday=#{birthday},sex=#{sex},address=#{address} where id=#{id} </update >
然后我们去测试类进行测试即可(放心,没问题)。 如果我有非常非常多的实体类,一个一个的注册,那岂不是超级耗时间?
1 2 3 4 5 6 7 8 9 10 11 12 13 14 15 16 17 18 19 20 21 22 23 24 25 26 27 28 29 30 31 32 33 34 35 36 37 38 39 40 41 <?xml version="1.0" encoding="UTF-8"?> <!DOCTYPE configuration PUBLIC "-//mybatis.org//DTD Config 3.0//EN" "http://mybatis.org/dtd/mybatis-3-config.dtd" > <configuration > <properties resource ="jdbcConfig.properties" > </properties > <typeAliases > <package name ="club.guoshizhan.domain" > </package > </typeAliases > <environments default ="mysql" > <environment id ="mysql" > <transactionManager type ="JDBC" > </transactionManager > <dataSource type ="POOLED" > <property name ="driver" value ="${jdbc.driver}" /> <property name ="url" value ="${jdbc.url}" /> <property name ="username" value ="${jdbc.username}" /> <property name ="password" value ="${jdbc.password}" /> </dataSource > </environment > </environments > <mappers > <package name ="club.guoshizhan.dao" > </package > </mappers > </configuration >
TIPS: 最后,我们只需要执行测试类进行测试即可。typeAliases 标签
mybatis 连接池 连接池概念和优点 连接池概念: 连接池其实就是一个容器(集合),存放数据库连接的容器。 用户访问完之后,会将连接对象归还给容器。
连接池的好处:
1、节约资源(可重复利用)
2、用户访问高效(减少了我们获取连接所消耗的时间)
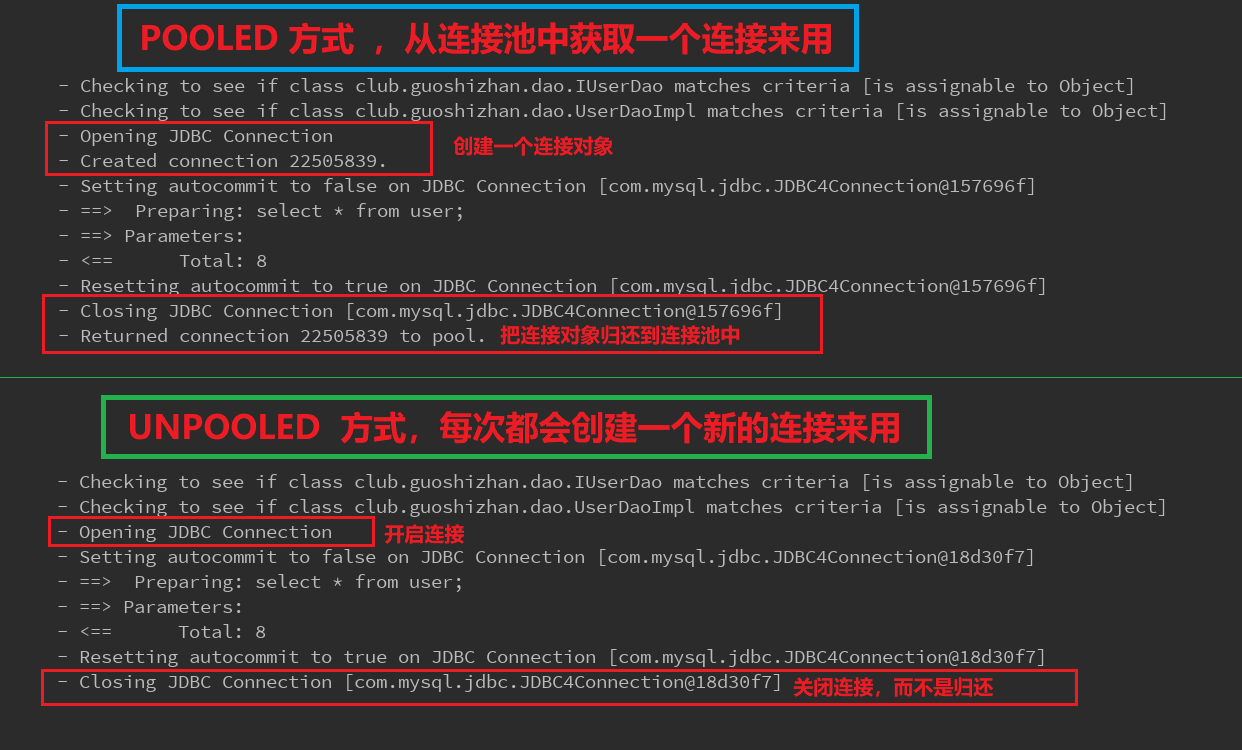
mybatis 连接池的三种配置 mybatis 连接池 提供了 3 种方式的配置,
1 2 3 4 5 6 7 8 9 10 11 12 13 + 在主配置文件 SqlMapConfig.xml 中的 dataSource 标签中,type 属性就是表示采用何种连接池方式。 + POOLED 采用传统的 javax.sql.DataSource 规范中的连接池,mybatis 中有针对规范的实现 + UNPOOLED 采用传统的获取连接的方式,虽然也实现 Javax.sql.DataSource 接口,但是并没有使用池的思想。 + JNDI 采用服务器提供的 JNDI 技术实现,来获取 DataSource 对象,不同的服务器所能拿到 DataSource 是不一样。
接下来,我们使用 POOLED 方式进行相关测试(就是对 SqlMapConfig.xml 中的 dataSource 标签进行修改)。
1 2 3 4 5 6 7 8 <dataSource type ="POOLED" > <property name ="driver" value ="${jdbc.driver}" /> <property name ="url" value ="${jdbc.url}" /> <property name ="username" value ="${jdbc.username}" /> <property name ="password" value ="${jdbc.password}" /> </dataSource >
经过上述操作后,我们来对比一下上述两种方式的不同。
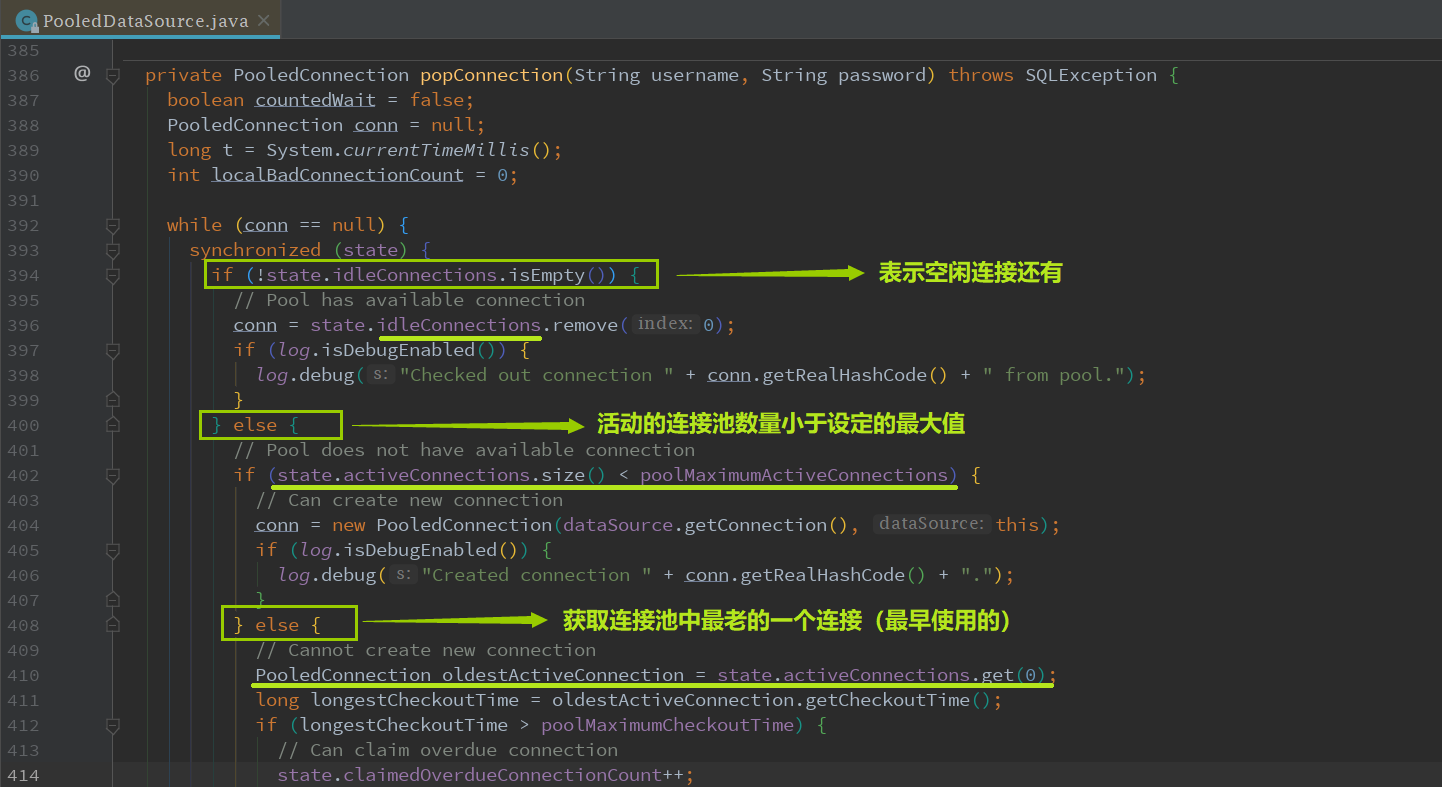
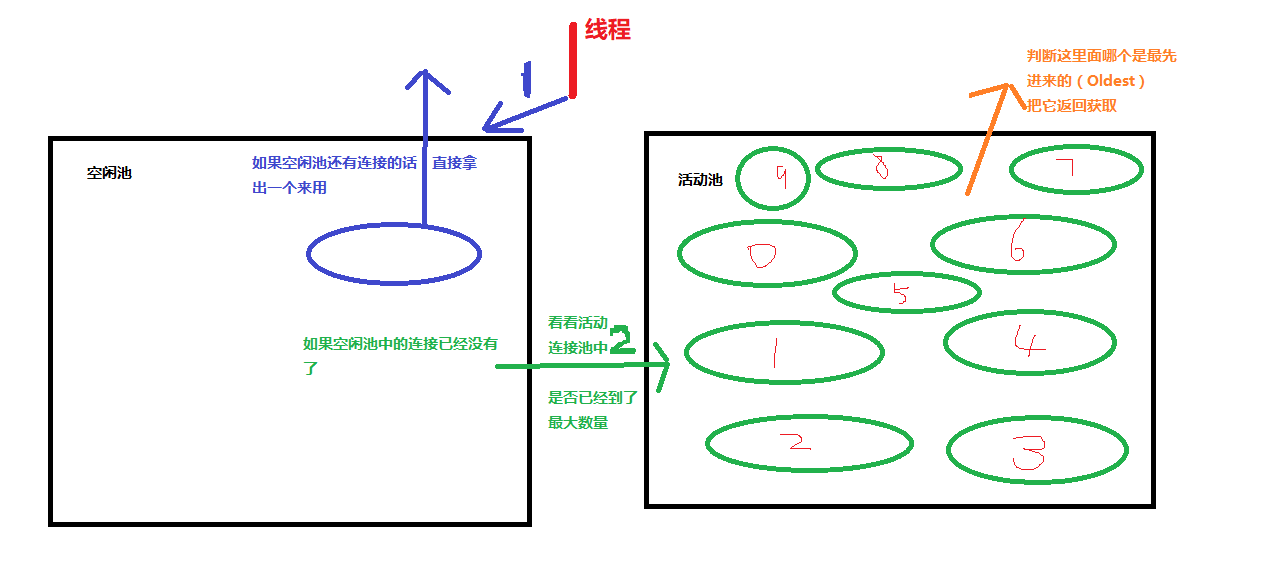
POOLED 方式 的源码分析
TIPS: 一般情况下,我们都是使用 POOLED 的配置方式。
mybatis 中的事务 学习 MySQL 的时候就已经学过事务了,所以这里只是简单的概述一下。
1 2 3 4 5 6 7 8 9 10 11 12 13 + 1、什么是事务 + 2、事务的四大特性 ACID + 3、不考虑隔离性会产生的 3 个问题 + 4、解决办法:四种隔离级别 + SqlSession session = factory.openSession(true);
mybatis 的动态 SQL 动态 SQL 语句都是和查询相关的。 这些条件便需要我们的动态 SQL 去完成(以后学习 mybatisPlus 的时候,wrapper 也可以实现条件查询)。所以,动态 SQL 是用来做 多条件查询 的。接着往下看!!!
if 标签 if 标签 根据实体类的不同取值,使用不同的 SQL 语句来进行查询,从而实现了多条件的综合查询。
第一步: 编写 IUserDao 类,新加 根据传入的条件进行查询 的方法。
IUserDao.java 1 2 3 4 5 6 7 8 9 10 11 12 13 14 15 16 17 18 19 20 21 22 23 24 25 26 package club.guoshizhan.dao;import club.guoshizhan.domain.User;import java.util.List;public interface IUserDao List<User> findAll () ; User findById (Integer userId) ; List<User> findByName (String username) ; List<User> findByCondition (User user) ; }
第二步: 编写 IUserDaoImpl 类,重写 根据传入的条件进行查询 的方法。
IUserDaoImpl.java 1 2 3 4 5 6 7 8 9 10 @Override public List<User> findByCondition (User user) SqlSession session = factory.openSession(); List<User> list = session.selectList("club.guoshizhan.dao.IUserDao.findByCondition" , user); session.close(); return list; }
第三步: 编写 IUserDao.xml 配置文件,新加如下代码(里面就是 if 标签 的用法)。
IUserDao.xml 1 2 3 4 5 6 7 8 9 10 11 <select id ="findByCondition" parameterType ="user" resultType ="club.guoshizhan.domain.User" > select * from user where 1=1 <if test ="username != null" > and username like #{username} </if > <if test ="sex != null" > and sex = #{sex} </if > </select >
第四步: 编写测试类代码,然后执行相应的方法即可。
MybatisTest.java 1 2 3 4 5 6 7 8 9 10 11 12 @Test public void testFindByCondition () User user = new User(); user.setUsername("%王%" ); user.setSex("男" ); List<User> users = userDao.findByCondition(user); for (User user1 : users) { System.out.println(user1); } }
执行测试代码中的 testFindByCondition 方法, (注意结果中的 SQL 语句)
1 2 3 4 5 6 7 8 9 10 11 2020-08-23 22:34:07,143 308 [ main] DEBUG .apache.ibatis.io.ResolverUtil - Checking to see if class club.guoshizhan.dao.IUserDao matches criteria [is assignable to Object] 2020-08-23 22:34:07,146 311 [ main] DEBUG .apache.ibatis.io.ResolverUtil - Checking to see if class club.guoshizhan.dao.UserDaoImpl matches criteria [is assignable to Object] 2020 -08 -23 22 :34 :07 ,426 591 [ main] DEBUG ansaction.jdbc.JdbcTransaction - Opening JDBC Connection2020 -08 -23 22 :34 :07 ,701 866 [ main] DEBUG ansaction.jdbc.JdbcTransaction - Setting autocommit to false on JDBC Connection [com.mysql.jdbc.JDBC4Connection@ac 3dc3]2020 -08 -23 22 :34 :07 ,708 873 [ main] DEBUG n.dao.IUserDao.findByCondition - ==> Preparing: select * from user where 1 =1 and username like ? and sex = ? 2020 -08 -23 22 :34 :07 ,739 904 [ main] DEBUG n.dao.IUserDao.findByCondition - ==> Parameters: %王%(String), 男(String)2020 -08 -23 22 :34 :07 ,765 930 [ main] DEBUG n.dao.IUserDao.findByCondition - <== Total: 2 2020 -08 -23 22 :34 :07 ,765 930 [ main] DEBUG ansaction.jdbc.JdbcTransaction - Resetting autocommit to true on JDBC Connection [com.mysql.jdbc.JDBC4Connection@ac 3dc3]2020 -08 -23 22 :34 :07 ,765 930 [ main] DEBUG ansaction.jdbc.JdbcTransaction - Closing JDBC Connection [com.mysql.jdbc.JDBC4Connection@ac 3dc3]User{id=43 , username='大王' , birthday=Tue Nov 12 10 :19 :13 CST 2019 , sex='男' , address='Los Angeles' } User{id=46 , username='老王' , birthday=Wed Mar 07 17 :37 :26 CST 2018 , sex='男' , address='北京' }
where 标签 为了简化上面 where 1=1 的条件拼装,我们可以采用 where 标签 来简化开发。
IUserDao.xml 1 2 3 4 5 6 7 8 9 10 11 12 13 <select id ="findByCondition" parameterType ="user" resultType ="club.guoshizhan.domain.User" > select * from user /* 此处使用了 where 标签 */ <where > <if test ="username != null" > and username like #{username} </if > <if test ="sex != null" > and sex = #{sex} </if > </where > </select >
然后执行测试代码中的 testFindByCondition 方法, (注意结果中的 SQL 语句)
1 2 3 4 5 6 7 8 9 10 11 2020-08-23 22:46:21,752 207 [ main] DEBUG .apache.ibatis.io.ResolverUtil - Checking to see if class club.guoshizhan.dao.IUserDao matches criteria [is assignable to Object] 2020-08-23 22:46:21,752 207 [ main] DEBUG .apache.ibatis.io.ResolverUtil - Checking to see if class club.guoshizhan.dao.UserDaoImpl matches criteria [is assignable to Object] 2020 -08 -23 22 :46 :22 ,008 463 [ main] DEBUG ansaction.jdbc.JdbcTransaction - Opening JDBC Connection2020 -08 -23 22 :46 :22 ,254 709 [ main] DEBUG ansaction.jdbc.JdbcTransaction - Setting autocommit to false on JDBC Connection [com.mysql.jdbc.JDBC4Connection@1 c8530f]2020 -08 -23 22 :46 :22 ,262 717 [ main] DEBUG n.dao.IUserDao.findByCondition - ==> Preparing: select * from user WHERE username like ? and sex = ? 2020 -08 -23 22 :46 :22 ,300 755 [ main] DEBUG n.dao.IUserDao.findByCondition - ==> Parameters: %王%(String), 男(String)2020 -08 -23 22 :46 :22 ,330 785 [ main] DEBUG n.dao.IUserDao.findByCondition - <== Total: 2 2020 -08 -23 22 :46 :22 ,331 786 [ main] DEBUG ansaction.jdbc.JdbcTransaction - Resetting autocommit to true on JDBC Connection [com.mysql.jdbc.JDBC4Connection@1 c8530f]2020 -08 -23 22 :46 :22 ,331 786 [ main] DEBUG ansaction.jdbc.JdbcTransaction - Closing JDBC Connection [com.mysql.jdbc.JDBC4Connection@1 c8530f]User{id=43 , username='大王' , birthday=Tue Nov 12 10 :19 :13 CST 2019 , sex='男' , address='Los Angeles' } User{id=46 , username='老王' , birthday=Wed Mar 07 17 :37 :26 CST 2018 , sex='男' , address='北京' }
foreach 标签 现在提出一个需求:传入多个 id 查询用户信息。
1 2 SELECT * FROM USERS WHERE username LIKE '%王%' AND (id =10 OR id =89 OR id =16 )SELECT * FROM USERS WHERE username LIKE '%王%' AND id IN (10 ,89 ,16 )
根据上面的需求,问题来了:我们在进行范围查询时,就要将一个集合中的值,作为参数动态添加进来。 mybatis 将如何进行参数的传递?
第一步: 编写 QueryVo 类,新加了 ids 属性 。
QueryVo.java 1 2 3 4 5 6 7 8 9 10 11 12 13 14 15 16 17 18 19 20 21 22 23 24 25 26 27 28 29 30 31 package club.guoshizhan.domain;import java.util.List;public class QueryVo private User user; private List<Integer> ids; public List<Integer> getIds () return ids; } public void setIds (List<Integer> ids) this .ids = ids; } public User getUser () return user; } public void setUser (User user) this .user = user; } }
第二步: 编写 IUserDao 类,新加了 findUserInIds 方法。
IUserDao.java 1 2 3 4 5 6 7 8 9 10 11 12 13 14 15 16 17 18 19 20 21 22 23 24 25 26 27 28 29 30 31 32 33 34 35 36 37 38 39 package club.guoshizhan.dao;import club.guoshizhan.domain.QueryVo;import club.guoshizhan.domain.User;import java.util.List;public interface IUserDao List<User> findAll () ; void saveUser (User user) void updateUser (User user) void deleteUser (Integer id) User findById (Integer userId) ; List<User> findByName (String username) ; List<User> findByCondition (User user) ; List<User> findUserInIds (QueryVo vo) ; }
第三步: 编写 IUserDaoImpl 类,重写 findUserInIds 方法。
IUserDaoImpl.java 1 2 3 4 5 6 7 8 9 @Override public List<User> findUserInIds (QueryVo vo) SqlSession session = factory.openSession(); List<User> list = session.selectList("club.guoshizhan.dao.IUserDao.findByCondition" , vo); session.close(); return list; }
第四步: 编写 IUserDao.xml 配置文件,新加如下代码(里面就是 foreach 标签 的用法)。 代码如下:
IUserDao.xml 1 2 3 4 5 6 7 8 9 10 11 12 13 <select id ="findUserInIds" parameterType ="club.guoshizhan.domain.QueryVo" resultType ="club.guoshizhan.domain.User" > select * from user /* 此处使用了 where 标签 */ <where > <if test ="ids != null and ids.size() > 0" > /* 此处使用了 foreach 标签。如果把此行注释去掉,那么下方 open 的值是 ="and id in(" */ <foreach collection ="ids" open ="id in(" close =")" item ="aaaId" separator ="," > #{aaaId} </foreach > </if > </where > </select >
foreach 标签 的相关属性的详细介绍如下:
1 2 3 4 5 6 7 8 9 10 11 + SQL语句:select 字段 from user where id in (?) + collection: 代表要遍历的集合元素,注意编写时不要写#{} + open: 代表语句的开始部分 + close: 代表结束部分 + item: 代表遍历集合的每个元素,生成的变量名 + sperator: 代表分隔符
第五步: 编写测试类代码,然后执行相应的方法即可。
MybatisTest.java 1 2 3 4 5 6 7 8 9 10 11 12 13 14 15 @Test public void testFindUserInIds () QueryVo vo = new QueryVo(); List<Integer> list = new ArrayList<>(); list.add(42 ); list.add(43 ); list.add(46 ); vo.setIds(list); List<User> users = userDao.findUserInIds(vo); for (User user1 : users) { System.out.println(user1); } }
执行测试代码中的 testFindUserInIds 方法, (注意结果中的 SQL 语句)
1 2 3 4 5 6 7 8 9 10 11 2020-08-24 00:10:27,079 145 [ main] DEBUG .apache.ibatis.io.ResolverUtil - Checking to see if class club.guoshizhan.dao.UserDaoImpl matches criteria [is assignable to Object] 2020 -08 -24 00 :10 :27 ,244 310 [ main] DEBUG ansaction.jdbc.JdbcTransaction - Opening JDBC Connection2020 -08 -24 00 :10 :27 ,552 618 [ main] DEBUG ansaction.jdbc.JdbcTransaction - Setting autocommit to false on JDBC Connection [com.mysql.jdbc.JDBC4Connection@76 c8cd]2020 -08 -24 00 :10 :27 ,559 625 [ main] DEBUG han.dao.IUserDao.findUserInIds - ==> Preparing: select * from user WHERE id in ( ? , ? , ? ) 2020-08-24 00:10:27,589 655 [ main] DEBUG han.dao.IUserDao.findUserInIds - ==> Parameters: 42 (Integer), 43 (Integer), 46 (Integer)2020 -08 -24 00 :10 :27 ,609 675 [ main] DEBUG han.dao.IUserDao.findUserInIds - <== Total: 3 2020 -08 -24 00 :10 :27 ,610 676 [ main] DEBUG ansaction.jdbc.JdbcTransaction - Resetting autocommit to true on JDBC Connection [com.mysql.jdbc.JDBC4Connection@76 c8cd]2020 -08 -24 00 :10 :27 ,610 676 [ main] DEBUG ansaction.jdbc.JdbcTransaction - Closing JDBC Connection [com.mysql.jdbc.JDBC4Connection@76 c8cd]User{id=42 , username='小二王' , birthday=Fri Mar 02 15 :09 :37 CST 2018 , sex='女' , address='北京金燕龙' } User{id=43 , username='大王' , birthday=Tue Nov 12 10 :19 :13 CST 2019 , sex='男' , address='Los Angeles' } User{id=46 , username='老王' , birthday=Wed Mar 07 17 :37 :26 CST 2018 , sex='男' , address='北京' }
TIPS: mybatis 的动态 SQL
mybatis 的多表操作 既然需要实现多表操作,那么就必须知道表与表之间的关系。
1 2 3 4 5 6 7 8 9 10 11 + 一对多 举例:用户和订单就是一对多,一个用户可以下多个订单 + 多对一 举例:订单和用户就是多对一,多个订单可以被一个用户所支付 + 一对一 举例:一个人只能有一个身份证号,一个身份证号只能属于一个人 + 多对多 举例:一个学生可以选择多门课程,一门课程可以被多个学生选择
前期准备 要实现 多表操作 ,必须要多张表呀。所以需要先完成准备工作。
1 2 3 4 5 6 7 8 9 10 11 12 + 一个用户可以有多个账户,一个账户只能属于一个用户(多个账户也可以属于同一个用户) + 1、建立两张表:用户表,账户表。让用户表和账户表之间具备一对多的关系:需要使用外键在账户表中添加 + 2、建立两个实体类:用户实体类和账户实体类。让用户和账户的实体类能体现出来一对多的关系 + 3、建立两个配置文件。用户的配置文件和账户的配置文件 + 4、实现配置:当我们查询用户时,可以同时得到用户下所包含的账户信息;当我们查询账户时,可以同时得到账户的所属用户信息
建表语句 在 mybatis 的环境搭建 我们的用户实体类(User 类)在先前已经创建了,所以第二步操作只需要在 domain 包下建立账户实体类(Account 类),然后在 dao 包下新建对应的 dao 接口。
Account.java 1 2 3 4 5 6 7 8 9 10 11 12 13 14 15 16 17 18 19 20 21 22 23 24 25 26 27 28 29 30 31 32 33 34 35 36 37 38 39 40 41 42 43 44 45 46 47 48 49 package club.guoshizhan.domain;import java.io.Serializable;public class Account implements Serializable private Integer id; private Integer uid; private Double money; public Integer getId () return id; } public void setId (Integer id) this .id = id; } public Integer getUid () return uid; } public void setUid (Integer uid) this .uid = uid; } public Double getMoney () return money; } public void setMoney (Double money) this .money = money; } @Override public String toString () return "Account{" + "id=" + id + ", uid=" + uid + ", money=" + money + '}' ; } }
账户实体类完成之后,我们去 dao 包下新建 IAccountDao 接口。
IAccountDao.java 1 2 3 4 5 6 7 8 9 10 11 12 13 14 15 16 17 package club.guoshizhan.dao;import club.guoshizhan.domain.Account;import java.util.List;public interface IAccountDao List<Account> findAll () ; }
接口搞定之后,我们去 resources 目录下的 club/guoshizhan/dao 下新建 IAccountDao.xml 配置文件。
IAccountDao.xml 1 2 3 4 5 6 7 8 9 10 11 12 13 <?xml version="1.0" encoding="UTF-8"?> <!DOCTYPE mapper PUBLIC "-//mybatis.org//DTD Mapper 3.0//EN" "http://mybatis.org/dtd/mybatis-3-mapper.dtd" > <mapper namespace ="club.guoshizhan.dao.IAccountDao" > <select id ="findAll" resultType ="Account" > select * from account; </select > </mapper >
最后,我们编写测试类进行测试。
AccountTest.java 1 2 3 4 5 6 7 8 9 10 11 12 13 14 15 16 17 18 19 20 21 22 23 24 25 26 27 28 29 30 31 32 33 34 35 36 37 38 39 40 41 42 43 44 45 46 47 48 49 50 51 52 53 54 55 56 57 58 59 package club.guoshizhan.Test;import club.guoshizhan.dao.IAccountDao;import club.guoshizhan.domain.Account;import org.apache.ibatis.io.Resources;import org.apache.ibatis.session.SqlSession;import org.apache.ibatis.session.SqlSessionFactory;import org.apache.ibatis.session.SqlSessionFactoryBuilder;import org.junit.After;import org.junit.Before;import org.junit.Test;import java.io.IOException;import java.io.InputStream;import java.util.List;public class AccountTest private InputStream in; private IAccountDao accountDao; private SqlSession session; @Before public void init () throws Exception in = Resources.getResourceAsStream("SqlMapConfig.xml" ); SqlSessionFactory factory = new SqlSessionFactoryBuilder().build(in); session = factory.openSession(); accountDao = session.getMapper(IAccountDao.class ) ; } @Test public void testFindAll () List<Account> accounts = accountDao.findAll(); for (Account account : accounts) { System.out.println(account); } } @After public void destory () throws IOException in.close(); } }
执行上述的 testFindAll 方法, (注意 SQL 语句)
1 2 3 4 5 6 7 8 9 10 2020-08-24 13:42:32,968 261 [ main] DEBUG .apache.ibatis.io.ResolverUtil - Checking to see if class club.guoshizhan.dao.IAccountDao matches criteria [is assignable to Object] 2020-08-24 13:42:32,968 261 [ main] DEBUG .apache.ibatis.io.ResolverUtil - Checking to see if class club.guoshizhan.dao.IUserDao matches criteria [is assignable to Object] 2020-08-24 13:42:32,968 261 [ main] DEBUG .apache.ibatis.io.ResolverUtil - Checking to see if class club.guoshizhan.dao.UserDaoImpl matches criteria [is assignable to Object] 2020 -08 -24 13 :42 :33 ,189 482 [ main] DEBUG ansaction.jdbc.JdbcTransaction - Opening JDBC Connection2020 -08 -24 13 :42 :33 ,454 747 [ main] DEBUG ansaction.jdbc.JdbcTransaction - Setting autocommit to false on JDBC Connection [com.mysql.jdbc.JDBC4Connection@121 c9d6]2020 -08 -24 13 :42 :33 ,462 755 [ main] DEBUG hizhan.dao.IAccountDao.findAll - ==> Preparing: select * from account; 2020 -08 -24 13 :42 :33 ,492 785 [ main] DEBUG hizhan.dao.IAccountDao.findAll - ==> Parameters: 2020 -08 -24 13 :42 :33 ,509 802 [ main] DEBUG hizhan.dao.IAccountDao.findAll - <== Total: 2 Account{id=1 , uid=46 , money=1000.0 } Account{id=3 , uid=46 , money=2000.0 }
TIPS: 前期准备工作
一对一 那么现在就搞定 一对一 第一步: 在 domain 包下新建 AccountUser 类。
AccountUser.java 1 2 3 4 5 6 7 8 9 10 11 12 13 14 15 16 17 18 19 20 21 22 23 24 25 26 27 28 29 30 31 32 33 34 35 36 37 package club.guoshizhan.domain;public class AccountUser extends Account private String username; private String address; public String getUsername () return username; } public void setUsername (String username) this .username = username; } public String getAddress () return address; } public void setAddress (String address) this .address = address; } @Override public String toString () return super .toString().substring(0 , super .toString().length() - 1 ) + ", " + "username='" + username + '\'' + ", address='" + address + '\'' + '}' ; } }
第二步: 在 IAccountDao 接口中新加 findAllAccount 方法。
IAccountDao.java 1 2 3 4 5 6 7 8 9 10 11 12 13 14 15 16 17 18 19 20 21 package club.guoshizhan.dao;import club.guoshizhan.domain.Account;import club.guoshizhan.domain.AccountUser;import java.util.List;public interface IAccountDao List<Account> findAll () ; List<AccountUser> findAllAccount () ; }
第三步: 在 IAccountDao.xml 文件中新加如下代码:
IAccountDao.xml 1 2 3 4 <select id ="findAllAccount" resultType ="AccountUser" > SELECT a.*,u.username,u.address FROM USER u , account a WHERE a.uid = u.id </select >
第四步: 编写测试方法进行测试。
AccountTest.java 1 2 3 4 5 6 7 8 9 @Test public void testFindAllAccount () List<AccountUser> accountUsers = accountDao.findAllAccount(); for (AccountUser account : accountUsers) { System.out.println(account); } }
执行上述的 testFindAllAccount 方法, (注意 SQL 语句)
1 2 3 4 5 6 7 8 9 10 2020-08-24 14:11:00,871 252 [ main] DEBUG .apache.ibatis.io.ResolverUtil - Checking to see if class club.guoshizhan.dao.IAccountDao matches criteria [is assignable to Object] 2020-08-24 14:11:00,871 252 [ main] DEBUG .apache.ibatis.io.ResolverUtil - Checking to see if class club.guoshizhan.dao.IUserDao matches criteria [is assignable to Object] 2020-08-24 14:11:00,872 253 [ main] DEBUG .apache.ibatis.io.ResolverUtil - Checking to see if class club.guoshizhan.dao.UserDaoImpl matches criteria [is assignable to Object] 2020 -08 -24 14 :11 :01 ,116 497 [ main] DEBUG ansaction.jdbc.JdbcTransaction - Opening JDBC Connection2020 -08 -24 14 :11 :01 ,423 804 [ main] DEBUG ansaction.jdbc.JdbcTransaction - Setting autocommit to false on JDBC Connection [com.mysql.jdbc.JDBC4Connection@7f 383f]2020 -08 -24 14 :11 :01 ,430 811 [ main] DEBUG dao.IAccountDao.findAllAccount - ==> Preparing: SELECT a.*,u.username,u.address FROM USER u , account a WHERE a.uid = u.id 2020 -08 -24 14 :11 :01 ,460 841 [ main] DEBUG dao.IAccountDao.findAllAccount - ==> Parameters: 2020 -08 -24 14 :11 :01 ,480 861 [ main] DEBUG dao.IAccountDao.findAllAccount - <== Total: 2 Account{id=1 , uid=46 , money=1000.0 , username='老王' , address='北京' } Account{id=3 , uid=46 , money=2000.0 , username='老王' , address='北京' }
虽然结果是查询出来了,但是,表结构之间的关系却没有体现出来。 让实体类能够体现出表结构之间的关系。 注意:以下是 一对一 体现
第一步: 给 Account 实体类添加一个属性,从而体现表结构之间的关系。
Account.java 1 2 3 4 5 6 7 8 9 10 11 12 13 14 15 16 17 18 19 20 21 22 23 24 25 26 27 28 29 30 31 32 33 34 35 36 37 38 39 40 41 42 43 44 45 46 47 48 49 50 51 52 53 54 55 56 57 58 59 60 package club.guoshizhan.domain;import java.io.Serializable;public class Account implements Serializable private Integer id; private Integer uid; private Double money; private User user; public User getUser () return user; } public void setUser (User user) this .user = user; } public Integer getId () return id; } public void setId (Integer id) this .id = id; } public Integer getUid () return uid; } public void setUid (Integer uid) this .uid = uid; } public Double getMoney () return money; } public void setMoney (Double money) this .money = money; } @Override public String toString () return "Account{" + "id=" + id + ", uid=" + uid + ", money=" + money + '}' ; } }
第二步: 修改 IAccountDao.xml 文件重点在 查询所有账户 那里。
IAccountDao.xml 1 2 3 4 5 6 7 8 9 10 11 12 13 14 15 16 17 18 19 20 21 22 23 24 25 26 27 28 29 30 31 32 33 34 35 <?xml version="1.0" encoding="UTF-8"?> <!DOCTYPE mapper PUBLIC "-//mybatis.org//DTD Mapper 3.0//EN" "http://mybatis.org/dtd/mybatis-3-mapper.dtd" > <mapper namespace ="club.guoshizhan.dao.IAccountDao" > <resultMap id ="accountMap" type ="account" > <id property ="id" column ="aid" > </id > <result property ="uid" column ="uid" > </result > <result property ="money" column ="money" > </result > <association property ="user" column ="uid" javaType ="user" > <id property ="id" column ="id" > </id > <result property ="username" column ="username" > </result > <result property ="address" column ="address" > </result > <result property ="sex" column ="sex" > </result > <result property ="birthday" column ="birthday" > </result > </association > </resultMap > <select id ="findAll" resultMap ="accountMap" > SELECT u.*,a.id AS aid,a.uid,a.money FROM USER u,account a WHERE u.id = a.uid </select > <select id ="findAllAccount" resultType ="AccountUser" > SELECT a.*,u.username,u.address FROM USER u , account a WHERE a.uid = u.id </select > </mapper >
第三步: 修改测试类 AccountTest 中的 testFindAll 方法。
1 2 3 4 5 6 7 8 9 10 11 @Test public void testFindAll () List<Account> accounts = accountDao.findAll(); for (Account account : accounts) { System.out.println("======== 一对一表结构结果输出 ========" ); System.out.println(account); System.out.println(account.getUser()); } }
第四步: 执行上述的 testFindAll 方法,(注意 SQL 语句)
1 2 3 4 5 6 7 8 9 10 11 12 13 14 2020-08-24 15:00:58,839 154 [ main] DEBUG .apache.ibatis.io.ResolverUtil - Checking to see if class club.guoshizhan.dao.IAccountDao matches criteria [is assignable to Object] 2020-08-24 15:00:58,839 154 [ main] DEBUG .apache.ibatis.io.ResolverUtil - Checking to see if class club.guoshizhan.dao.IUserDao matches criteria [is assignable to Object] 2020-08-24 15:00:58,840 155 [ main] DEBUG .apache.ibatis.io.ResolverUtil - Checking to see if class club.guoshizhan.dao.UserDaoImpl matches criteria [is assignable to Object] 2020 -08 -24 15 :00 :58 ,974 289 [ main] DEBUG ansaction.jdbc.JdbcTransaction - Opening JDBC Connection2020 -08 -24 15 :00 :59 ,260 575 [ main] DEBUG ansaction.jdbc.JdbcTransaction - Setting autocommit to false on JDBC Connection [com.mysql.jdbc.JDBC4Connection@126f 7b2]2020 -08 -24 15 :00 :59 ,266 581 [ main] DEBUG hizhan.dao.IAccountDao.findAll - ==> Preparing: SELECT u.*,a.id AS aid,a.uid,a.money FROM USER u,account a WHERE u.id = a.uid 2020 -08 -24 15 :00 :59 ,292 607 [ main] DEBUG hizhan.dao.IAccountDao.findAll - ==> Parameters: 2020 -08 -24 15 :00 :59 ,312 627 [ main] DEBUG hizhan.dao.IAccountDao.findAll - <== Total: 2 ======== 一对一表结构结果输出 ======== Account{id=1 , uid=46 , money=1000.0 } User{id=46 , username='老王' , birthday=Wed Mar 07 17 :37 :26 CST 2018 , sex='男' , address='北京' } ======== 一对一表结构结果输出 ======== Account{id=3 , uid=46 , money=2000.0 } User{id=46 , username='老王' , birthday=Wed Mar 07 17 :37 :26 CST 2018 , sex='男' , address='北京' }
TIPS: 一对一
一对多 话不多说,现在就解决 一对多 的表结构。第一步: 给 User 实体类添加一个属性,从而体现一对多的表结构。
User.java 1 2 3 4 5 6 7 8 9 10 11 12 13 14 15 16 17 18 19 20 21 22 23 24 25 26 27 28 29 30 31 32 33 34 35 36 37 38 39 40 41 42 43 44 45 46 47 48 49 50 51 52 53 54 55 56 57 58 59 60 61 62 63 64 65 66 67 68 69 70 71 72 73 74 75 76 77 78 79 80 package club.guoshizhan.domain;import java.io.Serializable;import java.util.Date;import java.util.List;public class User implements Serializable private Integer id; private String username; private Date birthday; private String sex; private String address; private List<Account> accounts; public List<Account> getAccounts () return accounts; } public void setAccounts (List<Account> accounts) this .accounts = accounts; } @Override public String toString () return "User{" + "id=" + id + ", username='" + username + '\'' + ", birthday=" + birthday + ", sex='" + sex + '\'' + ", address='" + address + '\'' + '}' ; } public Integer getId () return id; } public void setId (Integer id) this .id = id; } public String getUsername () return username; } public void setUsername (String username) this .username = username; } public Date getBirthday () return birthday; } public void setBirthday (Date birthday) this .birthday = birthday; } public String getSex () return sex; } public void setSex (String sex) this .sex = sex; } public String getAddress () return address; } public void setAddress (String address) this .address = address; } }
第二步: 修改 IUserDao.xml 文件,把以下代码替换原来的 id="findAll" 的那部分查询代码 。
IUserDao.xml 1 2 3 4 5 6 7 8 9 10 11 12 13 14 15 16 17 18 <resultMap id ="userMap" type ="user" > <id property ="id" column ="id" > </id > <result property ="username" column ="username" > </result > <result property ="address" column ="address" > </result > <result property ="sex" column ="sex" > </result > <result property ="birthday" column ="birthday" > </result > <collection property ="accounts" ofType ="account" > <id property ="id" column ="aid" > </id > <result property ="uid" column ="uid" > </result > <result property ="money" column ="money" > </result > </collection > </resultMap > <select id ="findAll" resultMap ="userMap" > SELECT u.*,a.id as aid,a.money,a.uid FROM USER u LEFT OUTER JOIN account a ON a.uid=u.id </select >
第三步: 编写测试类 UserTest 进行测试。
1 2 3 4 5 6 7 8 9 10 11 12 13 14 15 16 17 18 19 20 21 22 23 24 25 26 27 28 29 30 31 32 33 34 35 36 37 38 39 40 41 42 43 44 45 46 47 48 49 50 51 52 53 54 55 package club.guoshizhan.Test;import club.guoshizhan.dao.IUserDao;import club.guoshizhan.domain.User;import org.apache.ibatis.io.Resources;import org.apache.ibatis.session.SqlSession;import org.apache.ibatis.session.SqlSessionFactory;import org.apache.ibatis.session.SqlSessionFactoryBuilder;import org.junit.After;import org.junit.Before;import org.junit.Test;import java.io.IOException;import java.io.InputStream;import java.util.List;public class UserTest private InputStream in; private IUserDao userDao; private SqlSession session; @Before public void init () throws Exception in = Resources.getResourceAsStream("SqlMapConfig.xml" ); SqlSessionFactory factory = new SqlSessionFactoryBuilder().build(in); session = factory.openSession(); userDao = session.getMapper(IUserDao.class ) ; } @Test public void testFindAll () List<User> users = userDao.findAll(); for (User user : users) { System.out.println("======== 一对多表结构结果输出 ========" ); System.out.println(user); System.out.println(user.getAccounts()); } } @After public void destory () throws IOException in.close(); } }
第四步: 执行 testFindAll 方法。 (注意 SQL 语句)
1 2 3 4 5 6 7 8 9 10 11 12 13 14 15 16 17 18 19 20 21 22 23 24 25 26 27 28 29 2020-08-24 15:46:09,919 184 [ main] DEBUG .apache.ibatis.io.ResolverUtil - Checking to see if class club.guoshizhan.dao.IAccountDao matches criteria [is assignable to Object] 2020-08-24 15:46:09,919 184 [ main] DEBUG .apache.ibatis.io.ResolverUtil - Checking to see if class club.guoshizhan.dao.IUserDao matches criteria [is assignable to Object] 2020-08-24 15:46:09,919 184 [ main] DEBUG .apache.ibatis.io.ResolverUtil - Checking to see if class club.guoshizhan.dao.UserDaoImpl matches criteria [is assignable to Object] 2020 -08 -24 15 :46 :10 ,087 352 [ main] DEBUG ansaction.jdbc.JdbcTransaction - Opening JDBC Connection2020 -08 -24 15 :46 :10 ,394 659 [ main] DEBUG ansaction.jdbc.JdbcTransaction - Setting autocommit to false on JDBC Connection [com.mysql.jdbc.JDBC4Connection@126f 7b2]2020 -08 -24 15 :46 :10 ,400 665 [ main] DEBUG uoshizhan.dao.IUserDao.findAll - ==> Preparing: SELECT u.*,a.id as aid,a.money,a.uid FROM USER u LEFT OUTER JOIN account a ON a.uid=u.id 2020 -08 -24 15 :46 :10 ,435 700 [ main] DEBUG uoshizhan.dao.IUserDao.findAll - ==> Parameters: 2020 -08 -24 15 :46 :10 ,465 730 [ main] DEBUG uoshizhan.dao.IUserDao.findAll - <== Total: 8 ======== 一对多表结构结果输出 ======== User{id=42 , username='小二王' , birthday=Fri Mar 02 15 :09 :37 CST 2018 , sex='女' , address='北京金燕龙' } [] ======== 一对多表结构结果输出 ======== User{id=43 , username='大王' , birthday=Tue Nov 12 10 :19 :13 CST 2019 , sex='男' , address='Los Angeles' } [] ======== 一对多表结构结果输出 ======== User{id=46 , username='老王' , birthday=Wed Mar 07 17 :37 :26 CST 2018 , sex='男' , address='北京' } [Account{id=1 , uid=46 , money=1000.0 }, Account{id=3 , uid=46 , money=2000.0 }] ======== 一对多表结构结果输出 ======== User{id=49 , username='Jack' , birthday=Mon Oct 28 09 :15 :39 CST 2019 , sex='男' , address='上海闵行' } [] ======== 一对多表结构结果输出 ======== User{id=51 , username='Lisa' , birthday=Mon Oct 28 09 :17 :31 CST 2019 , sex='女' , address='广东佛山' } [] ======== 一对多表结构结果输出 ======== User{id=52 , username='Tom' , birthday=Mon Oct 28 10 :26 :42 CST 2019 , sex='男' , address='广东佛山' } [] ======== 一对多表结构结果输出 ======== User{id=54 , username='Bob' , birthday=Tue Nov 12 10 :21 :41 CST 2019 , sex='男' , address='广东佛山' } []
TIPS: 一对多
多对多 为了实现 多对多 操作,我们需要新建一个工程(主要是为了操作方便,排除一些不必要的干扰)。 多对多工程 。下载工程之后,我们来看一下需要做的准备工作。如下:
1 2 3 4 5 6 7 8 9 10 11 12 + 一个用户可以有多个角色,一个角色也可以赋予多个用户 + 1、建立两张表:用户表,角色表。让用户表和角色表具有多对多的关系。需要使用中间表,中间表中包含各自的主键,在中间表中是外键。 + 2、建立两个实体类:用户实体类和角色实体类。让用户和角色的实体类能体现出来多对多的关系(各自包含对方一个集合引用) + 3、建立两个配置文件。用户的配置文件和角色的配置文件 + 4、实现配置:当我们查询用户时,可以同时得到用户所包含的角色信息;当我们查询角色时,可以同时得到角色的所赋予的用户信息
建表语句 在 mybatis 的环境搭建 我们的用户实体类(User 类)在工程中已经创好了,所以第二步操作只需要在 domain 包下建立角色实体类(Role 类),然后在 dao 包下新建对应的 dao 接口。
Role.java 1 2 3 4 5 6 7 8 9 10 11 12 13 14 15 16 17 18 19 20 21 22 23 24 25 26 27 28 29 30 31 32 33 34 35 36 37 38 39 40 41 42 43 44 45 46 47 48 49 50 51 52 53 54 55 56 57 58 59 60 61 62 package club.guoshizhan.domain;import java.io.Serializable;import java.util.List;public class Role implements Serializable private Integer roleId; private String roleName; private String roleDesc; private List<User> users; public List<User> getUsers () return users; } public void setUsers (List<User> users) this .users = users; } public Integer getRoleId () return roleId; } public void setRoleId (Integer roleId) this .roleId = roleId; } public String getRoleName () return roleName; } public void setRoleName (String roleName) this .roleName = roleName; } public String getRoleDesc () return roleDesc; } public void setRoleDesc (String roleDesc) this .roleDesc = roleDesc; } @Override public String toString () return "Role{" + "roleId=" + roleId + ", roleName='" + roleName + '\'' + ", roleDesc='" + roleDesc + '\'' + '}' ; } }
角色实体类完成之后,我们去 dao 包下新建 IRoleDao 接口。
IRoleDao.java 1 2 3 4 5 6 7 8 9 10 11 12 13 14 15 16 17 package club.guoshizhan.dao;import club.guoshizhan.domain.Role;import java.util.List;public interface IRoleDao List<Role> findAll () ; }
接口搞定之后,我们去 resources 目录下的 club/guoshizhan/dao 下新建 IRoleDao.xml 配置文件。
IRoleDao.xml 1 2 3 4 5 6 7 8 9 10 11 12 13 14 15 16 17 18 19 20 21 22 23 24 25 26 27 28 29 <?xml version="1.0" encoding="UTF-8"?> <!DOCTYPE mapper PUBLIC "-//mybatis.org//DTD Mapper 3.0//EN" "http://mybatis.org/dtd/mybatis-3-mapper.dtd" > <mapper namespace ="club.guoshizhan.dao.IRoleDao" > <resultMap id ="roleMap" type ="club.guoshizhan.domain.Role" > <id property ="roleId" column ="rid" > </id > <result property ="roleName" column ="role_name" > </result > <result property ="roleDesc" column ="role_desc" > </result > <collection property ="users" ofType ="club.guoshizhan.domain.User" > <id column ="id" property ="id" > </id > <result property ="username" column ="username" > </result > <result property ="address" column ="address" > </result > <result property ="sex" column ="sex" > </result > <result property ="birthday" column ="birthday" > </result > </collection > </resultMap > <select id ="findAll" resultMap ="roleMap" > SELECT u.*,r.id AS rid,r.role_name,r.role_desc FROM role r LEFT OUTER JOIN user_role ur ON r.id=ur.rid LEFT OUTER JOIN USER u ON u.id=ur.uid </select > </mapper >
最后,我们新建 RoleTest 测试类进行测试。
RoleTest.java 1 2 3 4 5 6 7 8 9 10 11 12 13 14 15 16 17 18 19 20 21 22 23 24 25 26 27 28 29 30 31 32 33 34 35 36 37 38 39 40 41 42 43 44 45 46 47 48 package club.guoshizhan.test;import club.guoshizhan.dao.IRoleDao;import club.guoshizhan.domain.Role;import org.apache.ibatis.io.Resources;import org.apache.ibatis.session.SqlSession;import org.apache.ibatis.session.SqlSessionFactory;import org.apache.ibatis.session.SqlSessionFactoryBuilder;import org.junit.After;import org.junit.Before;import org.junit.Test;import java.io.InputStream;import java.util.List;public class RoleTest private InputStream in; private SqlSession session; private IRoleDao roleDao; @Before public void init () throws Exception in = Resources.getResourceAsStream("SqlMapConfig.xml" ); SqlSessionFactoryBuilder builder = new SqlSessionFactoryBuilder(); SqlSessionFactory factory = builder.build(in); session = factory.openSession(); roleDao = session.getMapper(IRoleDao.class ) ; } @Test public void testFindAll () List<Role> roles = roleDao.findAll(); for (Role role : roles){ System.out.println("-------- 每个角色的信息 --------" ); System.out.println(role); System.out.println(role.getUsers()); } } @After public void destory () throws Exception session.commit(); session.close(); in.close(); } }
执行上述的 testFindAll 方法, (注意 SQL 语句)
1 2 3 4 5 6 7 8 9 10 11 12 13 14 15 16 17 2020-08-24 17:13:04,762 187 [ main] DEBUG .apache.ibatis.io.ResolverUtil - Checking to see if class club.guoshizhan.dao.IRoleDao matches criteria [is assignable to Object] 2020-08-24 17:13:04,762 187 [ main] DEBUG .apache.ibatis.io.ResolverUtil - Checking to see if class club.guoshizhan.dao.IUserDao matches criteria [is assignable to Object] 2020 -08 -24 17 :13 :04 ,964 389 [ main] DEBUG ansaction.jdbc.JdbcTransaction - Opening JDBC Connection2020 -08 -24 17 :13 :05 ,244 669 [ main] DEBUG source.pooled.PooledDataSource - Created connection 8864840 .2020 -08 -24 17 :13 :05 ,245 670 [ main] DEBUG ansaction.jdbc.JdbcTransaction - Setting autocommit to false on JDBC Connection [com.mysql.jdbc.JDBC4Connection@874448 ]2020 -08 -24 17 :13 :05 ,247 672 [ main] DEBUG uoshizhan.dao.IRoleDao.findAll - ==> Preparing: SELECT u.*,r.id AS rid,r.role_name,r.role_desc FROM role r LEFT OUTER JOIN user_role ur ON r.id=ur.rid LEFT OUTER JOIN USER u ON u.id=ur.uid 2020 -08 -24 17 :13 :05 ,275 700 [ main] DEBUG uoshizhan.dao.IRoleDao.findAll - ==> Parameters: 2020 -08 -24 17 :13 :05 ,302 727 [ main] DEBUG uoshizhan.dao.IRoleDao.findAll - <== Total: 5 -------- 每个角色的信息 -------- Role{roleId=1 , roleName='院长' , roleDesc='管理整个学院' } [User{id=49 , username='Jack' , birthday=Mon Oct 28 09 :15 :39 CST 2019 , sex='男' , address='上海闵行' }, User{id=51 , username='Lisa' , birthday=Mon Oct 28 09 :17 :31 CST 2019 , sex='女' , address='广东佛山' }] -------- 每个角色的信息 -------- Role{roleId=2 , roleName='总裁' , roleDesc='管理整个公司' } [User{id=51 , username='Lisa' , birthday=Mon Oct 28 09 :17 :31 CST 2019 , sex='女' , address='广东佛山' }] -------- 每个角色的信息 -------- Role{roleId=3 , roleName='校长' , roleDesc='管理整个学校' } [User{id=49 , username='Jack' , birthday=Mon Oct 28 09 :15 :39 CST 2019 , sex='男' , address='上海闵行' }, User{id=51 , username='Lisa' , birthday=Mon Oct 28 09 :17 :31 CST 2019 , sex='女' , address='广东佛山' }]
上述的操作实现了 从角色到用户的多对多操作。那么接下来要实现 从用户到角色的多对多操作 。这个过程和上面的操作极其相似,
第一步: 给 User 类加上 roles 属性,用于多对多的关系映射。
User.java 1 2 3 4 5 6 7 8 9 10 11 12 13 14 15 16 17 18 19 20 21 22 23 24 25 26 27 28 29 30 31 32 33 34 35 36 37 38 39 40 41 42 43 44 45 46 47 48 49 50 51 52 53 54 55 56 57 58 59 60 61 62 63 64 65 66 67 68 69 70 71 72 73 74 75 76 77 78 79 80 package club.guoshizhan.domain;import java.io.Serializable;import java.util.Date;import java.util.List;public class User implements Serializable private Integer id; private String username; private Date birthday; private String sex; private String address; private List<Role> roles; public List<Role> getRoles () return roles; } public void setRoles (List<Role> roles) this .roles = roles; } @Override public String toString () return "User{" + "id=" + id + ", username='" + username + '\'' + ", birthday=" + birthday + ", sex='" + sex + '\'' + ", address='" + address + '\'' + '}' ; } public Integer getId () return id; } public void setId (Integer id) this .id = id; } public String getUsername () return username; } public void setUsername (String username) this .username = username; } public Date getBirthday () return birthday; } public void setBirthday (Date birthday) this .birthday = birthday; } public String getSex () return sex; } public void setSex (String sex) this .sex = sex; } public String getAddress () return address; } public void setAddress (String address) this .address = address; } }
第二步: 编写 IUserDao.xml 配置文件。
IUserDao.xml 1 2 3 4 5 6 7 8 9 10 11 12 13 14 15 16 17 18 19 20 21 22 23 24 25 26 27 28 29 <?xml version="1.0" encoding="UTF-8"?> <!DOCTYPE mapper PUBLIC "-//mybatis.org//DTD Mapper 3.0//EN" "http://mybatis.org/dtd/mybatis-3-mapper.dtd" > <mapper namespace ="club.guoshizhan.dao.IUserDao" > <resultMap id ="userMap" type ="user" > <id property ="id" column ="id" > </id > <result property ="username" column ="username" > </result > <result property ="address" column ="address" > </result > <result property ="sex" column ="sex" > </result > <result property ="birthday" column ="birthday" > </result > <collection property ="roles" ofType ="role" > <id property ="roleId" column ="rid" > </id > <result property ="roleName" column ="role_name" > </result > <result property ="roleDesc" column ="role_desc" > </result > </collection > </resultMap > <select id ="findAll" resultMap ="userMap" > SELECT u.*,r.id AS rid,r.role_name,r.role_desc FROM USER u LEFT OUTER JOIN user_role ur ON u.id=ur.uid LEFT OUTER JOIN role r ON r.id=ur.rid </select > </mapper >
最后,在 UserTest 测试类中编写方法进行测试。
1 2 3 4 5 6 7 8 9 10 11 12 13 14 15 16 17 18 19 20 21 22 23 24 25 26 27 28 29 30 31 32 33 34 35 36 37 38 39 40 41 42 43 44 45 46 47 48 49 50 51 52 53 54 55 package club.guoshizhan.test;import club.guoshizhan.dao.IUserDao;import club.guoshizhan.domain.User;import org.apache.ibatis.io.Resources;import org.apache.ibatis.session.SqlSession;import org.apache.ibatis.session.SqlSessionFactory;import org.apache.ibatis.session.SqlSessionFactoryBuilder;import org.junit.After;import org.junit.Before;import org.junit.Test;import java.io.IOException;import java.io.InputStream;import java.util.List;public class UserTest private InputStream in; private IUserDao userDao; private SqlSession session; @Before public void init () throws Exception in = Resources.getResourceAsStream("SqlMapConfig.xml" ); SqlSessionFactory factory = new SqlSessionFactoryBuilder().build(in); session = factory.openSession(); userDao = session.getMapper(IUserDao.class ) ; } @Test public void testFindAll () List<User> users = userDao.findAll(); for (User user : users) { System.out.println("-------- 每个用户的信息 --------" ); System.out.println(user); System.out.println(user.getRoles()); } } @After public void destory () throws IOException in.close(); } }
执行上述的 testFindAll 方法, (注意 SQL 语句)
1 2 3 4 5 6 7 8 9 10 11 12 13 14 15 16 17 18 19 20 21 22 23 24 25 26 27 28 29 2020-08-24 19:26:55,933 177 [ main] DEBUG .apache.ibatis.io.ResolverUtil - Checking to see if class club.guoshizhan.dao.IRoleDao matches criteria [is assignable to Object] 2020-08-24 19:26:55,934 178 [ main] DEBUG .apache.ibatis.io.ResolverUtil - Checking to see if class club.guoshizhan.dao.IUserDao matches criteria [is assignable to Object] 2020 -08 -24 19 :26 :56 ,080 324 [ main] DEBUG ansaction.jdbc.JdbcTransaction - Opening JDBC Connection2020 -08 -24 19 :26 :56 ,422 666 [ main] DEBUG source.pooled.PooledDataSource - Created connection 8864840 .2020 -08 -24 19 :26 :56 ,423 667 [ main] DEBUG ansaction.jdbc.JdbcTransaction - Setting autocommit to false on JDBC Connection [com.mysql.jdbc.JDBC4Connection@874448 ]2020 -08 -24 19 :26 :56 ,425 669 [ main] DEBUG uoshizhan.dao.IUserDao.findAll - ==> Preparing: SELECT u.*,r.id AS rid,r.role_name,r.role_desc FROM USER u LEFT OUTER JOIN user_role ur ON u.id=ur.uid LEFT OUTER JOIN role r ON r.id=ur.rid 2020 -08 -24 19 :26 :56 ,449 693 [ main] DEBUG uoshizhan.dao.IUserDao.findAll - ==> Parameters: 2020 -08 -24 19 :26 :56 ,474 718 [ main] DEBUG uoshizhan.dao.IUserDao.findAll - <== Total: 10 -------- 每个用户的信息 -------- User{id=42 , username='小二王' , birthday=Fri Mar 02 15 :09 :37 CST 2018 , sex='女' , address='北京金燕龙' } [] -------- 每个用户的信息 -------- User{id=43 , username='大王' , birthday=Tue Nov 12 10 :19 :13 CST 2019 , sex='男' , address='Los Angeles' } [] -------- 每个用户的信息 -------- User{id=46 , username='老王' , birthday=Wed Mar 07 17 :37 :26 CST 2018 , sex='男' , address='北京' } [] -------- 每个用户的信息 -------- User{id=49 , username='Jack' , birthday=Mon Oct 28 09 :15 :39 CST 2019 , sex='男' , address='上海闵行' } [Role{roleId=1 , roleName='院长' , roleDesc='管理整个学院' }, Role{roleId=3 , roleName='校长' , roleDesc='管理整个学校' }] -------- 每个用户的信息 -------- User{id=51 , username='Lisa' , birthday=Mon Oct 28 09 :17 :31 CST 2019 , sex='女' , address='广东佛山' } [Role{roleId=1 , roleName='院长' , roleDesc='管理整个学院' }, Role{roleId=2 , roleName='总裁' , roleDesc='管理整个公司' }, Role{roleId=3 , roleName='校长' , roleDesc='管理整个学校' }] -------- 每个用户的信息 -------- User{id=52 , username='Tom' , birthday=Mon Oct 28 10 :26 :42 CST 2019 , sex='男' , address='广东佛山' } [] -------- 每个用户的信息 -------- User{id=54 , username='Bob' , birthday=Tue Nov 12 10 :21 :41 CST 2019 , sex='男' , address='广东佛山' } []
TIPS: 多对多
JNDI 知识 这个部分的内容不是很重要,所以就先跳过,以后有空再完善。
1 2 3 4 5 6 7 + 这个部分的内容不是很重要,所以就先跳过,以后有空再完善 + 这个部分的内容不是很重要,所以就先跳过,以后有空再完善 + 这个部分的内容不是很重要,所以就先跳过,以后有空再完善
TIPS: JNDI 知识
延迟加载和缓存 mybatis 的延迟加载 有没有想过,为什么需要延迟加载技术?延迟加载主要用来干嘛的?
1 2 3 4 5 6 7 8 9 10 11 12 13 14 15 16 17 + 1、在查询用户的时候,要不要把关联的账户查出来? 2、在查询账户的时候,要不要把关联的用户查出来? + 在真正使用数据时才发起查询,不用的时候不查询。这种加载方式称之为延迟加载,也叫做按需加载(懒加载) + 延迟加载举例:在查询用户时,用户下的账户信息应该是这样的:什么时候使用,就什么时候查询,而不是一查询用户就把所有账户显示出来 + 不管用不用,只要一调用方法,马上发起查询。这中加载方式就叫做立即加载 + 立即加载举例:在查询账户时,账户的所属用户信息应该是随着账户查询时一起查询出来,否则我哪知道这个账户是谁的。 + 一对多,多对多:通常情况下我们都是采用延迟加载。 多对一,一对一:通常情况下我们都是采用立即加载。
了解完 延迟加载 (一对一的延迟加载) 第一步: 新建一个 maven 工程(自己构建一下,包括新建包结构等等,这里不过多介绍了),然后加入如下依赖:
pom.xml 1 2 3 4 5 6 7 8 9 10 11 12 13 14 15 16 17 18 19 20 21 22 23 24 25 26 27 28 29 30 31 32 33 34 35 36 37 38 39 40 41 42 43 <build > <plugins > <plugin > <groupId > org.apache.maven.plugins</groupId > <artifactId > maven-compiler-plugin</artifactId > </plugin > </plugins > </build > <packaging > jar</packaging > <dependencies > <dependency > <groupId > org.mybatis</groupId > <artifactId > mybatis</artifactId > <version > 3.4.5</version > </dependency > <dependency > <groupId > mysql</groupId > <artifactId > mysql-connector-java</artifactId > <version > 5.1.6</version > <scope > runtime</scope > </dependency > <dependency > <groupId > log4j</groupId > <artifactId > log4j</artifactId > <version > 1.2.12</version > </dependency > <dependency > <groupId > junit</groupId > <artifactId > junit</artifactId > <version > 4.10</version > <scope > test</scope > </dependency > </dependencies >
第二步: 在 domain 包下新建一个 User 实体类和 Account 实体类。
User.java 1 2 3 4 5 6 7 8 9 10 11 12 13 14 15 16 17 18 19 20 21 22 23 24 25 26 27 28 29 30 31 32 33 34 35 36 37 38 39 40 41 42 43 44 45 46 47 48 49 50 51 52 53 54 55 56 57 58 59 60 61 62 63 64 65 66 67 68 69 70 71 72 73 74 75 76 77 78 79 80 81 package club.guoshizhan.domain;import java.io.Serializable;import java.util.Date;import java.util.List;public class User implements Serializable private Integer id; private String username; private Date birthday; private String sex; private String address; private List<Account> accounts; public List<Account> getAccounts () return accounts; } public void setAccounts (List<Account> accounts) this .accounts = accounts; } @Override public String toString () return "User{" + "id=" + id + ", username='" + username + '\'' + ", birthday=" + birthday + ", sex='" + sex + '\'' + ", address='" + address + '\'' + '}' ; } public Integer getId () return id; } public void setId (Integer id) this .id = id; } public String getUsername () return username; } public void setUsername (String username) this .username = username; } public Date getBirthday () return birthday; } public void setBirthday (Date birthday) this .birthday = birthday; } public String getSex () return sex; } public void setSex (String sex) this .sex = sex; } public String getAddress () return address; } public void setAddress (String address) this .address = address; } }
Account.java 1 2 3 4 5 6 7 8 9 10 11 12 13 14 15 16 17 18 19 20 21 22 23 24 25 26 27 28 29 30 31 32 33 34 35 36 37 38 39 40 41 42 43 44 45 46 47 48 49 50 51 52 53 54 55 56 57 58 59 package club.guoshizhan.domain;import java.io.Serializable;public class Account implements Serializable private Integer id; private Integer uid; private Double money; private User user; public User getUser () return user; } public void setUser (User user) this .user = user; } public Integer getId () return id; } public void setId (Integer id) this .id = id; } public Integer getUid () return uid; } public void setUid (Integer uid) this .uid = uid; } public Double getMoney () return money; } public void setMoney (Double money) this .money = money; } @Override public String toString () return "Account{" + "id=" + id + ", uid=" + uid + ", money=" + money + '}' ; } }
第三步: 在 dao 包下新建 IUserDao 接口 和 IAccountDao 接口。
IUserDao.java 1 2 3 4 5 6 7 8 9 10 11 12 13 14 15 16 17 18 19 20 package club.guoshizhan.dao;import club.guoshizhan.domain.User;import java.util.List;public interface IUserDao List<User> findAll () ; User findById (Integer userId) ; }
IAccountDao.java 1 2 3 4 5 6 7 8 9 10 11 12 13 14 15 16 17 package club.guoshizhan.dao;import club.guoshizhan.domain.Account;import java.util.List;public interface IAccountDao List<Account> findAll () ; }
第四步: 在 resources 目录下新建三个配置文件。
jdbcConfig.properties 1 2 3 4 jdbc.driver =com.mysql.jdbc.Driver jdbc.url =jdbc:mysql://localhost:3306/eesy_mybatis jdbc.username =root jdbc.password =root
SqlMapConfig.xml 1 2 3 4 5 6 7 8 9 10 11 12 13 14 15 16 17 18 19 20 21 22 23 24 25 26 27 28 29 <?xml version="1.0" encoding="UTF-8"?> <!DOCTYPE configuration PUBLIC "-//mybatis.org//DTD Config 3.0//EN" "http://mybatis.org/dtd/mybatis-3-config.dtd" > <configuration > <properties resource ="jdbcConfig.properties" > </properties > <typeAliases > <package name ="club.guoshizhan.domain" > </package > </typeAliases > <environments default ="mysql" > <environment id ="mysql" > <transactionManager type ="JDBC" > </transactionManager > <dataSource type ="UNPOOLED" > <property name ="driver" value ="${jdbc.driver}" /> <property name ="url" value ="${jdbc.url}" /> <property name ="username" value ="${jdbc.username}" /> <property name ="password" value ="${jdbc.password}" /> </dataSource > </environment > </environments > <mappers > <package name ="club.guoshizhan.dao" > </package > </mappers > </configuration >
log4j.properties 1 2 3 4 5 6 7 8 9 10 11 12 13 14 15 16 17 18 log4j.rootCategory =debug, CONSOLE, LOGFILE log4j.logger.org.apache.axis.enterprise =FATAL, CONSOLE log4j.appender.CONSOLE =org.apache.log4j.ConsoleAppender log4j.appender.CONSOLE.layout =org.apache.log4j.PatternLayout log4j.appender.CONSOLE.layout.ConversionPattern =%d{ISO8601} %-6r [%15.15t] %-5p %30.30c %x - %m\n log4j.appender.LOGFILE =org.apache.log4j.FileAppender log4j.appender.LOGFILE.File =d:\axis.log log4j.appender.LOGFILE.Append =true log4j.appender.LOGFILE.layout =org.apache.log4j.PatternLayout log4j.appender.LOGFILE.layout.ConversionPattern =%d{ISO8601} %-6r [%15.15t] %-5p %30.30c %x - %m\n
第五步: 在 resources 目录的包结构下新建 IUserDao.xml 文件 和 IAccountDao.xml 文件。
IUserDao.xml 1 2 3 4 5 6 7 8 9 10 11 12 13 14 15 16 17 18 19 20 21 22 23 24 25 26 27 28 29 30 31 32 33 <?xml version="1.0" encoding="UTF-8"?> <!DOCTYPE mapper PUBLIC "-//mybatis.org//DTD Mapper 3.0//EN" "http://mybatis.org/dtd/mybatis-3-mapper.dtd" > <mapper namespace ="club.guoshizhan.dao.IUserDao" > <resultMap id ="userMap" type ="user" > <id property ="id" column ="id" > </id > <result property ="username" column ="username" > </result > <result property ="address" column ="address" > </result > <result property ="sex" column ="sex" > </result > <result property ="birthday" column ="birthday" > </result > <collection property ="accounts" ofType ="account" > <id property ="id" column ="aid" > </id > <result property ="uid" column ="uid" > </result > <result property ="money" column ="money" > </result > </collection > </resultMap > <select id ="findAll" resultMap ="userMap" > SELECT u.*,a.id as aid,a.money,a.uid FROM USER u LEFT OUTER JOIN account a ON a.uid=u.id </select > <select id ="findById" parameterType ="Integer" resultType ="User" > select * from user where id=#{id} </select > </mapper >
IAccountDao.xml 1 2 3 4 5 6 7 8 9 10 11 12 13 14 15 16 17 18 19 <?xml version="1.0" encoding="UTF-8"?> <!DOCTYPE mapper PUBLIC "-//mybatis.org//DTD Mapper 3.0//EN" "http://mybatis.org/dtd/mybatis-3-mapper.dtd" > <mapper namespace ="club.guoshizhan.dao.IAccountDao" > <resultMap id ="accountMap" type ="account" > <id property ="id" column ="id" > </id > <result property ="uid" column ="uid" > </result > <result property ="money" column ="money" > </result > </resultMap > <select id ="findAll" resultMap ="accountMap" > SELECT * FROM account </select > </mapper >
第六步: 编写 AccountTest 测试类。
1 2 3 4 5 6 7 8 9 10 11 12 13 14 15 16 17 18 19 20 21 22 23 24 25 26 27 28 29 30 31 32 33 34 35 36 37 38 39 40 41 42 43 44 45 46 47 48 49 50 51 52 53 54 55 package club.guoshizhan.test;import club.guoshizhan.dao.IAccountDao;import club.guoshizhan.domain.Account;import org.apache.ibatis.io.Resources;import org.apache.ibatis.session.SqlSession;import org.apache.ibatis.session.SqlSessionFactory;import org.apache.ibatis.session.SqlSessionFactoryBuilder;import org.junit.After;import org.junit.Before;import org.junit.Test;import java.io.IOException;import java.io.InputStream;import java.util.List;public class AccountTest private InputStream in; private IAccountDao accountDao; private SqlSession session; @Before public void init () throws Exception in = Resources.getResourceAsStream("SqlMapConfig.xml" ); SqlSessionFactory factory = new SqlSessionFactoryBuilder().build(in); session = factory.openSession(); accountDao = session.getMapper(IAccountDao.class ) ; } @Test public void testFindAll () List<Account> accounts = accountDao.findAll(); for (Account account : accounts) { System.out.println("======== 一对一 延迟加载 结果输出 ========" ); System.out.println(account); System.out.println(account.getUser()); } } @After public void destory () throws IOException session.close(); in.close(); } }
执行上述 testFindAll 方法, (注意 SQL 语句)
1 2 3 4 5 6 7 8 9 10 11 12 13 14 15 2020-08-27 16:33:33,600 658 [ main] DEBUG .apache.ibatis.io.ResolverUtil - Checking to see if class club.guoshizhan.dao.IAccountDao matches criteria [is assignable to Object] 2020-08-27 16:33:33,600 658 [ main] DEBUG .apache.ibatis.io.ResolverUtil - Checking to see if class club.guoshizhan.dao.IUserDao matches criteria [is assignable to Object] 2020 -08 -27 16 :33 :33 ,886 944 [ main] DEBUG ansaction.jdbc.JdbcTransaction - Opening JDBC Connection2020 -08 -27 16 :33 :34 ,309 1367 [ main] DEBUG ansaction.jdbc.JdbcTransaction - Setting autocommit to false on JDBC Connection [com.mysql.jdbc.JDBC4Connection@1f bf16f]2020 -08 -27 16 :33 :34 ,316 1374 [ main] DEBUG hizhan.dao.IAccountDao.findAll - ==> Preparing: SELECT * FROM account 2020 -08 -27 16 :33 :34 ,348 1406 [ main] DEBUG hizhan.dao.IAccountDao.findAll - ==> Parameters: 2020 -08 -27 16 :33 :34 ,368 1426 [ main] DEBUG hizhan.dao.IAccountDao.findAll - <== Total: 2 ======== 一对一 延迟加载 结果输出 ======== Account{id=1 , uid=46 , money=1000.0 } null ======== 一对一 延迟加载 结果输出 ======== Account{id=3 , uid=46 , money=2000.0 } null 2020 -08 -27 16 :33 :34 ,369 1427 [ main] DEBUG ansaction.jdbc.JdbcTransaction - Resetting autocommit to true on JDBC Connection [com.mysql.jdbc.JDBC4Connection@1f bf16f]2020 -08 -27 16 :33 :34 ,369 1427 [ main] DEBUG ansaction.jdbc.JdbcTransaction - Closing JDBC Connection [com.mysql.jdbc.JDBC4Connection@1f bf16f]
为什么上述没有查到用户的信息呢(结果是 null)?因为我们只查询了 account 表,所以只有账户信息,没有用户信息。所以此时就需要去配置 延迟加载 了,接着往下看!!!
那么如何配置延迟加载呢? 第一步: 在 IAccountDao.xml 文件中加入如下代码:
IAccountDao.xml 1 2 3 4 5 6 7 8 <resultMap id="accountMap" type="account"> <id property="id" column="id"></id> <result property="uid" column="uid"></result> <result property="money" column="money"></result> + <!-- 配置一对一延迟加载,使用 select 属性指定内容,就是去执行 IUserDao 下的 findById 方法 --> + <association property="user" column="uid" javaType="user" select="club.guoshizhan.dao.IUserDao.findById"> + </association> </resultMap>
第二步: 在 SqlMapConfig.xml 文件中加入如下代码:
SqlMapConfig.xml 1 2 3 4 5 6 7 8 9 <configuration> <properties resource="jdbcConfig.properties"></properties> + <!-- 配置延迟加载,各项参数在官网写的特别详细,建议参照官网学习 --> + <settings> + <!-- 开启 mybatis 支持延迟加载 --> + <setting name="lazyLoadingEnabled" value="true"/> + <setting name="aggressiveLazyLoading" value="false"/> + </settings>
上述两步做完之后,我们去执行测试类中的 testFindAll 方法。(为了演示明显,我去数据库加了两条数据) (注意 SQL 语句)
1 2 3 4 5 6 7 8 9 10 11 12 13 14 15 16 17 18 19 20 21 22 23 24 25 2020 -08 -27 16 :51 :03 ,382 516 [ main] DEBUG ansaction.jdbc.JdbcTransaction - Opening JDBC Connection2020 -08 -27 16 :51 :03 ,696 830 [ main] DEBUG ansaction.jdbc.JdbcTransaction - Setting autocommit to false on JDBC Connection [com.mysql.jdbc.JDBC4Connection@1f bf16f]2020 -08 -27 16 :51 :03 ,708 842 [ main] DEBUG hizhan.dao.IAccountDao.findAll - ==> Preparing: SELECT * FROM account 2020 -08 -27 16 :51 :03 ,738 872 [ main] DEBUG hizhan.dao.IAccountDao.findAll - ==> Parameters: 2020 -08 -27 16 :51 :03 ,808 942 [ main] DEBUG hizhan.dao.IAccountDao.findAll - <== Total: 4 ======== 一对一 延迟加载 结果输出 ======== 2020 -08 -27 16 :51 :03 ,809 943 [ main] DEBUG oshizhan.dao.IUserDao.findById - ==> Preparing: select * from user where id=? 2020 -08 -27 16 :51 :03 ,809 943 [ main] DEBUG oshizhan.dao.IUserDao.findById - ==> Parameters: 46 (Integer)2020 -08 -27 16 :51 :03 ,814 948 [ main] DEBUG oshizhan.dao.IUserDao.findById - <== Total: 1 Account{id=1 , uid=46 , money=1000.0 } User{id=46 , username='老王' , birthday=Wed Mar 07 17 :37 :26 CST 2018 , sex='男' , address='北京' } ======== 一对一 延迟加载 结果输出 ======== Account{id=3 , uid=46 , money=2000.0 } User{id=46 , username='老王' , birthday=Wed Mar 07 17 :37 :26 CST 2018 , sex='男' , address='北京' } ======== 一对一 延迟加载 结果输出 ======== 2020 -08 -27 16 :51 :03 ,818 952 [ main] DEBUG oshizhan.dao.IUserDao.findById - ==> Preparing: select * from user where id=? 2020 -08 -27 16 :51 :03 ,818 952 [ main] DEBUG oshizhan.dao.IUserDao.findById - ==> Parameters: 52 (Integer)2020 -08 -27 16 :51 :03 ,819 953 [ main] DEBUG oshizhan.dao.IUserDao.findById - <== Total: 1 Account{id=4 , uid=52 , money=3000.0 } User{id=52 , username='Tom' , birthday=Mon Oct 28 10 :26 :42 CST 2019 , sex='男' , address='广东佛山' } ======== 一对一 延迟加载 结果输出 ======== Account{id=5 , uid=52 , money=4000.0 } User{id=52 , username='Tom' , birthday=Mon Oct 28 10 :26 :42 CST 2019 , sex='男' , address='广东佛山' } 2020 -08 -27 16 :51 :03 ,819 953 [ main] DEBUG ansaction.jdbc.JdbcTransaction - Resetting autocommit to true on JDBC Connection [com.mysql.jdbc.JDBC4Connection@1f bf16f]2020 -08 -27 16 :51 :03 ,820 954 [ main] DEBUG ansaction.jdbc.JdbcTransaction - Closing JDBC Connection [com.mysql.jdbc.JDBC4Connection@1f bf16f]
由上述结果可知,mybatis 执行了 延迟加载。它是先去查询了 account 表,然后再去查询 user 表。
1 2 3 4 5 @Test public void testFindAll () List<Account> accounts = accountDao.findAll(); }
再次执行 testFindAll 方法, (注意 SQL 语句)
1 2 3 4 5 6 7 2020 -08 -27 16 :55 :36 ,796 389 [ main] DEBUG ansaction.jdbc.JdbcTransaction - Opening JDBC Connection2020 -08 -27 16 :55 :37 ,089 682 [ main] DEBUG ansaction.jdbc.JdbcTransaction - Setting autocommit to false on JDBC Connection [com.mysql.jdbc.JDBC4Connection@1f bf16f]2020 -08 -27 16 :55 :37 ,098 691 [ main] DEBUG hizhan.dao.IAccountDao.findAll - ==> Preparing: SELECT * FROM account 2020 -08 -27 16 :55 :37 ,133 726 [ main] DEBUG hizhan.dao.IAccountDao.findAll - ==> Parameters: 2020 -08 -27 16 :55 :37 ,223 816 [ main] DEBUG hizhan.dao.IAccountDao.findAll - <== Total: 4 2020 -08 -27 16 :55 :37 ,223 816 [ main] DEBUG ansaction.jdbc.JdbcTransaction - Resetting autocommit to true on JDBC Connection [com.mysql.jdbc.JDBC4Connection@1f bf16f]2020 -08 -27 16 :55 :37 ,223 816 [ main] DEBUG ansaction.jdbc.JdbcTransaction - Closing JDBC Connection [com.mysql.jdbc.JDBC4Connection@1f bf16f]
由上述结果可知,mybatis 只查询了 account 表,而没有去查询 user 表。(因为没有使用到,所以不去查,这个就是延迟加载) 一对多的延迟加载
第一步: 修改 IAccountDao 接口,新加如下方法。
IAccountDao.java 1 2 3 4 5 6 7 8 9 public interface IAccountDao { // 查询所有账户,同时还需要获取到当前账户的所属用户信息 List<Account> findAll(); + // 根据用户 id 查询账户信息 + List<Account> findById(Integer id); }
第二步: 修改 IUserDao.xml 文件。
IUserDao.xml 1 2 3 4 5 6 7 8 9 10 11 12 13 14 15 16 17 18 19 20 <resultMap id="userMap" type="user"> <id property="id" column="id"></id> <result property="username" column="username"></result> <result property="address" column="address"></result> <result property="sex" column="sex"></result> <result property="birthday" column="birthday"></result> - <!-- 配置 一对多 延迟加载 --> + <collection property="accounts" ofType="account" select="club.guoshizhan.dao.IAccountDao.findById" column="id"> - <collection property="accounts" ofType="account"> - <id property="id" column="aid"></id> - <result property="uid" column="uid"></result> - <result property="money" column="money"></result> </collection> </resultMap> <select id="findAll" resultMap="userMap"> - SELECT u.*,a.id as aid,a.money,a.uid FROM USER u LEFT OUTER JOIN account a ON a.uid=u.id + SELECT * FROM USER </select>
第三步: 修改 IAccountDao.xml 文件,加入如下语句。
IAccountDao.xml 1 2 3 4 5 6 7 8 9 10 11 12 13 <resultMap id="accountMap" type="account"> <id property="id" column="id"></id> <result property="uid" column="uid"></result> <result property="money" column="money"></result> + <!-- 配置一对一延迟加载,使用 select 属性指定内容 --> + <association property="user" column="uid" javaType="user" select="club.guoshizhan.dao.IUserDao.findById"> + </association> </resultMap> + <!-- 根据用户 id 查询账户信息 --> + <select id="findById" resultType="account"> + SELECT * FROM account where uid=#{uid} + </select>
第四步: 新建 UserTest 测试类。
UserTest.java 1 2 3 4 5 6 7 8 9 10 11 12 13 14 15 16 17 18 19 20 21 22 23 24 25 26 27 28 29 30 31 32 33 34 35 36 37 38 39 40 41 42 43 44 45 46 47 48 49 50 51 52 package club.guoshizhan.test;import club.guoshizhan.dao.IUserDao;import club.guoshizhan.domain.User;import org.apache.ibatis.io.Resources;import org.apache.ibatis.session.SqlSession;import org.apache.ibatis.session.SqlSessionFactory;import org.apache.ibatis.session.SqlSessionFactoryBuilder;import org.junit.After;import org.junit.Before;import org.junit.Test;import java.io.IOException;import java.io.InputStream;import java.util.List;public class UserTest private InputStream in; private IUserDao userDao; private SqlSession session; @Before public void init () throws Exception in = Resources.getResourceAsStream("SqlMapConfig.xml" ); SqlSessionFactory factory = new SqlSessionFactoryBuilder().build(in); session = factory.openSession(); userDao = session.getMapper(IUserDao.class ) ; } @Test public void testFindAll () List<User> users = userDao.findAll(); for (User user : users) { System.out.println("======== 一对多 延迟加载 结果输出 ========" ); System.out.println(user); System.out.println(user.getAccounts()); } } @After public void destroy () throws IOException session.close(); in.close(); } }
执行 testFindAll 方法, (注意 SQL 语句)
1 2 3 4 5 6 7 8 9 10 11 12 13 14 15 16 17 18 19 20 21 22 23 24 25 26 27 28 29 30 31 32 33 34 35 36 37 38 39 40 41 42 43 44 45 46 47 48 49 50 51 2020-08-27 17:14:33,760 329 [ main] DEBUG .apache.ibatis.io.ResolverUtil - Checking to see if class club.guoshizhan.dao.IAccountDao matches criteria [is assignable to Object] 2020-08-27 17:14:33,761 330 [ main] DEBUG .apache.ibatis.io.ResolverUtil - Checking to see if class club.guoshizhan.dao.IUserDao matches criteria [is assignable to Object] 2020 -08 -27 17 :14 :33 ,952 521 [ main] DEBUG ansaction.jdbc.JdbcTransaction - Opening JDBC Connection2020 -08 -27 17 :14 :34 ,224 793 [ main] DEBUG ansaction.jdbc.JdbcTransaction - Setting autocommit to false on JDBC Connection [com.mysql.jdbc.JDBC4Connection@1f bf16f]2020 -08 -27 17 :14 :34 ,231 800 [ main] DEBUG uoshizhan.dao.IUserDao.findAll - ==> Preparing: SELECT * FROM USER 2020 -08 -27 17 :14 :34 ,261 830 [ main] DEBUG uoshizhan.dao.IUserDao.findAll - ==> Parameters: 2020 -08 -27 17 :14 :34 ,359 928 [ main] DEBUG uoshizhan.dao.IUserDao.findAll - <== Total: 7 ======== 一对多 延迟加载 结果输出 ======== 2020 -08 -27 17 :14 :34 ,360 929 [ main] DEBUG izhan.dao.IAccountDao.findById - ==> Preparing: SELECT * FROM account where uid=? 2020 -08 -27 17 :14 :34 ,360 929 [ main] DEBUG izhan.dao.IAccountDao.findById - ==> Parameters: 42 (Integer)2020 -08 -27 17 :14 :34 ,443 1012 [ main] DEBUG izhan.dao.IAccountDao.findById - <== Total: 0 User{id=42 , username='小二王' , birthday=Fri Mar 02 15 :09 :37 CST 2018 , sex='女' , address='北京金燕龙' } [] ======== 一对多 延迟加载 结果输出 ======== 2020 -08 -27 17 :14 :34 ,446 1015 [ main] DEBUG izhan.dao.IAccountDao.findById - ==> Preparing: SELECT * FROM account where uid=? 2020 -08 -27 17 :14 :34 ,446 1015 [ main] DEBUG izhan.dao.IAccountDao.findById - ==> Parameters: 43 (Integer)2020 -08 -27 17 :14 :34 ,447 1016 [ main] DEBUG izhan.dao.IAccountDao.findById - <== Total: 0 User{id=43 , username='大王' , birthday=Tue Nov 12 10 :19 :13 CST 2019 , sex='男' , address='Los Angeles' } [] ======== 一对多 延迟加载 结果输出 ======== 2020 -08 -27 17 :14 :34 ,447 1016 [ main] DEBUG izhan.dao.IAccountDao.findById - ==> Preparing: SELECT * FROM account where uid=? 2020 -08 -27 17 :14 :34 ,447 1016 [ main] DEBUG izhan.dao.IAccountDao.findById - ==> Parameters: 46 (Integer)2020 -08 -27 17 :14 :34 ,450 1019 [ main] DEBUG izhan.dao.IAccountDao.findById - <== Total: 2 User{id=46 , username='老王' , birthday=Wed Mar 07 17 :37 :26 CST 2018 , sex='男' , address='北京' } [Account{id=1 , uid=46 , money=1000.0 }, Account{id=3 , uid=46 , money=2000.0 }] ======== 一对多 延迟加载 结果输出 ======== 2020 -08 -27 17 :14 :34 ,451 1020 [ main] DEBUG izhan.dao.IAccountDao.findById - ==> Preparing: SELECT * FROM account where uid=? 2020 -08 -27 17 :14 :34 ,451 1020 [ main] DEBUG izhan.dao.IAccountDao.findById - ==> Parameters: 49 (Integer)2020 -08 -27 17 :14 :34 ,452 1021 [ main] DEBUG izhan.dao.IAccountDao.findById - <== Total: 0 User{id=49 , username='Jack' , birthday=Mon Oct 28 09 :15 :39 CST 2019 , sex='男' , address='上海闵行' } [] ======== 一对多 延迟加载 结果输出 ======== 2020 -08 -27 17 :14 :34 ,452 1021 [ main] DEBUG izhan.dao.IAccountDao.findById - ==> Preparing: SELECT * FROM account where uid=? 2020 -08 -27 17 :14 :34 ,452 1021 [ main] DEBUG izhan.dao.IAccountDao.findById - ==> Parameters: 51 (Integer)2020 -08 -27 17 :14 :34 ,453 1022 [ main] DEBUG izhan.dao.IAccountDao.findById - <== Total: 0 User{id=51 , username='Lisa' , birthday=Mon Oct 28 09 :17 :31 CST 2019 , sex='女' , address='广东佛山' } [] ======== 一对多 延迟加载 结果输出 ======== 2020 -08 -27 17 :14 :34 ,453 1022 [ main] DEBUG izhan.dao.IAccountDao.findById - ==> Preparing: SELECT * FROM account where uid=? 2020 -08 -27 17 :14 :34 ,453 1022 [ main] DEBUG izhan.dao.IAccountDao.findById - ==> Parameters: 52 (Integer)2020 -08 -27 17 :14 :34 ,455 1024 [ main] DEBUG izhan.dao.IAccountDao.findById - <== Total: 2 User{id=52 , username='Tom' , birthday=Mon Oct 28 10 :26 :42 CST 2019 , sex='男' , address='广东佛山' } [Account{id=4 , uid=52 , money=3000.0 }, Account{id=5 , uid=52 , money=4000.0 }] ======== 一对多 延迟加载 结果输出 ======== 2020 -08 -27 17 :14 :34 ,455 1024 [ main] DEBUG izhan.dao.IAccountDao.findById - ==> Preparing: SELECT * FROM account where uid=? 2020 -08 -27 17 :14 :34 ,456 1025 [ main] DEBUG izhan.dao.IAccountDao.findById - ==> Parameters: 54 (Integer)2020 -08 -27 17 :14 :34 ,457 1026 [ main] DEBUG izhan.dao.IAccountDao.findById - <== Total: 0 User{id=54 , username='Bob' , birthday=Tue Nov 12 10 :21 :41 CST 2019 , sex='男' , address='广东佛山' } [] 2020 -08 -27 17 :14 :34 ,458 1027 [ main] DEBUG ansaction.jdbc.JdbcTransaction - Resetting autocommit to true on JDBC Connection [com.mysql.jdbc.JDBC4Connection@1f bf16f]2020 -08 -27 17 :14 :34 ,458 1027 [ main] DEBUG ansaction.jdbc.JdbcTransaction - Closing JDBC Connection [com.mysql.jdbc.JDBC4Connection@1f bf16f]
TIPS: mybatis 的延迟加载
mybatis 的缓存 缓存 是个很重要的东西,英文名叫 Cache 。那么缓存到底是什么呢?往下看:
1 2 3 4 5 6 7 8 9 10 11 12 13 + 缓存就是存在于内存中的临时数据。 + 减少和数据库的交互次数,提高执行效率。 + 适用于缓存的数据:1、经常查询并且不经常改变的。2、数据的正确与否对最终结果影响不大的。 - 不适用于缓存的数据:1、经常改变的数据。2、数据的正确与否对最终结果影响很大的数据。例如:商品的库存,银行的汇率,股市的牌价。
了解完上述问题之后,我们来了解一下 mybatis 中的 一级缓存 和 二级缓存 。
1 2 3 4 5 6 7 8 9 10 11 12 13 14 + 一级缓存:它指的是 Mybatis 中 SqlSession 对象的缓存。当我们执行查询之后,查询的结果会同时存入到 SqlSession 为我们提供一块区域中。 + 该区域的结构是一个 Map 集合。当我们再次查询同样的数据,Mybatis 会先去 SqlSession 中查询是否有,有的话直接拿出来用。 - 当 SqlSession 对象消失时,Mybatis 的一级缓存也就消失了。 + 二级缓存:它指的是 Mybatis 中 SqlSessionFactory 对象的缓存。由同一个 SqlSessionFactory 对象创建的 SqlSession 共享其缓存。 + 第一步:让 Mybatis 框架支持二级缓存(在 SqlMapConfig.xml 中配置) + 第二步:让当前的映射文件支持二级缓存(在 IUserDao.xml 中配置) + 第三步:让当前的操作支持二级缓存(在 select 标签中配置)
现在我们测试一下 一级缓存 。具体操作:把 MybatisTest 类中的 testFindById 方法修改成下列代码:
MybatisTest.java 1 2 3 4 5 6 7 8 9 10 11 @Test public void testFindById () User user = userDao.findById(52 ); System.out.println(user); User user1 = userDao.findById(52 ); System.out.println(user1); System.out.println(user==user1); }
执行 testFindById 方法, 结果如下(关注 user==user1 的结果及 SQL 语句
1 2 3 4 5 6 7 8 9 10 11 12 13 14 15 2020 -08 -25 15 :53 :49 ,849 212 [ main] DEBUG ansaction.jdbc.JdbcTransaction - Opening JDBC Connection2020 -08 -25 15 :53 :50 ,079 442 [ main] DEBUG source.pooled.PooledDataSource - Created connection 9807749 .2020 -08 -25 15 :53 :50 ,079 442 [ main] DEBUG ansaction.jdbc.JdbcTransaction - Setting autocommit to false on JDBC Connection [com.mysql.jdbc.JDBC4Connection@95 a785]2020 -08 -25 15 :53 :50 ,084 447 [ main] DEBUG oshizhan.dao.IUserDao.findById - ==> Preparing: select * from user where id=? 2020 -08 -25 15 :53 :50 ,125 488 [ main] DEBUG oshizhan.dao.IUserDao.findById - ==> Parameters: 52 (Integer)2020 -08 -25 15 :53 :50 ,211 574 [ main] DEBUG oshizhan.dao.IUserDao.findById - <== Total: 1 2020 -08 -25 15 :53 :50 ,212 575 [ main] DEBUG o.IAccountDao.findAccountByUid - ==> Preparing: select * from account where uid = ? 2020 -08 -25 15 :53 :50 ,212 575 [ main] DEBUG o.IAccountDao.findAccountByUid - ==> Parameters: 52 (Integer)2020 -08 -25 15 :53 :50 ,213 576 [ main] DEBUG o.IAccountDao.findAccountByUid - <== Total: 0 User{userId=52 , userName='Tom' , userBirthday=Mon Oct 28 10 :26 :42 CST 2019 , userSex='男' , userAddress='广东佛山' } User{userId=52 , userName='Tom' , userBirthday=Mon Oct 28 10 :26 :42 CST 2019 , userSex='男' , userAddress='广东佛山' } true 2020 -08 -25 15 :53 :50 ,221 584 [ main] DEBUG ansaction.jdbc.JdbcTransaction - Resetting autocommit to true on JDBC Connection [com.mysql.jdbc.JDBC4Connection@95 a785]2020 -08 -25 15 :53 :50 ,222 585 [ main] DEBUG ansaction.jdbc.JdbcTransaction - Closing JDBC Connection [com.mysql.jdbc.JDBC4Connection@95 a785]2020 -08 -25 15 :53 :50 ,222 585 [ main] DEBUG source.pooled.PooledDataSource - Returned connection 9807749 to pool.
由上述 user==user1 的结果为 true 可知,mybatis 是使用了 一级缓存 的。这也说明了 mybatis 的一级缓存不需要进行配置,是默认就有的。 如果我们想要关闭一级缓存,
MybatisTest.java 1 2 3 4 5 6 7 8 9 10 11 12 13 14 15 @Test public void testFindById () User user = userDao.findById(52 ); System.out.println(user); session.close(); session = factory.openSession(); userDao = session.getMapper(IUserDao.class ) ; User user1 = userDao.findById(52 ); System.out.println(user1); System.out.println(user==user1); }
再次执行 testFindById 方法, 结果如下(关注 user==user1 的结果及 SQL 语句
1 2 3 4 5 6 7 8 9 10 11 12 13 14 15 16 17 18 2020 -08 -26 22 :20 :37 ,703 216 [ main] DEBUG ansaction.jdbc.JdbcTransaction - Opening JDBC Connection2020 -08 -26 22 :20 :38 ,040 553 [ main] DEBUG source.pooled.PooledDataSource - Created connection 5257320 .2020 -08 -26 22 :20 :38 ,040 553 [ main] DEBUG ansaction.jdbc.JdbcTransaction - Setting autocommit to false on JDBC Connection [com.mysql.jdbc.JDBC4Connection@503868 ]2020 -08 -26 22 :20 :38 ,043 556 [ main] DEBUG oshizhan.dao.IUserDao.findById - ==> Preparing: select * from user where id=? 2020 -08 -26 22 :20 :38 ,070 583 [ main] DEBUG oshizhan.dao.IUserDao.findById - ==> Parameters: 52 (Integer)2020 -08 -26 22 :20 :38 ,090 603 [ main] DEBUG oshizhan.dao.IUserDao.findById - <== Total: 1 User{Id=52 , username='Tom' , birthday=Mon Oct 28 10 :26 :42 CST 2019 , sex='男' , address='广东佛山' } 2020 -08 -26 22 :20 :38 ,099 612 [ main] DEBUG ansaction.jdbc.JdbcTransaction - Resetting autocommit to true on JDBC Connection [com.mysql.jdbc.JDBC4Connection@503868 ]2020 -08 -26 22 :20 :38 ,099 612 [ main] DEBUG ansaction.jdbc.JdbcTransaction - Closing JDBC Connection [com.mysql.jdbc.JDBC4Connection@503868 ]2020 -08 -26 22 :20 :38 ,099 612 [ main] DEBUG source.pooled.PooledDataSource - Returned connection 5257320 to pool.2020 -08 -26 22 :20 :38 ,099 612 [ main] DEBUG ansaction.jdbc.JdbcTransaction - Opening JDBC Connection2020 -08 -26 22 :20 :38 ,099 612 [ main] DEBUG source.pooled.PooledDataSource - Checked out connection 5257320 from pool.2020 -08 -26 22 :20 :38 ,100 613 [ main] DEBUG ansaction.jdbc.JdbcTransaction - Setting autocommit to false on JDBC Connection [com.mysql.jdbc.JDBC4Connection@503868 ]2020 -08 -26 22 :20 :38 ,100 613 [ main] DEBUG oshizhan.dao.IUserDao.findById - ==> Preparing: select * from user where id=? 2020 -08 -26 22 :20 :38 ,100 613 [ main] DEBUG oshizhan.dao.IUserDao.findById - ==> Parameters: 52 (Integer)2020 -08 -26 22 :20 :38 ,101 614 [ main] DEBUG oshizhan.dao.IUserDao.findById - <== Total: 1 User{Id=52 , username='Tom' , birthday=Mon Oct 28 10 :26 :42 CST 2019 , sex='男' , address='广东佛山' } false
从结果可知,我们已经实现了一级缓存的关闭操作(从结果为 false ,且进行了两次查询操作可得知)。 close() 和 clearCache() 方法,任选其一即可实现操作。
上述一级缓存搞定了,那么如果一级缓存中的数据和数据库的数据不一致了,那么如何实现数据同步呢?
1 2 3 4 5 6 7 8 9 10 11 12 13 14 15 16 @Test public void testFindById () User user = userDao.findById(52 ); System.out.println(user); user.setUsername("Tom" ); userDao.updateUser(user); User user1 = userDao.findById(52 ); System.out.println(user1); System.out.println(user==user1); }
上述代码执行结果如下:
1 2 3 4 5 6 7 8 9 10 11 12 13 14 15 16 2020 -08 -26 22 :38 :23 ,855 220 [ main] DEBUG ansaction.jdbc.JdbcTransaction - Opening JDBC Connection2020 -08 -26 22 :38 :24 ,093 458 [ main] DEBUG source.pooled.PooledDataSource - Created connection 24129702 .2020 -08 -26 22 :38 :24 ,093 458 [ main] DEBUG ansaction.jdbc.JdbcTransaction - Setting autocommit to false on JDBC Connection [com.mysql.jdbc.JDBC4Connection@17030 a6]2020 -08 -26 22 :38 :24 ,096 461 [ main] DEBUG oshizhan.dao.IUserDao.findById - ==> Preparing: select * from user where id=? 2020 -08 -26 22 :38 :24 ,126 491 [ main] DEBUG oshizhan.dao.IUserDao.findById - ==> Parameters: 52 (Integer)2020 -08 -26 22 :38 :24 ,149 514 [ main] DEBUG oshizhan.dao.IUserDao.findById - <== Total: 1 User{Id=52 , username='Jack' , birthday=Mon Oct 28 10 :26 :42 CST 2019 , sex='男' , address='广东佛山' } 2020 -08 -26 22 :38 :24 ,155 520 [ main] DEBUG hizhan.dao.IUserDao.updateUser - ==> Preparing: update user set username=? where id=? 2020 -08 -26 22 :38 :24 ,156 521 [ main] DEBUG hizhan.dao.IUserDao.updateUser - ==> Parameters: Tom(String), 52 (Integer)2020 -08 -26 22 :38 :24 ,156 521 [ main] DEBUG hizhan.dao.IUserDao.updateUser - <== Updates: 1 2020 -08 -26 22 :38 :24 ,157 522 [ main] DEBUG oshizhan.dao.IUserDao.findById - ==> Preparing: select * from user where id=? 2020 -08 -26 22 :38 :24 ,157 522 [ main] DEBUG oshizhan.dao.IUserDao.findById - ==> Parameters: 52 (Integer)2020 -08 -26 22 :38 :24 ,158 523 [ main] DEBUG oshizhan.dao.IUserDao.findById - <== Total: 1 User{Id=52 , username='Tom' , birthday=Mon Oct 28 10 :26 :42 CST 2019 , sex='男' , address='广东佛山' } false 2020 -08 -26 22 :38 :24 ,158 523 [ main] DEBUG ansaction.jdbc.JdbcTransaction - Committing JDBC Connection [com.mysql.jdbc.JDBC4Connection@17030 a6]
由结果可知:如果数据发生了更新,那么再次发起查询,mybatis 就不会从一级缓存中取,而是去重新查询数据库。 当我们去调用 SqlSession 的 修改、删除、添加、close()、commit() 等方法时,就会清空一级缓存。
现在,我们去开启 二级缓存(二级缓存的介绍及相关步骤上面已经讲过了) 。具体步骤:第一步: 在主配置文件 SqlMapConfig.xml 中
SqlMapConfig.xml 1 2 3 4 5 6 <configuration> + <!-- 配置开启二级缓存 --> + <settings> + <setting name="cacheEnabled" value="true"/> + </settings>
第二步: 在 IUserDao.xml 文件中加入如下配置。(表示开启二级缓存)
IUserDao.xml 1 2 3 4 5 6 7 8 <mapper namespace="club.guoshizhan.dao.IUserDao"> + <!-- 开启 user 支持二级缓存 --> + <cache/> + <!-- 在 select 标签上加上 userCache="true" 表示 select 查询语句支持二级缓存 --> + <select id="findById" parameterType="Integer" resultType="club.guoshizhan.domain.User" useCache="true"> select * from user where id=#{id} </select>
第三步: 在测试类中加入如下测试方法,用于测试二级缓存。
MybatisTest.java 1 2 3 4 5 6 7 8 9 10 11 12 13 14 15 16 17 @Test public void testSecondLevelCache () SqlSession session = factory.openSession(); IUserDao userDao = session.getMapper(IUserDao.class ) ; User user = userDao.findById(52 ); System.out.println(user); session.close(); SqlSession session1 = factory.openSession(); IUserDao userDao1 = session1.getMapper(IUserDao.class ) ; User user1 = userDao1.findById(52 ); System.out.println(user1); session1.close(); }
执行 testSecondLevelCache 方法,
1 2 3 4 5 6 7 8 9 10 11 12 2020 -08 -26 23 :06 :20 ,961 208 [ main] DEBUG ansaction.jdbc.JdbcTransaction - Opening JDBC Connection2020 -08 -26 23 :06 :21 ,200 447 [ main] DEBUG source.pooled.PooledDataSource - Created connection 23649725 .2020 -08 -26 23 :06 :21 ,200 447 [ main] DEBUG ansaction.jdbc.JdbcTransaction - Setting autocommit to false on JDBC Connection [com.mysql.jdbc.JDBC4Connection@168 ddbd]2020 -08 -26 23 :06 :21 ,203 450 [ main] DEBUG oshizhan.dao.IUserDao.findById - ==> Preparing: select * from user where id=? 2020 -08 -26 23 :06 :21 ,235 482 [ main] DEBUG oshizhan.dao.IUserDao.findById - ==> Parameters: 52 (Integer)2020 -08 -26 23 :06 :21 ,259 506 [ main] DEBUG oshizhan.dao.IUserDao.findById - <== Total: 1 User{Id=52 , username='Tom' , birthday=Mon Oct 28 10 :26 :42 CST 2019 , sex='男' , address='广东佛山' } 2020 -08 -26 23 :06 :21 ,273 520 [ main] DEBUG ansaction.jdbc.JdbcTransaction - Resetting autocommit to true on JDBC Connection [com.mysql.jdbc.JDBC4Connection@168 ddbd]2020 -08 -26 23 :06 :21 ,275 522 [ main] DEBUG ansaction.jdbc.JdbcTransaction - Closing JDBC Connection [com.mysql.jdbc.JDBC4Connection@168 ddbd]2020 -08 -26 23 :06 :21 ,276 523 [ main] DEBUG source.pooled.PooledDataSource - Returned connection 23649725 to pool.2020 -08 -26 23 :06 :21 ,278 525 [ main] DEBUG club.guoshizhan.dao.IUserDao - Cache Hit Ratio [club.guoshizhan.dao.IUserDao]: 0.5 User{Id=52 , username='Tom' , birthday=Mon Oct 28 10 :26 :42 CST 2019 , sex='男' , address='广东佛山' }
由结果可知,mybatis 只发起了一次查询,由于一级缓存已经关闭了,所以第二次则是通过 二级缓存 查到的数据。
TIPS: mybatis 的缓存
mybatis 注解开发 环境搭建 mybatis 注解开发的 环境搭建 过程上述已经做过了,所以此处跳过。 mybatis 注解案例
注意: 使用注解的时候,不要把接口的 xml 文件也加上, 哪怕你没有使用接口的 xml 文件,它也会报错 解决方法: 把接口的 xml 文件移动到不相干的目录,或者直接删除,
单表 CRUD 操作 CRUD 操作已经写过很多次了,基本步骤也就是那样。 而是写一个整体的过程。 mybatis 的单表操作 。注意: 注解开发比 xml 配置更简单哦!!!
第一步: 编写 IUserDao 接口,里面定义各种单表操作的方法(注解就是在这个地方使用的)。
IUserDao.java 1 2 3 4 5 6 7 8 9 10 11 12 13 14 15 16 17 18 19 20 21 22 23 24 25 26 27 28 29 30 31 32 33 34 35 36 37 38 39 40 41 42 43 44 45 46 47 package club.guoshizhan.dao;import club.guoshizhan.domain.User;import org.apache.ibatis.annotations.Delete;import org.apache.ibatis.annotations.Insert;import org.apache.ibatis.annotations.Select;import org.apache.ibatis.annotations.Update;import java.util.List;public interface IUserDao @Select ("select * from user" ) List<User> findAll () ; @Insert ("insert into user(username,birthday,sex,address) values (#{username},#{birthday},#{sex},#{address})" ) void saveUser (User user) @Update ("update user set username=#{username},birthday=#{birthday},sex=#{sex},address=#{address} where id=#{id}" ) void updateUser (User user) @Delete ("delete from user where id=#{id}" ) void deleteUser (Integer id) @Select ("select * from user where id=#{id}" ) User findById (Integer id) ; @Select ("select * from user where username like #{username}" ) List<User> findByName (String username) ; @Select ("select count(id) from user" ) int findTotal () }
第二步: 编写 MybatisTest 测试类进行测试。
MybatisTest.java 1 2 3 4 5 6 7 8 9 10 11 12 13 14 15 16 17 18 19 20 21 22 23 24 25 26 27 28 29 30 31 32 33 34 35 36 37 38 39 40 41 42 43 44 45 46 47 48 49 50 51 52 53 54 55 56 57 58 59 60 61 62 63 64 65 66 67 68 69 70 71 72 73 74 75 76 77 78 79 80 81 82 83 84 85 86 87 88 89 90 91 92 93 94 95 96 97 98 99 100 101 102 103 104 105 106 107 108 109 package club.guoshizhan.Test;import club.guoshizhan.dao.IUserDao;import club.guoshizhan.domain.User;import org.apache.ibatis.io.Resources;import org.apache.ibatis.session.SqlSession;import org.apache.ibatis.session.SqlSessionFactory;import org.apache.ibatis.session.SqlSessionFactoryBuilder;import org.junit.After;import org.junit.Before;import org.junit.Test;import java.io.IOException;import java.io.InputStream;import java.util.Date;import java.util.List;public class MybatisTest private InputStream in; private IUserDao userDao; private SqlSession session; @Before public void init () throws Exception in = Resources.getResourceAsStream("SqlMapConfig.xml" ); SqlSessionFactory factory = new SqlSessionFactoryBuilder().build(in); session = factory.openSession(); userDao = session.getMapper(IUserDao.class ) ; } @Test public void testFindAll () List<User> users = userDao.findAll(); for (User user : users) { System.out.println(user); } } @Test public void testSave () User user = new User(); user.setUsername("Miracle" ); user.setBirthday(new Date()); user.setSex("女" ); user.setAddress("Los Angeles" ); userDao.saveUser(user); } @Test public void testUpdate () User user = new User(); user.setId(74 ); user.setUsername("Miracle" ); user.setBirthday(new Date()); user.setSex("女" ); user.setAddress("Washington" ); userDao.updateUser(user); } @Test public void testDelete () userDao.deleteUser(74 ); } @Test public void testFindById () User user = userDao.findById(52 ); System.out.println(user); } @Test public void testFindByName () String username = "%王%" ; List<User> users = userDao.findByName(username); for (User user : users) { System.out.println(user); } } @Test public void testFindTotal () int total = userDao.findTotal(); System.out.println("===================== total:" + total + " =====================" ); } @After public void destroy () throws IOException session.commit(); session.close(); in.close(); } }
TIPS: 执行上述的任意一个测试方法,即可实现相应的功能。 但是还存在一些问题,接着往下看!!!
上述操作虽然成功,但是我们还需要来解决一个问题:如果 User 实体类属性和数据库字段不一致,会有什么后果呢? 但是现在是使用注解开发,那么如何解决这个问题呢?
第一步: 修改 User 类,故意把它的属性设置的和数据库字段不一致。
User.java 1 2 3 4 5 6 7 8 9 10 11 12 13 14 15 16 17 18 19 20 21 22 23 24 25 26 27 28 29 30 31 32 33 34 35 36 37 38 39 40 41 42 43 44 45 46 47 48 49 50 51 52 53 54 55 56 57 58 59 60 61 62 63 64 65 66 67 68 69 70 package club.guoshizhan.domain;import java.io.Serializable;import java.util.Date;public class User implements Serializable private Integer userId; private String userName; private Date userBirthday; private String userSex; private String userAddress; public Integer getUserId () return userId; } public void setUserId (Integer userId) this .userId = userId; } public String getUserName () return userName; } public void setUserName (String userName) this .userName = userName; } public Date getUserBirthday () return userBirthday; } public void setUserBirthday (Date userBirthday) this .userBirthday = userBirthday; } public String getUserSex () return userSex; } public void setUserSex (String userSex) this .userSex = userSex; } public String getUserAddress () return userAddress; } public void setUserAddress (String userAddress) this .userAddress = userAddress; } @Override public String toString () return "User{" + "userId=" + userId + ", userName='" + userName + '\'' + ", userBirthday=" + userBirthday + ", userSex='" + userSex + '\'' + ", userAddress='" + userAddress + '\'' + '}' ; } }
第二步: 为了解决实体类属性和数据库字段不一致的问题,我们需要修改 IUserDao 接口(解决方式见注释)。
IUserDao.java 1 2 3 4 5 6 7 8 9 10 11 12 13 14 15 16 17 18 19 20 21 22 23 24 25 26 27 28 29 30 31 32 33 34 35 36 37 38 39 40 41 42 43 44 package club.guoshizhan.dao;import club.guoshizhan.domain.User;import org.apache.ibatis.annotations.Result;import org.apache.ibatis.annotations.ResultMap;import org.apache.ibatis.annotations.Results;import org.apache.ibatis.annotations.Select;import java.util.List;public interface IUserDao @Select ("select * from user" ) @Results (id = "userMap" , value = { @Result (id = true , property = "userId" , column = "id" ), @Result (property = "userName" , column = "username" ), @Result (property = "userAddress" , column = "address" ), @Result (property = "userSex" , column = "sex" ), @Result (property = "userBirthday" , column = "birthday" ) }) List<User> findAll () ; @Select ("select * from user where id=#{id}" ) @ResultMap (value = {"userMap" }) User findById (Integer id) ; @Select ("select * from user where username like #{username}" ) @ResultMap ("userMap" ) List<User> findByName (String username) ; }
第三步: 编写测试类进行进行测试。
MybatisTest.java 1 2 3 4 5 6 7 8 9 10 11 12 13 14 15 16 17 18 19 20 21 22 23 24 25 26 27 28 29 30 31 32 33 34 35 36 37 38 39 40 41 42 43 44 45 46 47 48 49 50 51 52 53 54 55 56 57 58 59 60 61 62 63 64 65 66 67 68 69 70 71 package club.guoshizhan.Test;import club.guoshizhan.dao.IUserDao;import club.guoshizhan.domain.User;import org.apache.ibatis.io.Resources;import org.apache.ibatis.session.SqlSession;import org.apache.ibatis.session.SqlSessionFactory;import org.apache.ibatis.session.SqlSessionFactoryBuilder;import org.junit.After;import org.junit.Before;import org.junit.Test;import java.io.IOException;import java.io.InputStream;import java.util.List;public class MybatisTest private InputStream in; private IUserDao userDao; private SqlSession session; @Before public void init () throws Exception in = Resources.getResourceAsStream("SqlMapConfig.xml" ); SqlSessionFactory factory = new SqlSessionFactoryBuilder().build(in); session = factory.openSession(); userDao = session.getMapper(IUserDao.class ) ; } @Test public void testFindAll () List<User> users = userDao.findAll(); for (User user : users) { System.out.println(user); } } @Test public void testFindById () User user = userDao.findById(52 ); System.out.println(user); } @Test public void testFindByName () String username = "%王%" ; List<User> users = userDao.findByName(username); for (User user : users) { System.out.println(user); } } @After public void destroy () throws IOException session.commit(); session.close(); in.close(); } }
执行上述的任何一个方法,都是没有问题的,即都可以封装成功,每一个属性都是有值的。 @Results 注解 的那段相关配置,那么执行任何方法,都是无法完成封装的。我们以 testFindAll 方法为例,执行这个方法,结果如下(只有 username 能够封装成功,其余都为 null):
1 2 3 4 5 6 7 8 9 10 11 12 13 14 15 16 2020 -08 -25 11 :22 :37 ,059 172 [ main] DEBUG ansaction.jdbc.JdbcTransaction - Opening JDBC Connection2020 -08 -25 11 :22 :37 ,308 421 [ main] DEBUG source.pooled.PooledDataSource - Created connection 23465806 .2020 -08 -25 11 :22 :37 ,309 422 [ main] DEBUG ansaction.jdbc.JdbcTransaction - Setting autocommit to false on JDBC Connection [com.mysql.jdbc.JDBC4Connection@1660f 4e]2020 -08 -25 11 :22 :37 ,312 425 [ main] DEBUG uoshizhan.dao.IUserDao.findAll - ==> Preparing: select * from user 2020 -08 -25 11 :22 :37 ,340 453 [ main] DEBUG uoshizhan.dao.IUserDao.findAll - ==> Parameters: 2020 -08 -25 11 :22 :37 ,357 470 [ main] DEBUG uoshizhan.dao.IUserDao.findAll - <== Total: 7 User{userId=null , userName='小二王' , userBirthday=null , userSex='null' , userAddress='null' } User{userId=null , userName='大王' , userBirthday=null , userSex='null' , userAddress='null' } User{userId=null , userName='老王' , userBirthday=null , userSex='null' , userAddress='null' } User{userId=null , userName='Jack' , userBirthday=null , userSex='null' , userAddress='null' } User{userId=null , userName='Lisa' , userBirthday=null , userSex='null' , userAddress='null' } User{userId=null , userName='Tom' , userBirthday=null , userSex='null' , userAddress='null' } User{userId=null , userName='Bob' , userBirthday=null , userSex='null' , userAddress='null' } 2020 -08 -25 11 :22 :37 ,358 471 [ main] DEBUG ansaction.jdbc.JdbcTransaction - Resetting autocommit to true on JDBC Connection [com.mysql.jdbc.JDBC4Connection@1660f 4e]2020 -08 -25 11 :22 :37 ,358 471 [ main] DEBUG ansaction.jdbc.JdbcTransaction - Closing JDBC Connection [com.mysql.jdbc.JDBC4Connection@1660f 4e]2020 -08 -25 11 :22 :37 ,359 472 [ main] DEBUG source.pooled.PooledDataSource - Returned connection 23465806 to pool.
TIPS: 单表 CRUD 操作
多表查询操作 一对一操作 在 xml 配置中讲过了这部分, 第一步: 在 domain 包下新建 Account 实体类。
Account.java 1 2 3 4 5 6 7 8 9 10 11 12 13 14 15 16 17 18 19 20 21 22 23 24 25 26 27 28 29 30 31 32 33 34 35 36 37 38 39 40 41 42 43 44 45 46 47 48 49 50 51 52 53 54 55 56 57 58 59 60 package club.guoshizhan.domain;import java.io.Serializable;public class Account implements Serializable private Integer id; private Integer uid; private Double money; private User user; public User getUser () return user; } public void setUser (User user) this .user = user; } public Integer getId () return id; } public void setId (Integer id) this .id = id; } public Integer getUid () return uid; } public void setUid (Integer uid) this .uid = uid; } public Double getMoney () return money; } public void setMoney (Double money) this .money = money; } @Override public String toString () return "Account{" + "id=" + id + ", uid=" + uid + ", money=" + money + '}' ; } }
第二步: 在 dao 包下新建 IAccountDao 接口,注解也就在这个地方使用。
IAccountDao.java 1 2 3 4 5 6 7 8 9 10 11 12 13 14 15 16 17 18 19 20 21 22 23 24 25 26 27 28 29 30 package club.guoshizhan.dao;import club.guoshizhan.domain.Account;import org.apache.ibatis.annotations.One;import org.apache.ibatis.annotations.Result;import org.apache.ibatis.annotations.Results;import org.apache.ibatis.annotations.Select;import org.apache.ibatis.mapping.FetchType;import java.util.List;public interface IAccountDao @Select ("select * from account" ) @Results (id = "accountMap" , value = { @Result (id = true , property = "id" , column = "id" ), @Result (property = "uid" , column = "uid" ), @Result (property = "money" , column = "money" ), @Result (property = "user" , column = "uid" ,one = @One (select = "club.guoshizhan.dao.IUserDao.findById" ,fetchType = FetchType.EAGER)) }) List<Account> findAll () ; }
第三步: 在 SqlMapConfig 主配置文件中添加一行配置,让框架能够扫描到 IAccountDao 接口。
SqlMapConfig.java 1 2 3 4 <mappers> <mapper class="club.guoshizhan.dao.IUserDao"/> + <mapper class="club.guoshizhan.dao.IAccountDao"/> </mappers>
第四步: 编写 AccountTest 测试类进行测试。
AccountTest.java 1 2 3 4 5 6 7 8 9 10 11 12 13 14 15 16 17 18 19 20 21 22 23 24 25 26 27 28 29 30 31 32 33 34 35 36 37 38 39 40 41 42 43 44 45 46 47 48 49 50 51 52 53 54 package club.guoshizhan.Test;import club.guoshizhan.dao.IAccountDao;import club.guoshizhan.domain.Account;import org.apache.ibatis.io.Resources;import org.apache.ibatis.session.SqlSession;import org.apache.ibatis.session.SqlSessionFactory;import org.apache.ibatis.session.SqlSessionFactoryBuilder;import org.junit.After;import org.junit.Before;import org.junit.Test;import java.io.IOException;import java.io.InputStream;import java.util.List;public class AccountTest private InputStream in; private IAccountDao accountDao; private SqlSession session; @Before public void init () throws Exception in = Resources.getResourceAsStream("SqlMapConfig.xml" ); SqlSessionFactory factory = new SqlSessionFactoryBuilder().build(in); session = factory.openSession(); accountDao = session.getMapper(IAccountDao.class ) ; } @Test public void testFindAll () List<Account> accounts = accountDao.findAll(); for (Account account : accounts) { System.out.println("======== 一对一表结构结果输出 ========" ); System.out.println(account); System.out.println(account.getUser()); } } @After public void destroy () throws IOException session.close(); in.close(); } }
执行上述 testFindAll 方法, (注意 SQL 语句)
1 2 3 4 5 6 7 8 9 10 11 12 13 14 15 16 17 18 2020 -08 -25 15 :08 :07 ,647 188 [ main] DEBUG ansaction.jdbc.JdbcTransaction - Opening JDBC Connection2020 -08 -25 15 :08 :07 ,905 446 [ main] DEBUG source.pooled.PooledDataSource - Created connection 24030126 .2020 -08 -25 15 :08 :07 ,906 447 [ main] DEBUG ansaction.jdbc.JdbcTransaction - Setting autocommit to false on JDBC Connection [com.mysql.jdbc.JDBC4Connection@16 eabae]2020 -08 -25 15 :08 :07 ,909 450 [ main] DEBUG hizhan.dao.IAccountDao.findAll - ==> Preparing: select * from account 2020 -08 -25 15 :08 :07 ,943 484 [ main] DEBUG hizhan.dao.IAccountDao.findAll - ==> Parameters: 2020 -08 -25 15 :08 :07 ,961 502 [ main] DEBUG oshizhan.dao.IUserDao.findById - ====> Preparing: select * from user where id=? 2020 -08 -25 15 :08 :07 ,962 503 [ main] DEBUG oshizhan.dao.IUserDao.findById - ====> Parameters: 46 (Integer)2020 -08 -25 15 :08 :07 ,976 517 [ main] DEBUG oshizhan.dao.IUserDao.findById - <==== Total: 1 2020 -08 -25 15 :08 :07 ,977 518 [ main] DEBUG hizhan.dao.IAccountDao.findAll - <== Total: 2 ======== 一对一表结构结果输出 ======== Account{id=1 , uid=46 , money=1000.0 } User{userId=46 , userName='老王' , userBirthday=Wed Mar 07 17 :37 :26 CST 2018 , userSex='男' , userAddress='北京' } ======== 一对一表结构结果输出 ======== Account{id=3 , uid=46 , money=2000.0 } User{userId=46 , userName='老王' , userBirthday=Wed Mar 07 17 :37 :26 CST 2018 , userSex='男' , userAddress='北京' } 2020 -08 -25 15 :08 :07 ,989 530 [ main] DEBUG ansaction.jdbc.JdbcTransaction - Resetting autocommit to true on JDBC Connection [com.mysql.jdbc.JDBC4Connection@16 eabae]2020 -08 -25 15 :08 :07 ,989 530 [ main] DEBUG ansaction.jdbc.JdbcTransaction - Closing JDBC Connection [com.mysql.jdbc.JDBC4Connection@16 eabae]2020 -08 -25 15 :08 :07 ,989 530 [ main] DEBUG source.pooled.PooledDataSource - Returned connection 24030126 to pool.
一对多操作 第一步: 在 User 实体类中添加如下几行代码。
1 2 3 4 5 6 7 8 9 10 11 12 13 14 15 16 17 18 19 20 21 22 23 24 25 26 27 28 29 30 31 32 33 34 35 36 37 38 39 40 41 42 43 44 45 46 47 48 49 50 51 52 53 54 55 56 57 58 59 60 61 62 63 64 65 66 67 68 69 70 71 72 73 74 75 76 77 78 79 80 81 82 package club.guoshizhan.domain; import java.io.Serializable; import java.util.Date; + import java.util.List; /** * @Author: guoshizhan * @Create: 2020/6/22 23:52 * @Description: User 实体类 */ public class User implements Serializable { private Integer userId; private String userName; private Date userBirthday; private String userSex; private String userAddress; + // 一对多关系映射:一个用户对应多个账户 + private List<Account> accounts; + public List<Account> getAccounts() { + return accounts; + } + public void setAccounts(List<Account> accounts) { + this.accounts = accounts; + } public Integer getUserId() { return userId; } public void setUserId(Integer userId) { this.userId = userId; } public String getUserName() { return userName; } public void setUserName(String userName) { this.userName = userName; } public Date getUserBirthday() { return userBirthday; } public void setUserBirthday(Date userBirthday) { this.userBirthday = userBirthday; } public String getUserSex() { return userSex; } public void setUserSex(String userSex) { this.userSex = userSex; } public String getUserAddress() { return userAddress; } public void setUserAddress(String userAddress) { this.userAddress = userAddress; } @Override public String toString() { return "User{" + "userId=" + userId + ", userName='" + userName + '\'' + ", userBirthday=" + userBirthday + ", userSex='" + userSex + '\'' + ", userAddress='" + userAddress + '\'' + '}'; } }
第二步: 在 IAccountDao 接口中添加如下几行代码。
1 2 3 4 5 6 7 8 9 10 11 12 13 14 15 16 17 18 19 20 21 22 23 24 25 26 27 28 29 30 31 32 33 34 package club.guoshizhan.dao; import club.guoshizhan.domain.Account; import org.apache.ibatis.annotations.One; import org.apache.ibatis.annotations.Result; import org.apache.ibatis.annotations.Results; import org.apache.ibatis.annotations.Select; import org.apache.ibatis.mapping.FetchType; import java.util.List; /** * @Author: guoshizhan * @Create: 2020/8/24 11:07 * @Description: Account 的 dao 接口 */ public interface IAccountDao { // 查询所有账户,并且获取每个账户所属的用户信息 @Select("select * from account") @Results(id = "accountMap", value = { @Result(id = true, property = "id", column = "id"), @Result(property = "uid", column = "uid"), @Result(property = "money", column = "money"), // one 表示一对一里面的 select 属性表示对应方法的全限定类名,fetchType 表示加载时机:立即加载、延迟加载或者默认 @Result(property = "user", column = "uid",one = @One(select = "club.guoshizhan.dao.IUserDao.findById",fetchType = FetchType.EAGER)) }) List<Account> findAll(); + // 根据用户 id 查询账户信息 + @Select("select * from account where uid = #{uid}") + List<Account> findAccountByUid(Integer uid); }
第三步: 在 IUserDao 接口中添加一行代码。
1 2 3 4 5 6 7 8 9 10 11 12 13 14 15 16 17 18 19 20 21 22 23 24 25 26 27 28 29 30 31 32 33 34 35 36 37 38 39 40 41 42 package club.guoshizhan.dao; import club.guoshizhan.domain.User; import org.apache.ibatis.annotations.*; import org.apache.ibatis.mapping.FetchType; import java.util.List; /** * @Author: guoshizhan * @Create: 2020/6/22 23:53 * @Description: 用户持久层接口 */ public interface IUserDao { // 01-查询所有用户 @Select("select * from user") // 此处的 id 属性是一个唯一标识,相当于 resultMap 中的 id 属性。目的是此处定义好的配置可以在其他的方法上使用 @Results(id = "userMap", value = { @Result(id = true, property = "userId", column = "id"), @Result(property = "userName", column = "username"), @Result(property = "userAddress", column = "address"), @Result(property = "userSex", column = "sex"), @Result(property = "userBirthday", column = "birthday"), + @Result(property = "accounts", column = "id", many = @Many(select = "club.guoshizhan.dao.IAccountDao.findAccountByUid", fetchType = FetchType.LAZY)) }) List<User> findAll(); // 02-根据 id 查询用户 @Select("select * from user where id=#{id}") @ResultMap(value = {"userMap"}) // 此处使用了上述定义好的属性映射关系 User findById(Integer id); // 03-根据用户名称模糊查询 @Select("select * from user where username like #{username}") @ResultMap("userMap") /* @Select("select * from user where username like '%${value}%'") */ List<User> findByName(String username); }
第四步: 执行测试类中的 testFindAll 方法。
MybatisTest.java 1 2 3 4 5 6 7 8 9 10 11 12 13 14 15 16 17 18 19 20 21 22 23 24 25 26 27 28 29 30 31 32 33 34 35 36 37 38 39 40 41 42 43 44 45 46 47 48 49 50 51 52 53 54 55 56 57 58 59 60 61 62 63 64 65 66 67 68 69 70 71 72 73 package club.guoshizhan.Test;import club.guoshizhan.dao.IUserDao;import club.guoshizhan.domain.User;import org.apache.ibatis.io.Resources;import org.apache.ibatis.session.SqlSession;import org.apache.ibatis.session.SqlSessionFactory;import org.apache.ibatis.session.SqlSessionFactoryBuilder;import org.junit.After;import org.junit.Before;import org.junit.Test;import java.io.IOException;import java.io.InputStream;import java.util.List;public class MybatisTest private InputStream in; private IUserDao userDao; private SqlSession session; @Before public void init () throws Exception in = Resources.getResourceAsStream("SqlMapConfig.xml" ); SqlSessionFactory factory = new SqlSessionFactoryBuilder().build(in); session = factory.openSession(); userDao = session.getMapper(IUserDao.class ) ; } @Test public void testFindAll () List<User> users = userDao.findAll(); for (User user : users) { System.out.println("======== 每个用户的信息(使用了延迟加载) ========" ); System.out.println(user); System.out.println(user.getAccounts()); } } @Test public void testFindById () User user = userDao.findById(52 ); System.out.println(user); } @Test public void testFindByName () String username = "%王%" ; List<User> users = userDao.findByName(username); for (User user : users) { System.out.println(user); } } @After public void destroy () throws IOException session.commit(); session.close(); in.close(); } }
The result of MybatisTest's testFindAll method 1 2 3 4 5 6 7 8 9 10 11 12 13 14 15 16 17 18 19 20 21 22 23 24 25 26 27 28 29 30 31 32 33 34 35 36 37 38 39 40 41 42 43 44 45 46 47 48 49 50 51 2020 -08 -25 15 :38 :35 ,275 240 [ main] DEBUG ansaction.jdbc.JdbcTransaction - Opening JDBC Connection2020 -08 -25 15 :38 :35 ,553 518 [ main] DEBUG source.pooled.PooledDataSource - Created connection 12309002 .2020 -08 -25 15 :38 :35 ,554 519 [ main] DEBUG ansaction.jdbc.JdbcTransaction - Setting autocommit to false on JDBC Connection [com.mysql.jdbc.JDBC4Connection@bbd 20a]2020 -08 -25 15 :38 :35 ,556 521 [ main] DEBUG uoshizhan.dao.IUserDao.findAll - ==> Preparing: select * from user 2020 -08 -25 15 :38 :35 ,587 552 [ main] DEBUG uoshizhan.dao.IUserDao.findAll - ==> Parameters: 2020 -08 -25 15 :38 :35 ,673 638 [ main] DEBUG uoshizhan.dao.IUserDao.findAll - <== Total: 7 ======== 每个用户的信息(使用了延迟加载) ======== 2020 -08 -25 15 :38 :35 ,674 639 [ main] DEBUG o.IAccountDao.findAccountByUid - ==> Preparing: select * from account where uid = ? 2020 -08 -25 15 :38 :35 ,674 639 [ main] DEBUG o.IAccountDao.findAccountByUid - ==> Parameters: 42 (Integer)2020 -08 -25 15 :38 :35 ,674 639 [ main] DEBUG o.IAccountDao.findAccountByUid - <== Total: 0 User{userId=42 , userName='小二王' , userBirthday=Fri Mar 02 15 :09 :37 CST 2018 , userSex='女' , userAddress='北京金燕龙' } [] ======== 每个用户的信息(使用了延迟加载) ======== 2020 -08 -25 15 :38 :35 ,679 644 [ main] DEBUG o.IAccountDao.findAccountByUid - ==> Preparing: select * from account where uid = ? 2020 -08 -25 15 :38 :35 ,679 644 [ main] DEBUG o.IAccountDao.findAccountByUid - ==> Parameters: 43 (Integer)2020 -08 -25 15 :38 :35 ,679 644 [ main] DEBUG o.IAccountDao.findAccountByUid - <== Total: 0 User{userId=43 , userName='大王' , userBirthday=Tue Nov 12 10 :19 :13 CST 2019 , userSex='男' , userAddress='Los Angeles' } [] ======== 每个用户的信息(使用了延迟加载) ======== 2020 -08 -25 15 :38 :35 ,680 645 [ main] DEBUG o.IAccountDao.findAccountByUid - ==> Preparing: select * from account where uid = ? 2020 -08 -25 15 :38 :35 ,680 645 [ main] DEBUG o.IAccountDao.findAccountByUid - ==> Parameters: 46 (Integer)2020 -08 -25 15 :38 :35 ,681 646 [ main] DEBUG o.IAccountDao.findAccountByUid - <== Total: 2 User{userId=46 , userName='老王' , userBirthday=Wed Mar 07 17 :37 :26 CST 2018 , userSex='男' , userAddress='北京' } [Account{id=1 , uid=46 , money=1000.0 }, Account{id=3 , uid=46 , money=2000.0 }] ======== 每个用户的信息(使用了延迟加载) ======== 2020 -08 -25 15 :38 :35 ,681 646 [ main] DEBUG o.IAccountDao.findAccountByUid - ==> Preparing: select * from account where uid = ? 2020 -08 -25 15 :38 :35 ,682 647 [ main] DEBUG o.IAccountDao.findAccountByUid - ==> Parameters: 49 (Integer)2020 -08 -25 15 :38 :35 ,682 647 [ main] DEBUG o.IAccountDao.findAccountByUid - <== Total: 0 User{userId=49 , userName='Jack' , userBirthday=Mon Oct 28 09 :15 :39 CST 2019 , userSex='男' , userAddress='上海闵行' } [] ======== 每个用户的信息(使用了延迟加载) ======== 2020 -08 -25 15 :38 :35 ,683 648 [ main] DEBUG o.IAccountDao.findAccountByUid - ==> Preparing: select * from account where uid = ? 2020 -08 -25 15 :38 :35 ,683 648 [ main] DEBUG o.IAccountDao.findAccountByUid - ==> Parameters: 51 (Integer)2020 -08 -25 15 :38 :35 ,683 648 [ main] DEBUG o.IAccountDao.findAccountByUid - <== Total: 0 User{userId=51 , userName='Lisa' , userBirthday=Mon Oct 28 09 :17 :31 CST 2019 , userSex='女' , userAddress='广东佛山' } [] ======== 每个用户的信息(使用了延迟加载) ======== 2020 -08 -25 15 :38 :35 ,684 649 [ main] DEBUG o.IAccountDao.findAccountByUid - ==> Preparing: select * from account where uid = ? 2020 -08 -25 15 :38 :35 ,684 649 [ main] DEBUG o.IAccountDao.findAccountByUid - ==> Parameters: 52 (Integer)2020 -08 -25 15 :38 :35 ,685 650 [ main] DEBUG o.IAccountDao.findAccountByUid - <== Total: 0 User{userId=52 , userName='Tom' , userBirthday=Mon Oct 28 10 :26 :42 CST 2019 , userSex='男' , userAddress='广东佛山' } [] ======== 每个用户的信息(使用了延迟加载) ======== 2020 -08 -25 15 :38 :35 ,686 651 [ main] DEBUG o.IAccountDao.findAccountByUid - ==> Preparing: select * from account where uid = ? 2020 -08 -25 15 :38 :35 ,687 652 [ main] DEBUG o.IAccountDao.findAccountByUid - ==> Parameters: 54 (Integer)2020 -08 -25 15 :38 :35 ,688 653 [ main] DEBUG o.IAccountDao.findAccountByUid - <== Total: 0 User{userId=54 , userName='Bob' , userBirthday=Tue Nov 12 10 :21 :41 CST 2019 , userSex='男' , userAddress='广东佛山' } [] 2020 -08 -25 15 :38 :35 ,688 653 [ main] DEBUG ansaction.jdbc.JdbcTransaction - Resetting autocommit to true on JDBC Connection [com.mysql.jdbc.JDBC4Connection@bbd 20a]2020 -08 -25 15 :38 :35 ,689 654 [ main] DEBUG ansaction.jdbc.JdbcTransaction - Closing JDBC Connection [com.mysql.jdbc.JDBC4Connection@bbd 20a]2020 -08 -25 15 :38 :35 ,689 654 [ main] DEBUG source.pooled.PooledDataSource - Returned connection 12309002 to pool.
缓存的配置 一级缓存 不用我们开启,也不用我们配置,mabatis 已经自动配置好了,不需要我们去操心。 MybatisTest 类中的 testFindById 方法修改成下列代码:
MybatisTest's testFindById method 1 2 3 4 5 6 7 8 9 10 11 @Test public void testFindById () User user = userDao.findById(52 ); System.out.println(user); User user1 = userDao.findById(52 ); System.out.println(user1); System.out.println(user==user1); }
执行 testFindById 方法, (关注 user==user1 的结果及 SQL 语句)
1 2 3 4 5 6 7 8 9 10 11 12 13 14 15 2020 -08 -25 15 :53 :49 ,849 212 [ main] DEBUG ansaction.jdbc.JdbcTransaction - Opening JDBC Connection2020 -08 -25 15 :53 :50 ,079 442 [ main] DEBUG source.pooled.PooledDataSource - Created connection 9807749 .2020 -08 -25 15 :53 :50 ,079 442 [ main] DEBUG ansaction.jdbc.JdbcTransaction - Setting autocommit to false on JDBC Connection [com.mysql.jdbc.JDBC4Connection@95 a785]2020 -08 -25 15 :53 :50 ,084 447 [ main] DEBUG oshizhan.dao.IUserDao.findById - ==> Preparing: select * from user where id=? 2020 -08 -25 15 :53 :50 ,125 488 [ main] DEBUG oshizhan.dao.IUserDao.findById - ==> Parameters: 52 (Integer)2020 -08 -25 15 :53 :50 ,211 574 [ main] DEBUG oshizhan.dao.IUserDao.findById - <== Total: 1 2020 -08 -25 15 :53 :50 ,212 575 [ main] DEBUG o.IAccountDao.findAccountByUid - ==> Preparing: select * from account where uid = ? 2020 -08 -25 15 :53 :50 ,212 575 [ main] DEBUG o.IAccountDao.findAccountByUid - ==> Parameters: 52 (Integer)2020 -08 -25 15 :53 :50 ,213 576 [ main] DEBUG o.IAccountDao.findAccountByUid - <== Total: 0 User{userId=52 , userName='Tom' , userBirthday=Mon Oct 28 10 :26 :42 CST 2019 , userSex='男' , userAddress='广东佛山' } User{userId=52 , userName='Tom' , userBirthday=Mon Oct 28 10 :26 :42 CST 2019 , userSex='男' , userAddress='广东佛山' } true 2020 -08 -25 15 :53 :50 ,221 584 [ main] DEBUG ansaction.jdbc.JdbcTransaction - Resetting autocommit to true on JDBC Connection [com.mysql.jdbc.JDBC4Connection@95 a785]2020 -08 -25 15 :53 :50 ,222 585 [ main] DEBUG ansaction.jdbc.JdbcTransaction - Closing JDBC Connection [com.mysql.jdbc.JDBC4Connection@95 a785]2020 -08 -25 15 :53 :50 ,222 585 [ main] DEBUG source.pooled.PooledDataSource - Returned connection 9807749 to pool.
由结果可知,user 和 user1 是相等的。所以我们需要关注的是: 二级缓存 如何去配置。 第一步: 在测试的包下新建 SecondLevelCacheTest 测试类,
SecondLevelCacheTest.java 1 2 3 4 5 6 7 8 9 10 11 12 13 14 15 16 17 18 19 20 21 22 23 24 25 26 27 28 29 30 31 32 33 34 35 36 37 38 39 40 41 42 43 44 45 46 47 48 49 50 51 52 53 54 package club.guoshizhan.Test;import club.guoshizhan.dao.IUserDao;import club.guoshizhan.domain.User;import org.apache.ibatis.io.Resources;import org.apache.ibatis.session.SqlSession;import org.apache.ibatis.session.SqlSessionFactory;import org.apache.ibatis.session.SqlSessionFactoryBuilder;import org.junit.After;import org.junit.Before;import org.junit.Test;import java.io.IOException;import java.io.InputStream;public class SecondLevelCacheTest private InputStream in; private SqlSessionFactory factory; @Before public void init () throws Exception in = Resources.getResourceAsStream("SqlMapConfig.xml" ); factory = new SqlSessionFactoryBuilder().build(in); } @Test public void testFindById () SqlSession session = factory.openSession(); IUserDao userDao = session.getMapper(IUserDao.class ) ; User user = userDao.findById(52 ); System.out.println(user); session.close(); SqlSession session1 = factory.openSession(); IUserDao userDao1 = session1.getMapper(IUserDao.class ) ; User user1 = userDao1.findById(52 ); System.out.println(user1); session1.close(); } @After public void destroy () throws IOException in.close(); } }
执行 testFindById 方法, (由于没有配置缓存,SQL 必定执行两次。因为这样,所以需要配置二级缓存)
1 2 3 4 5 6 7 8 9 10 11 12 13 14 15 16 17 18 19 20 21 22 23 24 25 26 20 -08 -25 16 :10 :49 ,746 249 [ main] DEBUG ansaction.jdbc.JdbcTransaction - Opening JDBC Connection2020 -08 -25 16 :10 :49 ,984 487 [ main] DEBUG source.pooled.PooledDataSource - Created connection 9807749 .2020 -08 -25 16 :10 :49 ,985 488 [ main] DEBUG ansaction.jdbc.JdbcTransaction - Setting autocommit to false on JDBC Connection [com.mysql.jdbc.JDBC4Connection@95 a785]2020 -08 -25 16 :10 :49 ,987 490 [ main] DEBUG oshizhan.dao.IUserDao.findById - ==> Preparing: select * from user where id=? 2020 -08 -25 16 :10 :50 ,016 519 [ main] DEBUG oshizhan.dao.IUserDao.findById - ==> Parameters: 52 (Integer)2020 -08 -25 16 :10 :50 ,091 594 [ main] DEBUG oshizhan.dao.IUserDao.findById - <== Total: 1 2020 -08 -25 16 :10 :50 ,092 595 [ main] DEBUG o.IAccountDao.findAccountByUid - ==> Preparing: select * from account where uid = ? 2020 -08 -25 16 :10 :50 ,092 595 [ main] DEBUG o.IAccountDao.findAccountByUid - ==> Parameters: 52 (Integer)2020 -08 -25 16 :10 :50 ,092 595 [ main] DEBUG o.IAccountDao.findAccountByUid - <== Total: 0 User{userId=52 , userName='Tom' , userBirthday=Mon Oct 28 10 :26 :42 CST 2019 , userSex='男' , userAddress='广东佛山' } 2020 -08 -25 16 :10 :50 ,095 598 [ main] DEBUG ansaction.jdbc.JdbcTransaction - Resetting autocommit to true on JDBC Connection [com.mysql.jdbc.JDBC4Connection@95 a785]2020 -08 -25 16 :10 :50 ,095 598 [ main] DEBUG ansaction.jdbc.JdbcTransaction - Closing JDBC Connection [com.mysql.jdbc.JDBC4Connection@95 a785]2020 -08 -25 16 :10 :50 ,095 598 [ main] DEBUG source.pooled.PooledDataSource - Returned connection 9807749 to pool.2020 -08 -25 16 :10 :50 ,095 598 [ main] DEBUG ansaction.jdbc.JdbcTransaction - Opening JDBC Connection2020 -08 -25 16 :10 :50 ,095 598 [ main] DEBUG source.pooled.PooledDataSource - Checked out connection 9807749 from pool.2020 -08 -25 16 :10 :50 ,095 598 [ main] DEBUG ansaction.jdbc.JdbcTransaction - Setting autocommit to false on JDBC Connection [com.mysql.jdbc.JDBC4Connection@95 a785]2020 -08 -25 16 :10 :50 ,096 599 [ main] DEBUG oshizhan.dao.IUserDao.findById - ==> Preparing: select * from user where id=? 2020 -08 -25 16 :10 :50 ,096 599 [ main] DEBUG oshizhan.dao.IUserDao.findById - ==> Parameters: 52 (Integer)2020 -08 -25 16 :10 :50 ,097 600 [ main] DEBUG oshizhan.dao.IUserDao.findById - <== Total: 1 2020 -08 -25 16 :10 :50 ,098 601 [ main] DEBUG o.IAccountDao.findAccountByUid - ==> Preparing: select * from account where uid = ? 2020 -08 -25 16 :10 :50 ,098 601 [ main] DEBUG o.IAccountDao.findAccountByUid - ==> Parameters: 52 (Integer)2020 -08 -25 16 :10 :50 ,098 601 [ main] DEBUG o.IAccountDao.findAccountByUid - <== Total: 0 User{userId=52 , userName='Tom' , userBirthday=Mon Oct 28 10 :26 :42 CST 2019 , userSex='男' , userAddress='广东佛山' } 2020 -08 -25 16 :10 :50 ,099 602 [ main] DEBUG ansaction.jdbc.JdbcTransaction - Resetting autocommit to true on JDBC Connection [com.mysql.jdbc.JDBC4Connection@95 a785]2020 -08 -25 16 :10 :50 ,099 602 [ main] DEBUG ansaction.jdbc.JdbcTransaction - Closing JDBC Connection [com.mysql.jdbc.JDBC4Connection@95 a785]2020 -08 -25 16 :10 :50 ,099 602 [ main] DEBUG source.pooled.PooledDataSource - Returned connection 9807749 to pool.
既然这样,那么我们如何去配置 二级缓存 呢? 第一步: 在主配置文件 SqlMapConfig.xml 中 其实下列代码可加可不加,因为 mybatis 的默认配置就是 true,所以可不加,加了也没有关系
SqlMapConfig.xml 1 2 3 4 5 6 <configuration> + <!-- 配置开启二级缓存 --> + <settings> + <setting name="cacheEnabled" value="true"/> + </settings>
第二步: 在 IUserDao 接口中加入如下注解。(表示开启二级缓存)
IUserDao.java 1 2 3 + @CacheNamespace(blocking = true) public interface IUserDao { ...
上述步骤做完后,我们就去执行 testFindById 方法,
1 2 3 4 5 6 7 8 9 10 11 12 13 14 15 2020 -08 -25 16 :20 :36 ,351 231 [ main] DEBUG ansaction.jdbc.JdbcTransaction - Opening JDBC Connection2020 -08 -25 16 :20 :36 ,644 524 [ main] DEBUG source.pooled.PooledDataSource - Created connection 26174884 .2020 -08 -25 16 :20 :36 ,644 524 [ main] DEBUG ansaction.jdbc.JdbcTransaction - Setting autocommit to false on JDBC Connection [com.mysql.jdbc.JDBC4Connection@18f 65a4]2020 -08 -25 16 :20 :36 ,647 527 [ main] DEBUG oshizhan.dao.IUserDao.findById - ==> Preparing: select * from user where id=? 2020 -08 -25 16 :20 :36 ,677 557 [ main] DEBUG oshizhan.dao.IUserDao.findById - ==> Parameters: 52 (Integer)2020 -08 -25 16 :20 :36 ,773 653 [ main] DEBUG oshizhan.dao.IUserDao.findById - <== Total: 1 2020 -08 -25 16 :20 :36 ,775 655 [ main] DEBUG o.IAccountDao.findAccountByUid - ==> Preparing: select * from account where uid = ? 2020 -08 -25 16 :20 :36 ,775 655 [ main] DEBUG o.IAccountDao.findAccountByUid - ==> Parameters: 52 (Integer)2020 -08 -25 16 :20 :36 ,775 655 [ main] DEBUG o.IAccountDao.findAccountByUid - <== Total: 0 User{userId=52 , userName='Tom' , userBirthday=Mon Oct 28 10 :26 :42 CST 2019 , userSex='男' , userAddress='广东佛山' } 2020 -08 -25 16 :20 :36 ,792 672 [ main] DEBUG ansaction.jdbc.JdbcTransaction - Resetting autocommit to true on JDBC Connection [com.mysql.jdbc.JDBC4Connection@18f 65a4]2020 -08 -25 16 :20 :36 ,792 672 [ main] DEBUG ansaction.jdbc.JdbcTransaction - Closing JDBC Connection [com.mysql.jdbc.JDBC4Connection@18f 65a4]2020 -08 -25 16 :20 :36 ,792 672 [ main] DEBUG source.pooled.PooledDataSource - Returned connection 26174884 to pool.2020 -08 -25 16 :20 :36 ,794 674 [ main] DEBUG club.guoshizhan.dao.IUserDao - Cache Hit Ratio [club.guoshizhan.dao.IUserDao]: 0.5 User{userId=52 , userName='Tom' , userBirthday=Mon Oct 28 10 :26 :42 CST 2019 , userSex='男' , userAddress='广东佛山' }
我们从结果发现: 它只执行了一次 SQL 语句,并没有发起第二次查询,这说明 二级缓存 开启了,也就是第二次的查询操作使用了我们配置的二级缓存。