前期准备 前期的准备主要就是建立数据库和创建表,所使用的数据库为 Oracle 数据库。往下看!!!
产品表 1 2 3 4 5 6 7 8 9 10 11 12 13 14 15 16 17 18 19 20 21 22 23 CREATE TABLE product(id varchar2 (32 ) default SYS_GUID() PRIMARY KEY ,productNum VARCHAR2 (50 ) NOT NULL , productName VARCHAR2 (50 ), cityName VARCHAR2 (50 ), DepartureTime timestamp , productPrice Number , productDesc VARCHAR2 (500 ), productStatus INT , CONSTRAINT product UNIQUE (id ,productNum)); select * from product;insert into PRODUCT (id ,productnum,productname,cityname,departuretime,productprice,productdesc,productstatus)values ('676C5BD1D35E429A8C2E114939C5685A' ,'itcast-002' ,'北京三日游' ,'北京' ,to_timestamp('10-10-201810:10:00.000000' ,'dd-mm-yyyyhh24:mi:ss.ff' ),1200 ,'不错的旅行' ,1 );insert into PRODUCT (id ,productnum,productname,cityname,departuretime,productprice,productdesc,productstatus)values ('12B7ABF2A4C544568B0A7C69F36BF8B7' ,'itcast-003' ,'上海五日游' ,'上海' ,to_timestamp('25-04-201814:30:00.000000' ,'dd-mm-yyyyhh24:mi:ss.ff' ),1800 ,'魔都我来了' ,0 );insert into PRODUCT (id ,productnum,productname,cityname,departuretime,productprice,productdesc,productstatus)values ('9F71F01CB448476DAFB309AA6DF9497F' ,'itcast-001' ,'北京三日游' ,'北京' ,to_timestamp('10-10-201810:10:00.000000' ,'dd-mm-yyyyhh24:mi:ss.ff' ),1200 ,'不错的旅行' ,1 );
订单表 1 2 3 4 5 6 7 8 9 10 11 12 13 14 15 16 17 18 19 CREATE TABLE orders(id varchar2 (32 ) default SYS_GUID() PRIMARY KEY ,orderNum VARCHAR2 (20 ) NOT NULL UNIQUE , orderTime timestamp , peopleCount INT , orderDesc VARCHAR2 (500 ), payType INT , orderStatus INT , productId varchar2 (32 ), memberId varchar2 (32 ), FOREIGN KEY (productId )REFERENCES product(id ),FOREIGN KEY (memberId) REFERENCES member (id )); insert into ORDERS(id ,ordernum,ordertime,peoplecount,orderdesc,paytype,orderstatus,productid,memberid)values ('5DC6A48DD4E94592AE904930EA866AFA' ,'54321' ,to_timestamp('02-03-201812:00:00.000000' ,'dd-mm-yyyyhh24:mi:ss.ff' ),2 ,'没什么' ,0 ,1 ,'676C5BD1D35E429A8C2E114939C5685A' ,'E61D65F673D54F68B0861025C69773DB' );
会员表 1 2 3 4 5 6 7 8 9 10 11 CREATE TABLE member (id varchar2 (32 ) default SYS_GUID()PRIMARY KEY ,NAME VARCHAR2 (20 ),nickname VARCHAR2 (20 ), phoneNum VARCHAR2 (20 ), email VARCHAR2 (20 ) ) insert into MEMBER (name ,nickname,phonenum,email)values ('张三' ,'小si' ,'18884588888' ,'zs@163.com' );
旅客表 1 2 3 4 5 6 7 8 9 10 11 12 13 14 CREATE TABLE traveller(id varchar2 (32 ) default SYS_GUID() PRIMARY KEY ,NAME VARCHAR2 (20 ),sex VARCHAR2 (20 ), phoneNum VARCHAR2 (20 ), credentialsType INT , credentialsNum VARCHAR2 (50 ), travellerType INT ) insert into TRAVELLER(id ,name ,sex,phonenum,credentialstype,credentialsnum,travellertype)values ('3FE27DF2A4E44A6DBC5D0FE4651D3D3E' ,'张龙' ,'男' ,'13333333333' ,0 ,'123456789009876543' ,0 );insert into TRAVELLER(id ,name ,sex,phonenum,credentialstype,credentialsnum,travellertype)values ('EE7A71FB6945483FBF91543DBE851960' ,'张小龙' ,'男' ,'15555555555' ,0 ,'987654321123456789' ,1 );
用户表 1 2 3 4 5 6 7 8 9 CREATE TABLE users (id varchar2 (32 ) default SYS_GUID() PRIMARY KEY ,email VARCHAR2 (50 ) UNIQUE NOT NULL , username VARCHAR2 (50 ), PASSWORD VARCHAR2 (50 ),phoneNum VARCHAR2 (20 ), STATUS INT )
角色表 1 2 3 4 5 6 7 8 9 CREATE TABLE role (id varchar2 (32 ) default SYS_GUID() PRIMARY KEY ,roleName VARCHAR2 (50 ) , roleDesc VARCHAR2 (50 ) ) insert into role values ('1111' ,'ADMIN' ,'VIP' );
用户角色关联表 1 2 3 4 5 6 7 8 9 10 11 CREATE TABLE users_role(userId varchar2 (32 ), roleId varchar2 (32 ), PRIMARY KEY (userId,roleId), FOREIGN KEY (userId) REFERENCES users (id ),FOREIGN KEY (roleId) REFERENCES role (id )) insert into users_role values ('111-222' ,'1111' );
资源权限表 1 2 3 4 5 6 CREATE TABLE permission(id varchar2 (32 ) default SYS_GUID() PRIMARY KEY ,permissionName VARCHAR2 (50 ) , url VARCHAR2 (50 ))
角色权限关联表 1 2 3 4 5 6 7 8 CREATE TABLE role_permission(permissionId varchar2 (32 ), roleId varchar2 (32 ), PRIMARY KEY (permissionId,roleId), FOREIGN KEY (permissionId) REFERENCES permission(id ),FOREIGN KEY (roleId) REFERENCES role (id ))
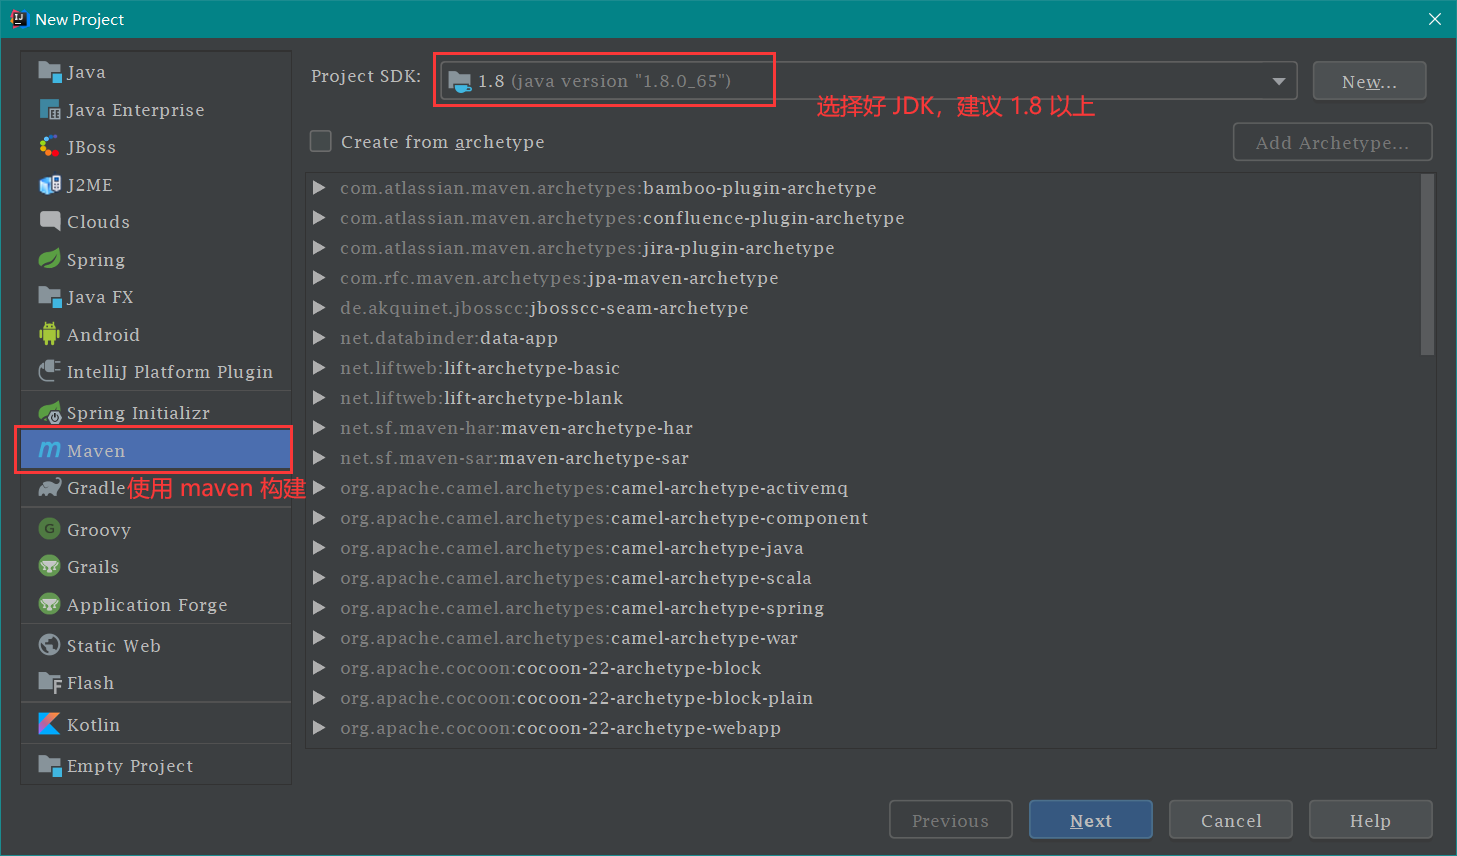
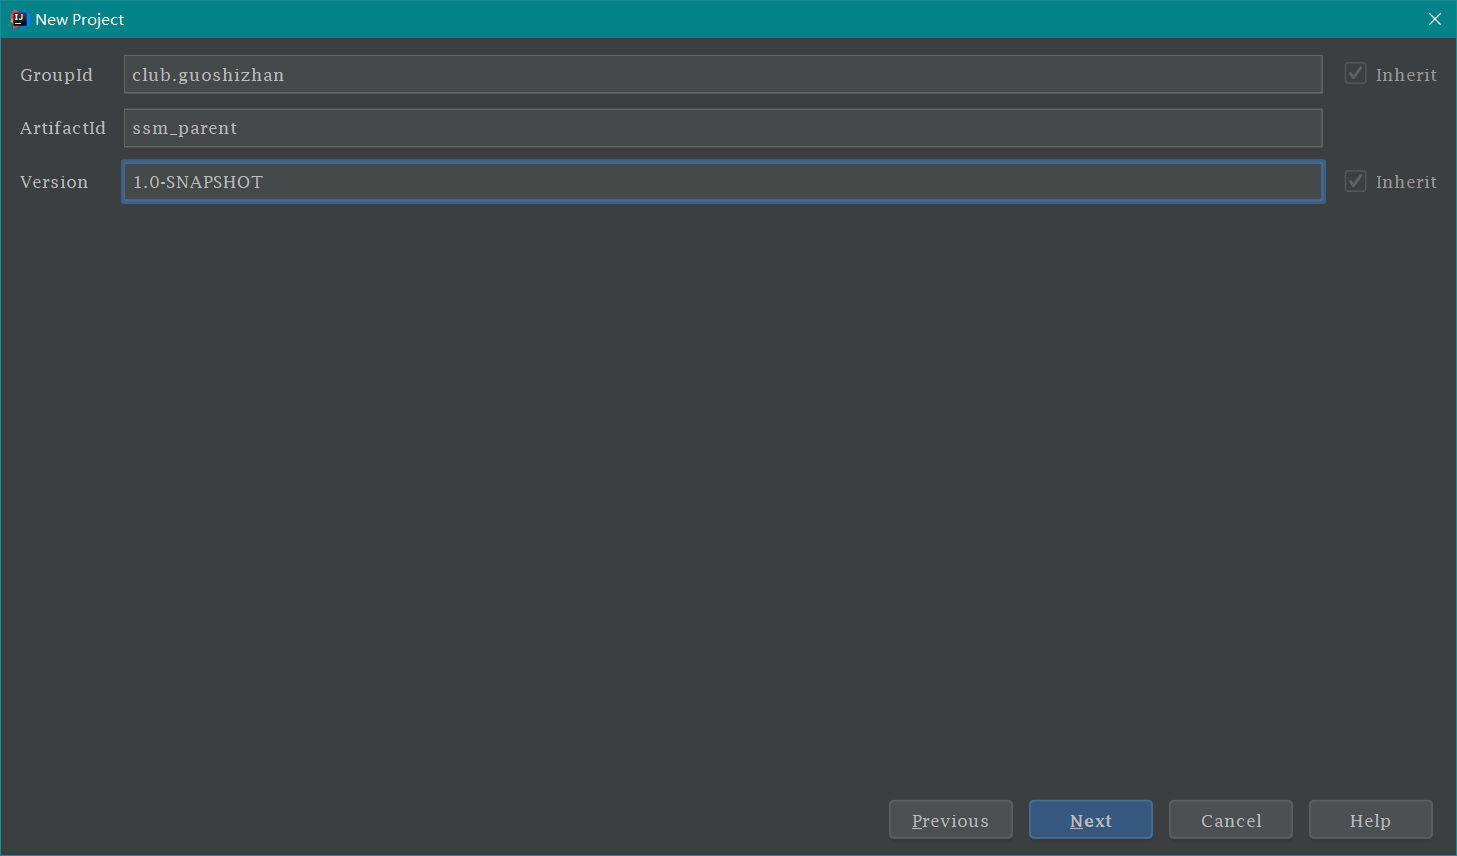
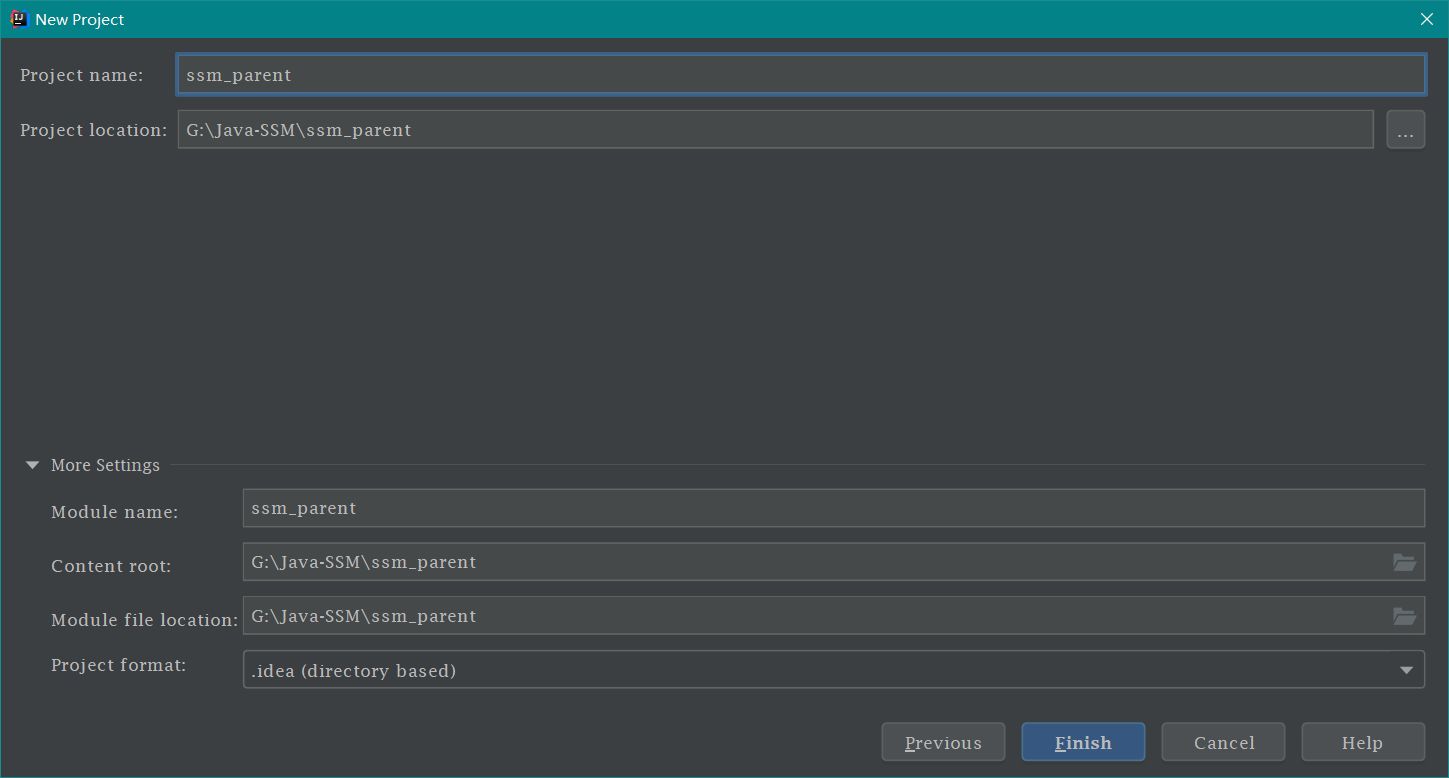
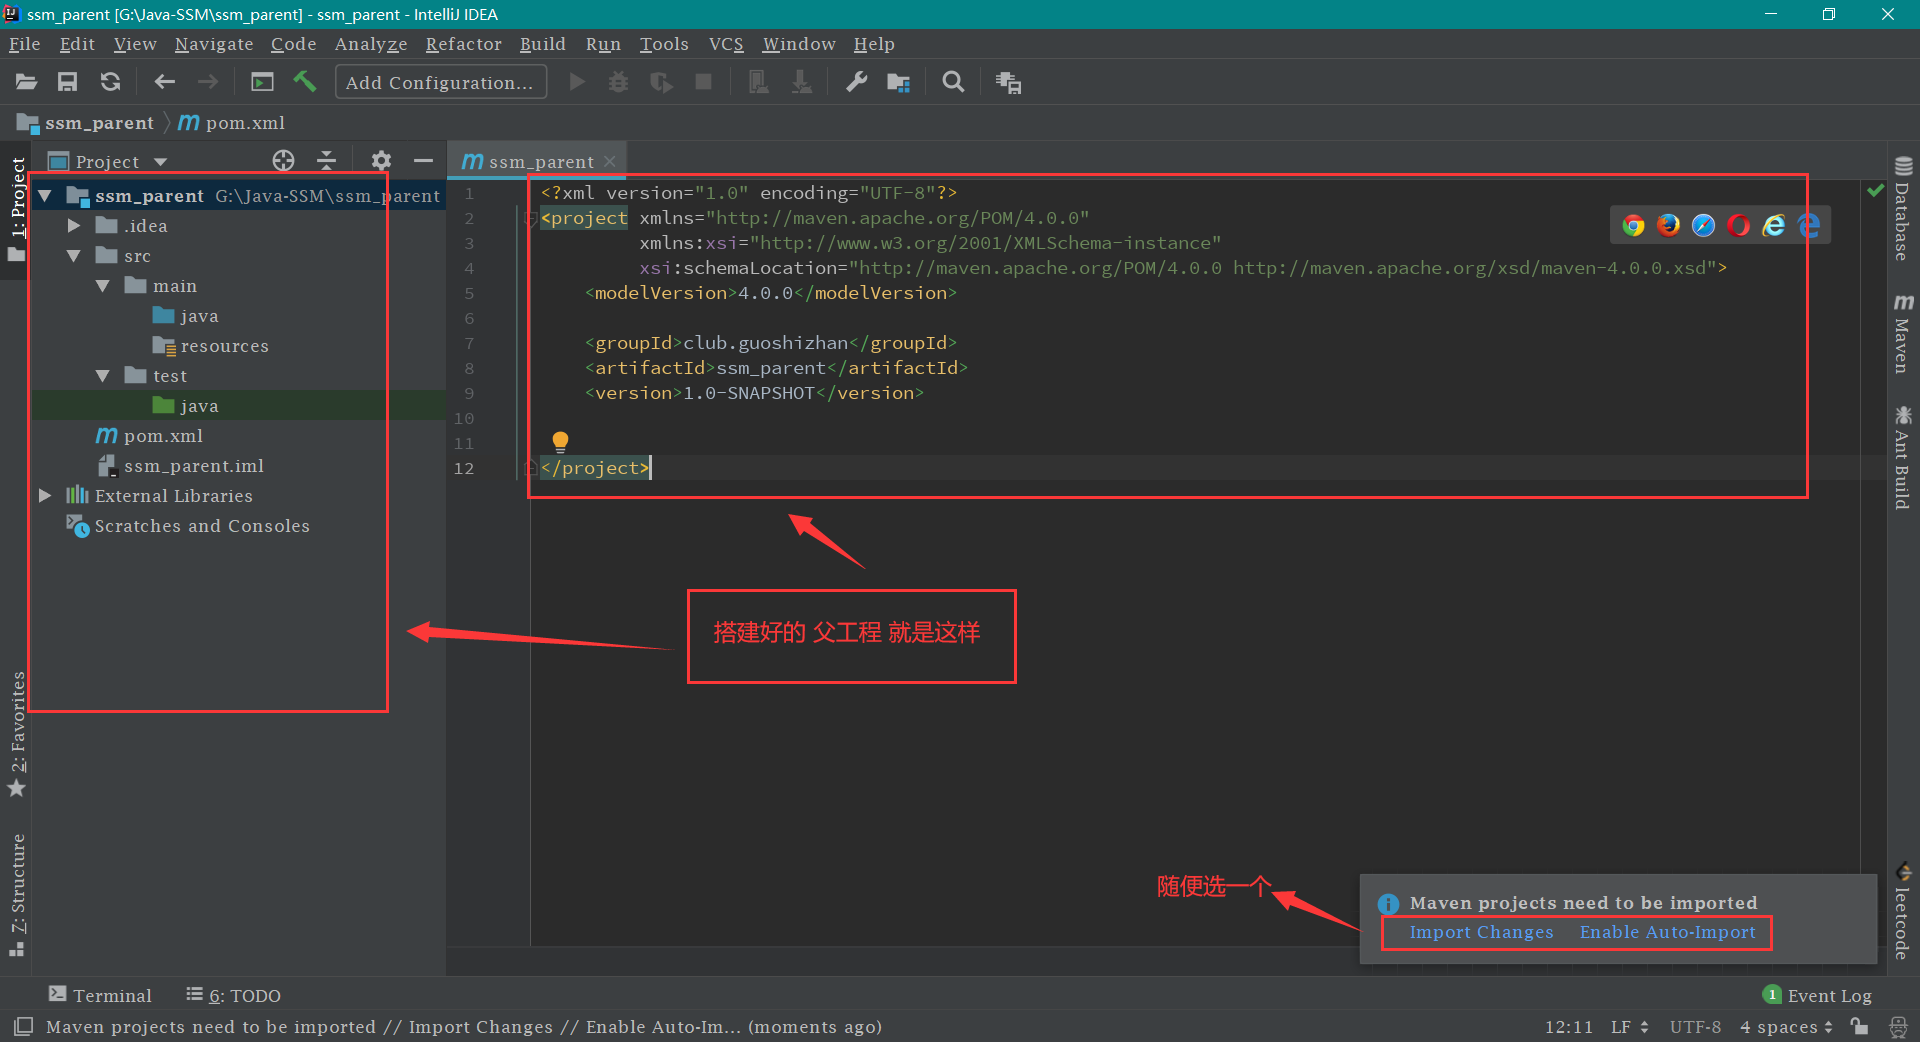
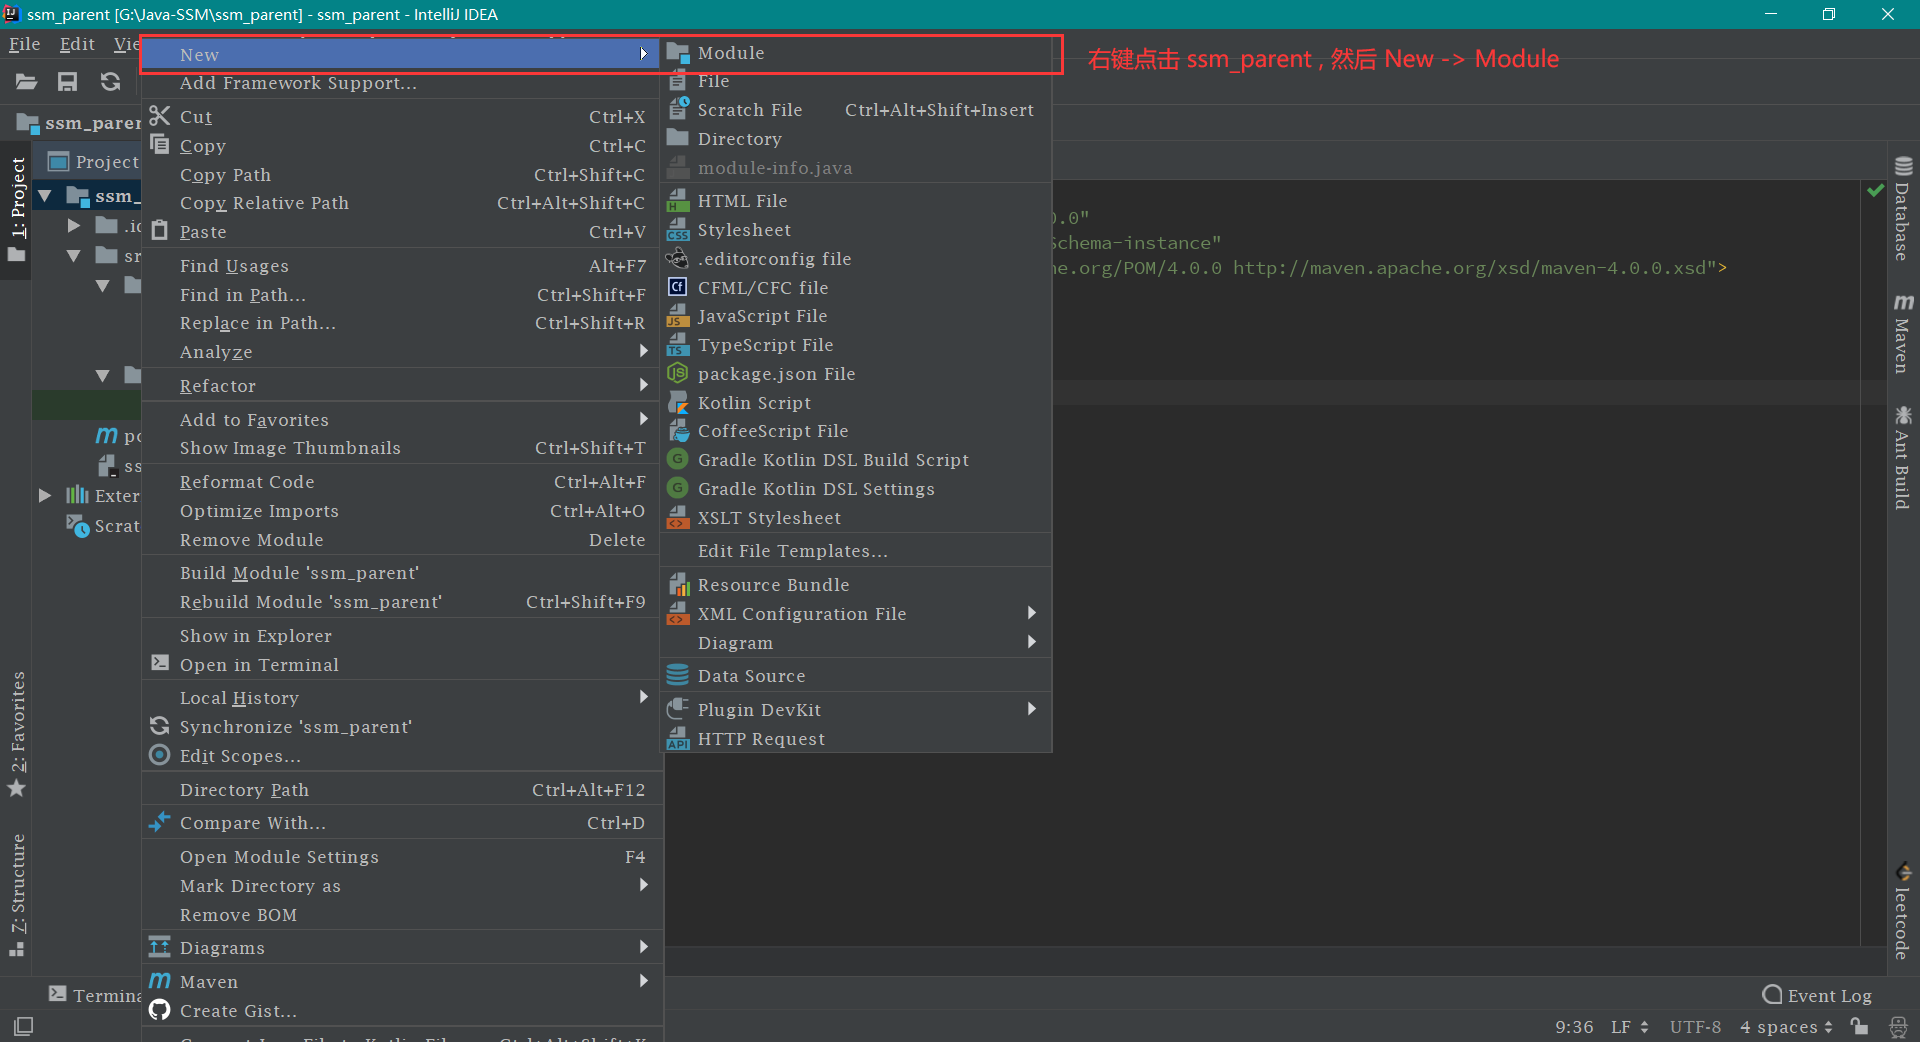
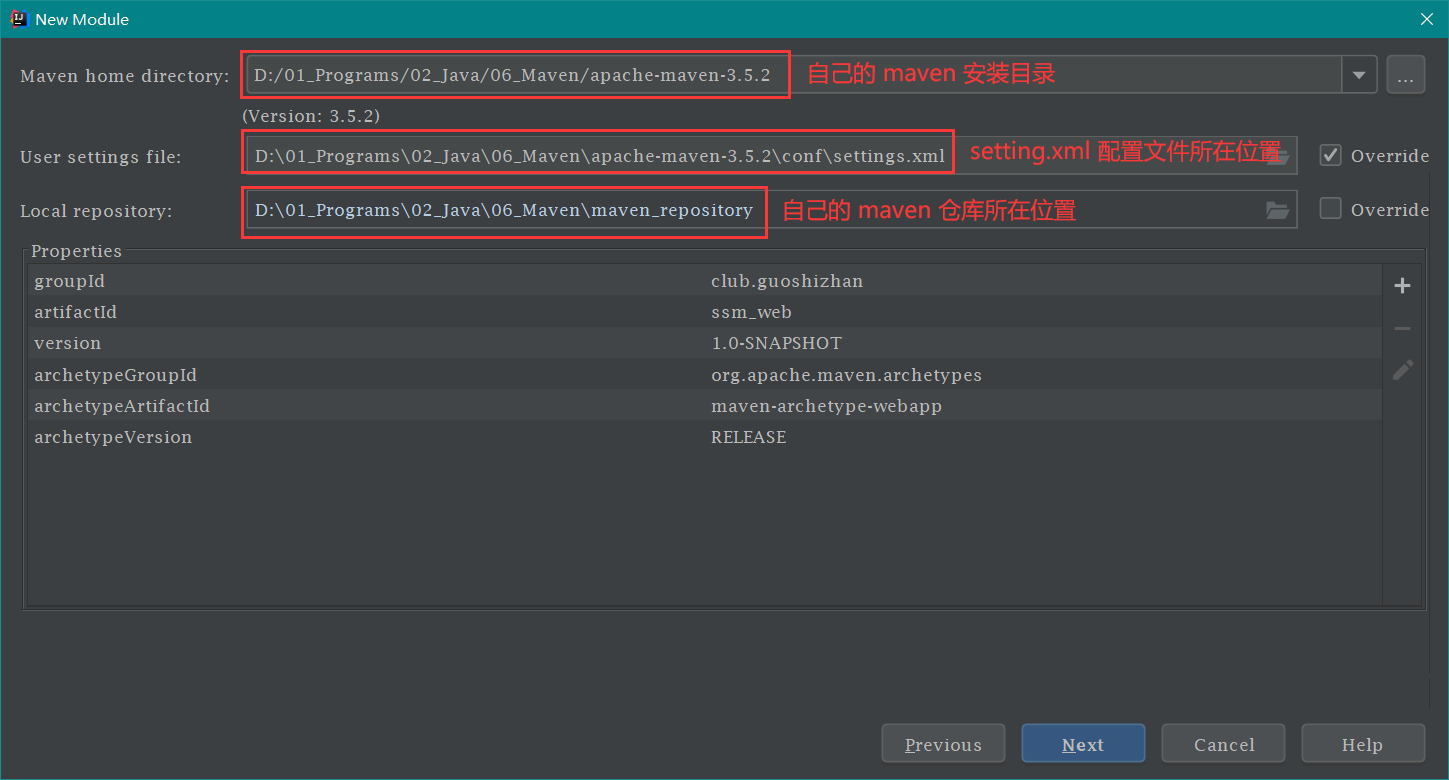
SSM 环境搭建 工程搭建 搭建父工程 首先打开 IDEA File -> New -> Project ,接着按下图进行操作即可搭建好父工程。如下图所示:
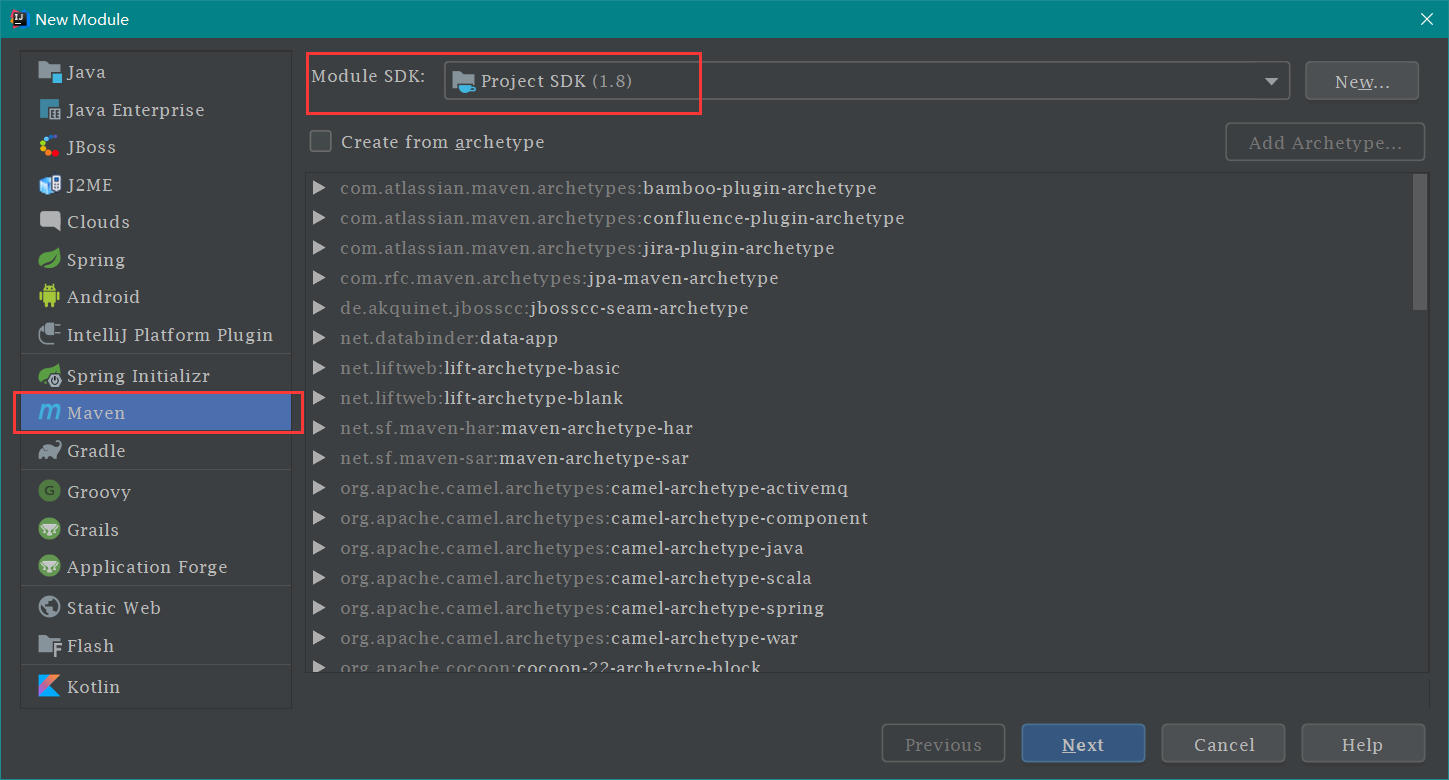
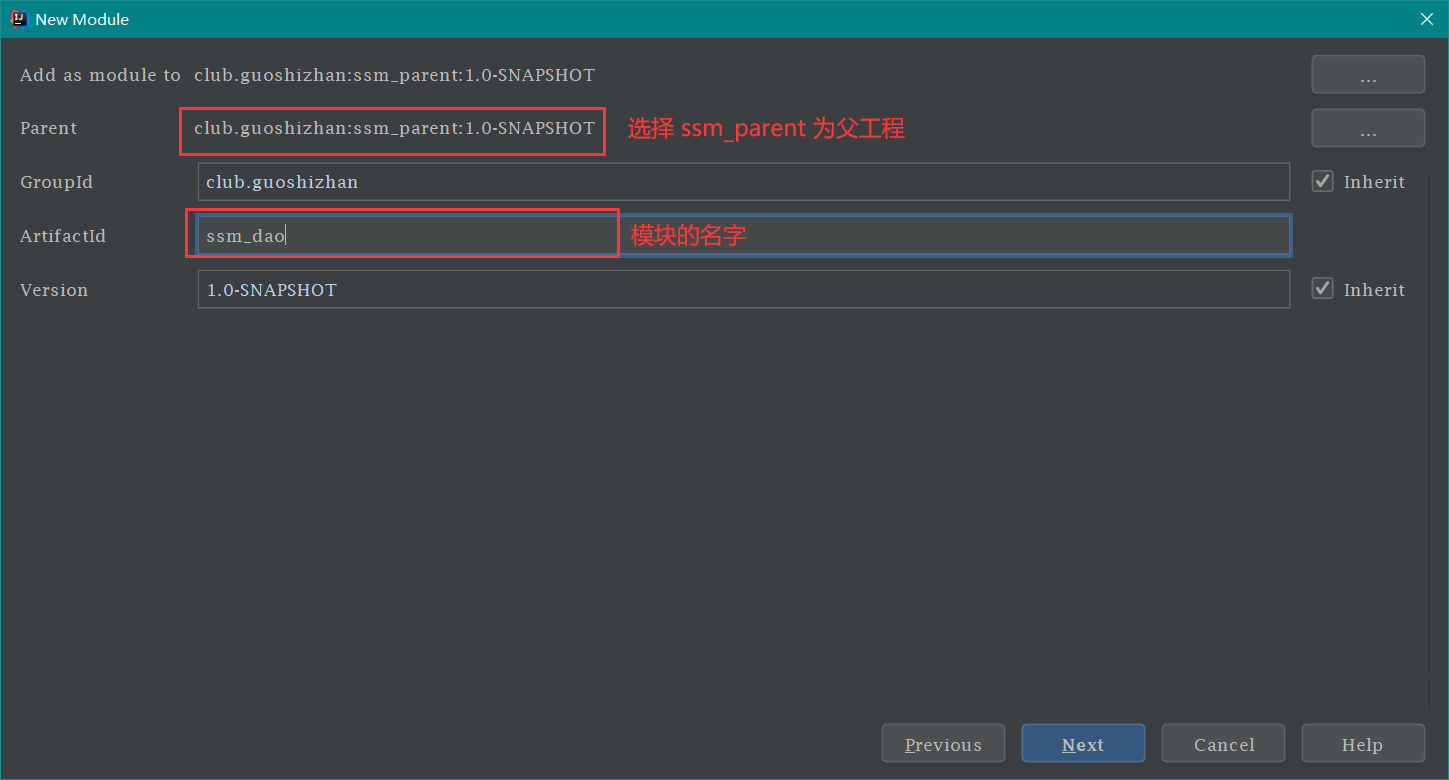
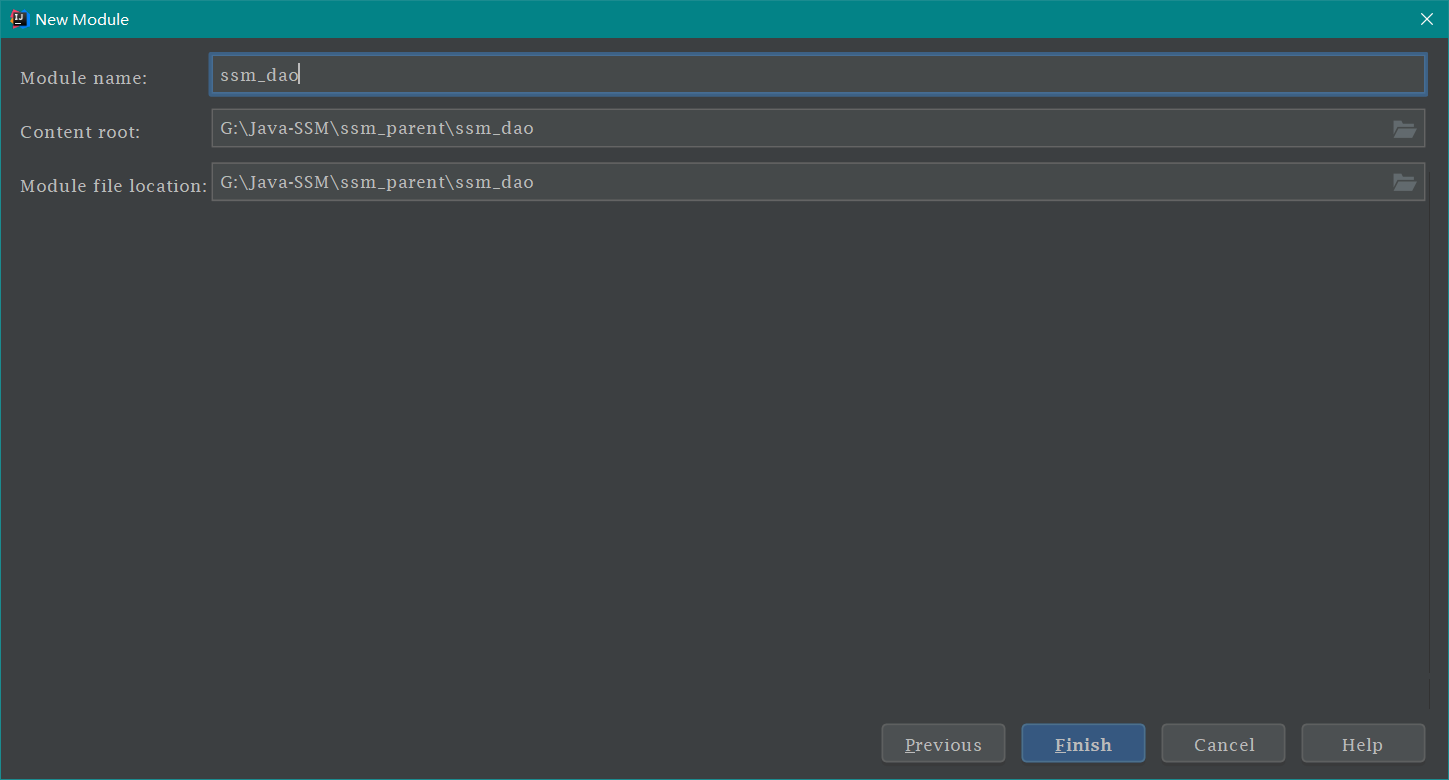
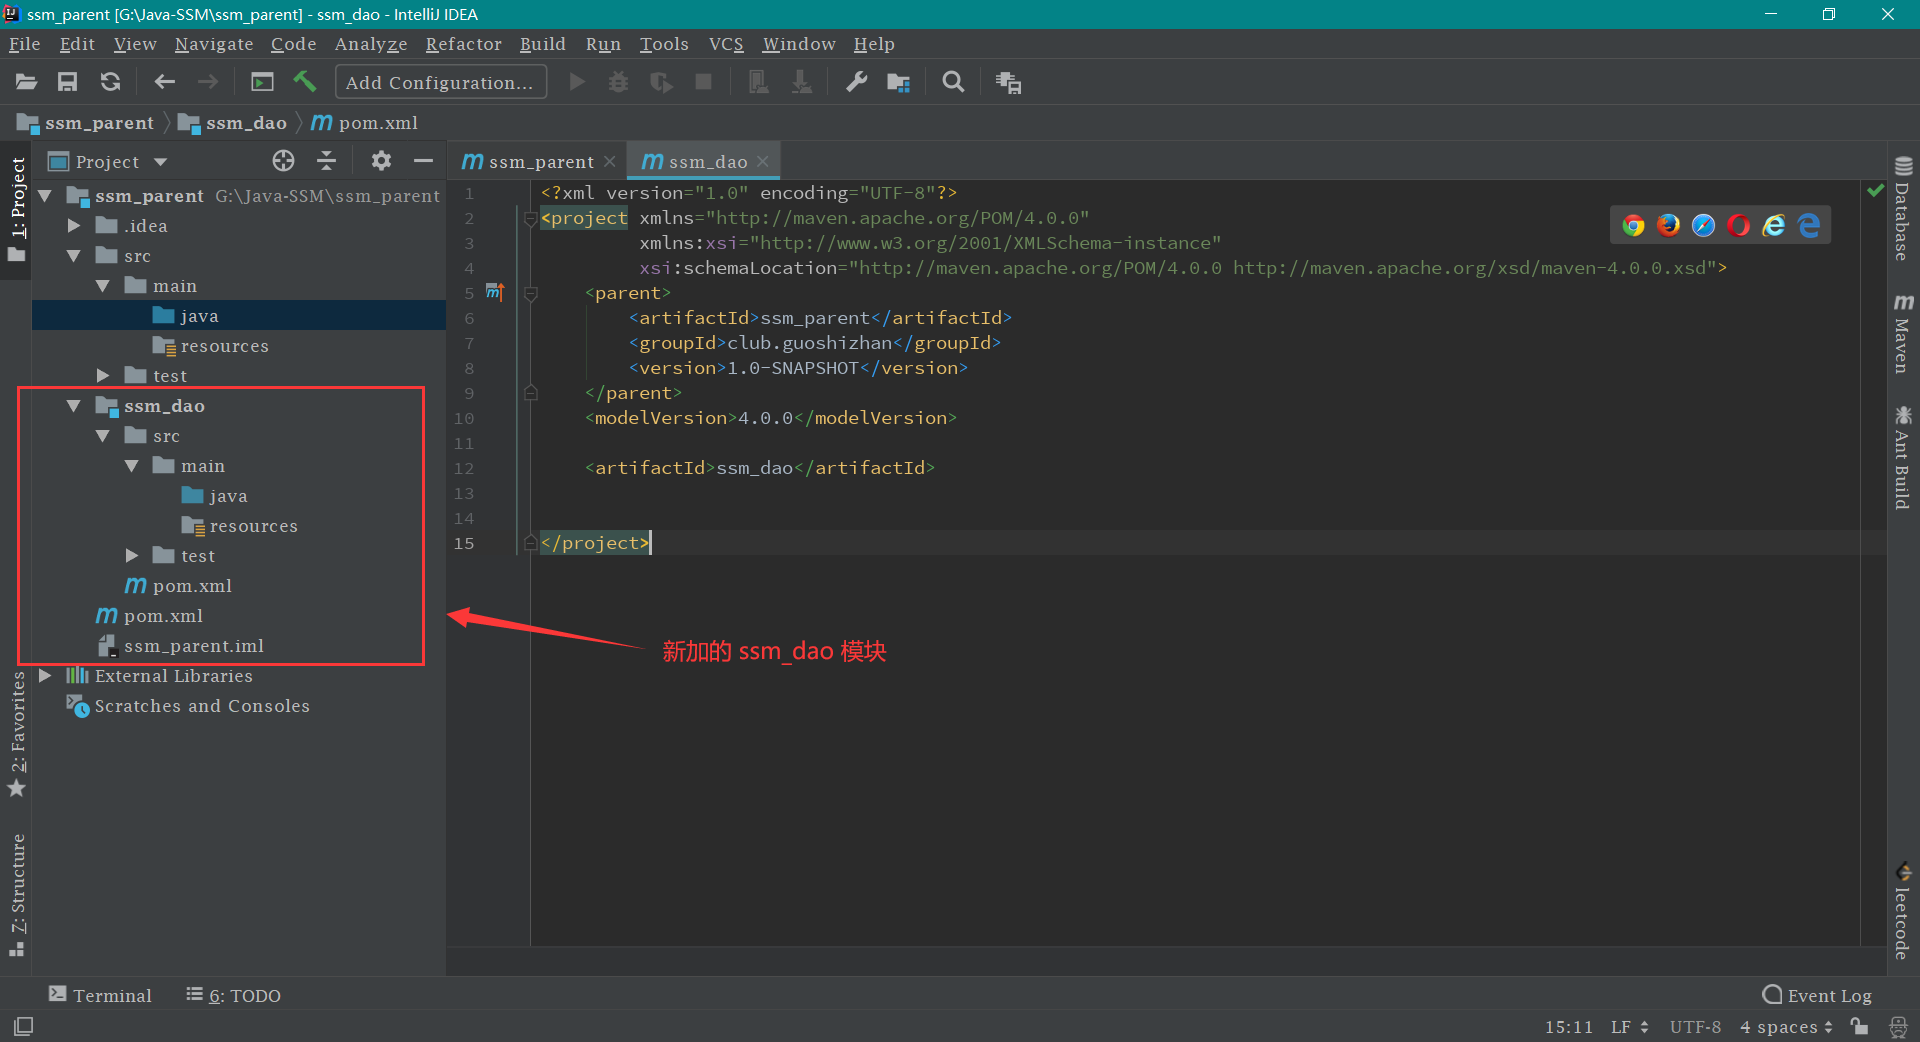
创建 ssm_dao 模块 按照下图操作即可,如下:
TIPS:
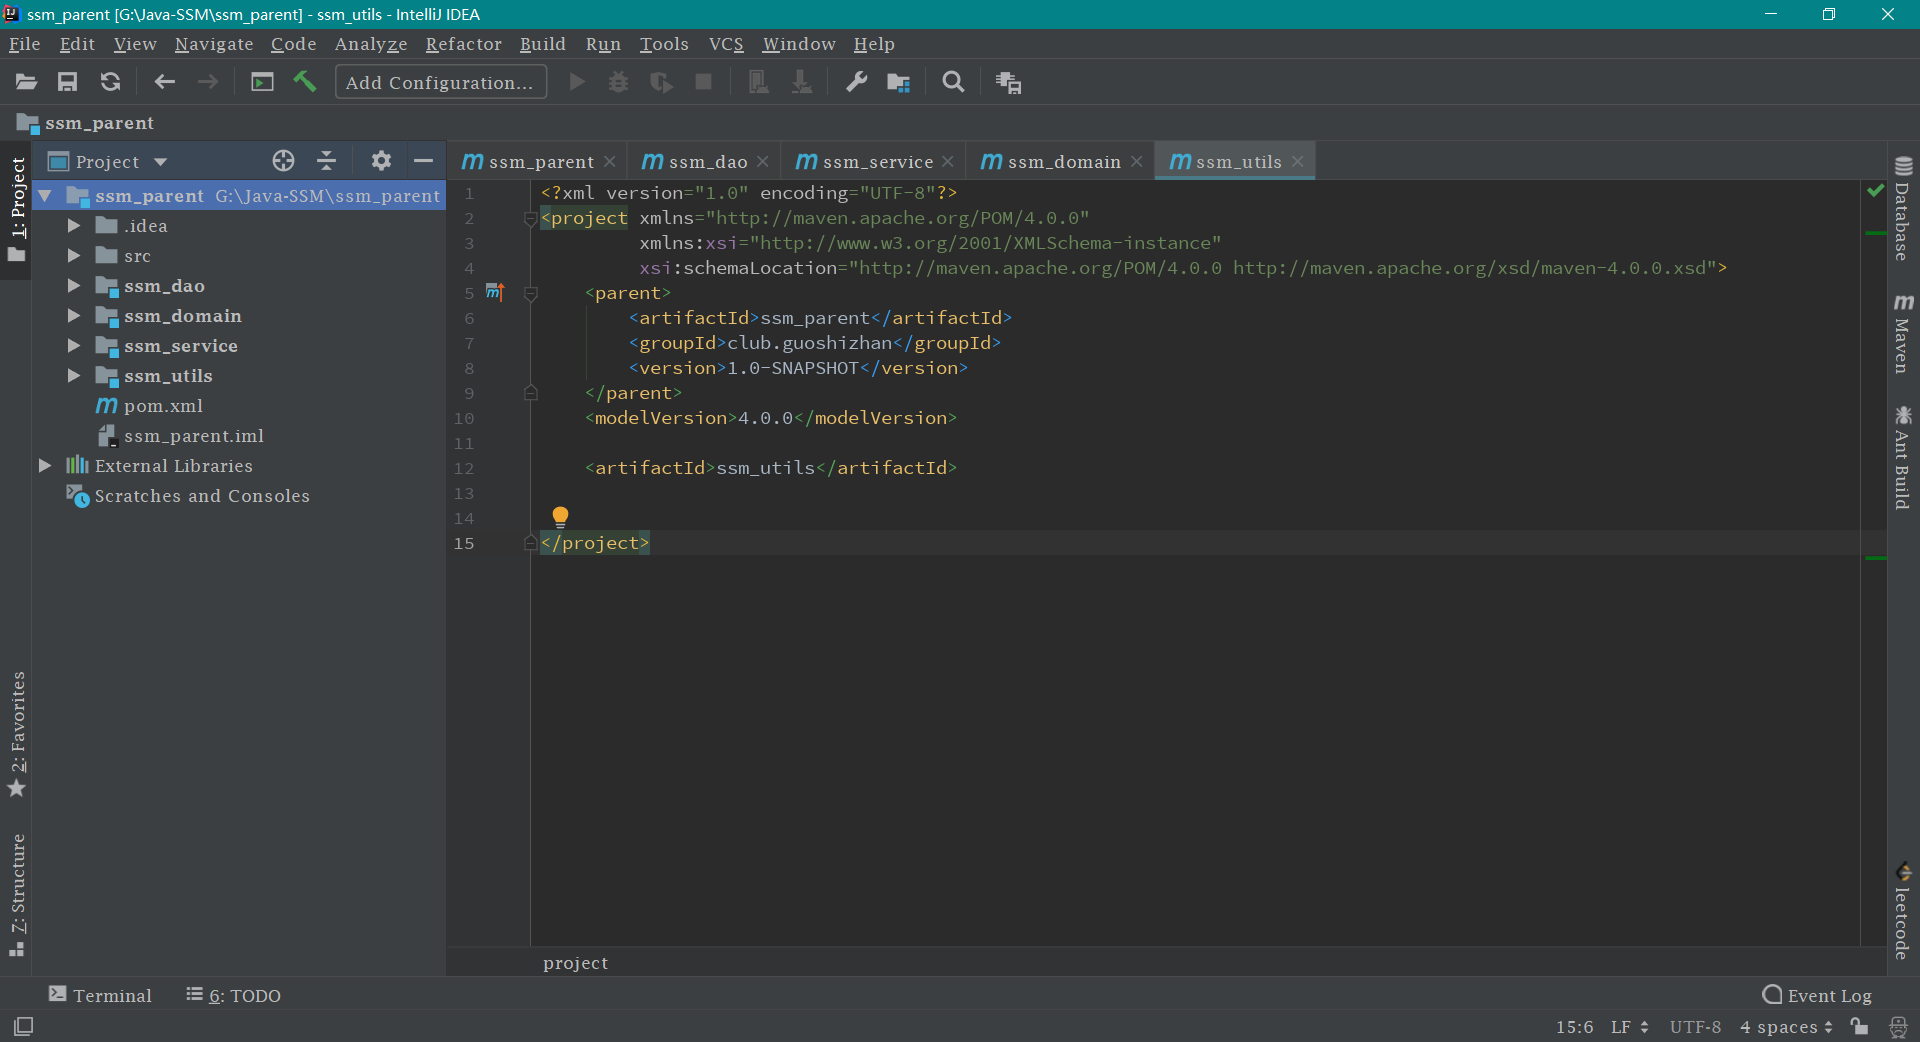
接下来的 ssm_service ssm_utils ssm_domain ssm_dao
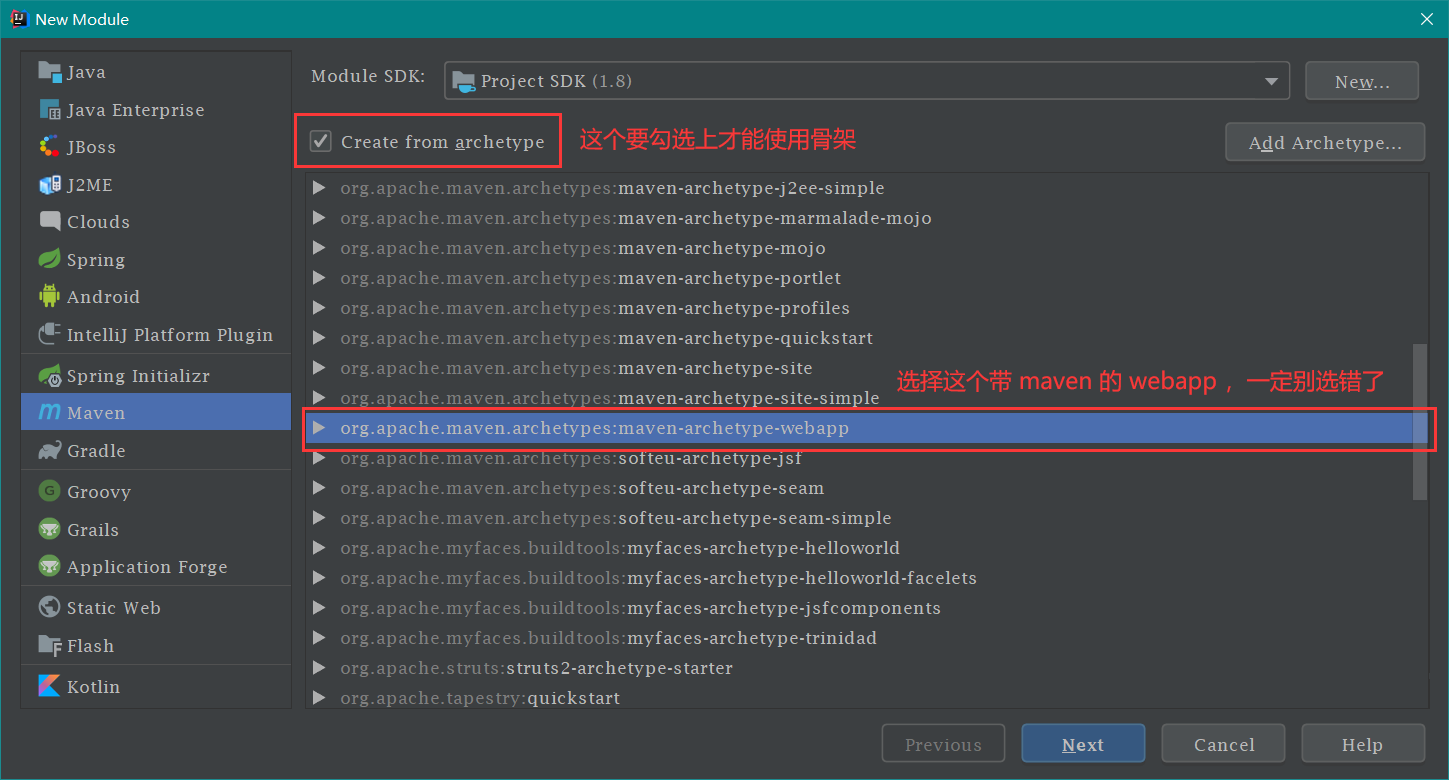
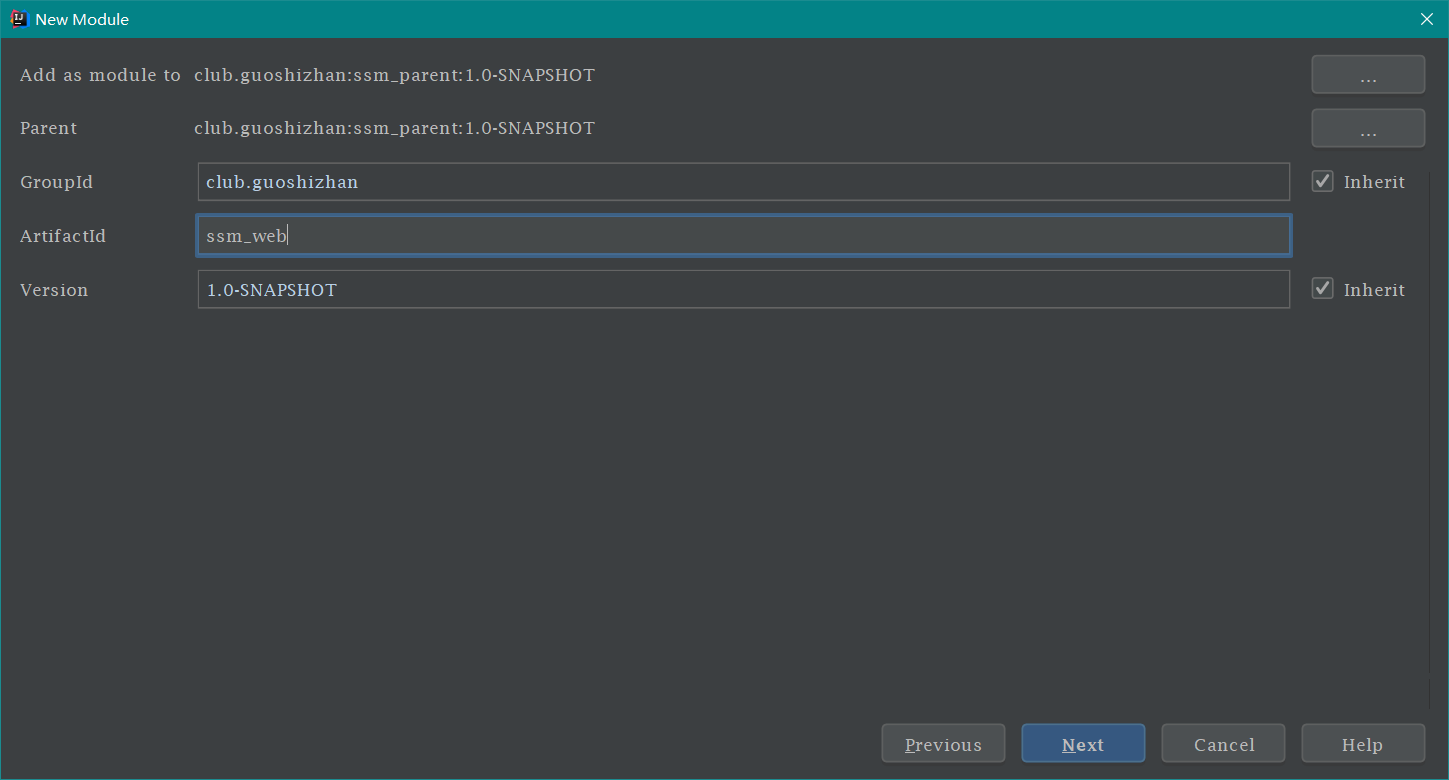
创建 ssm_web 模块 这个模块有点特殊,需要用到骨架
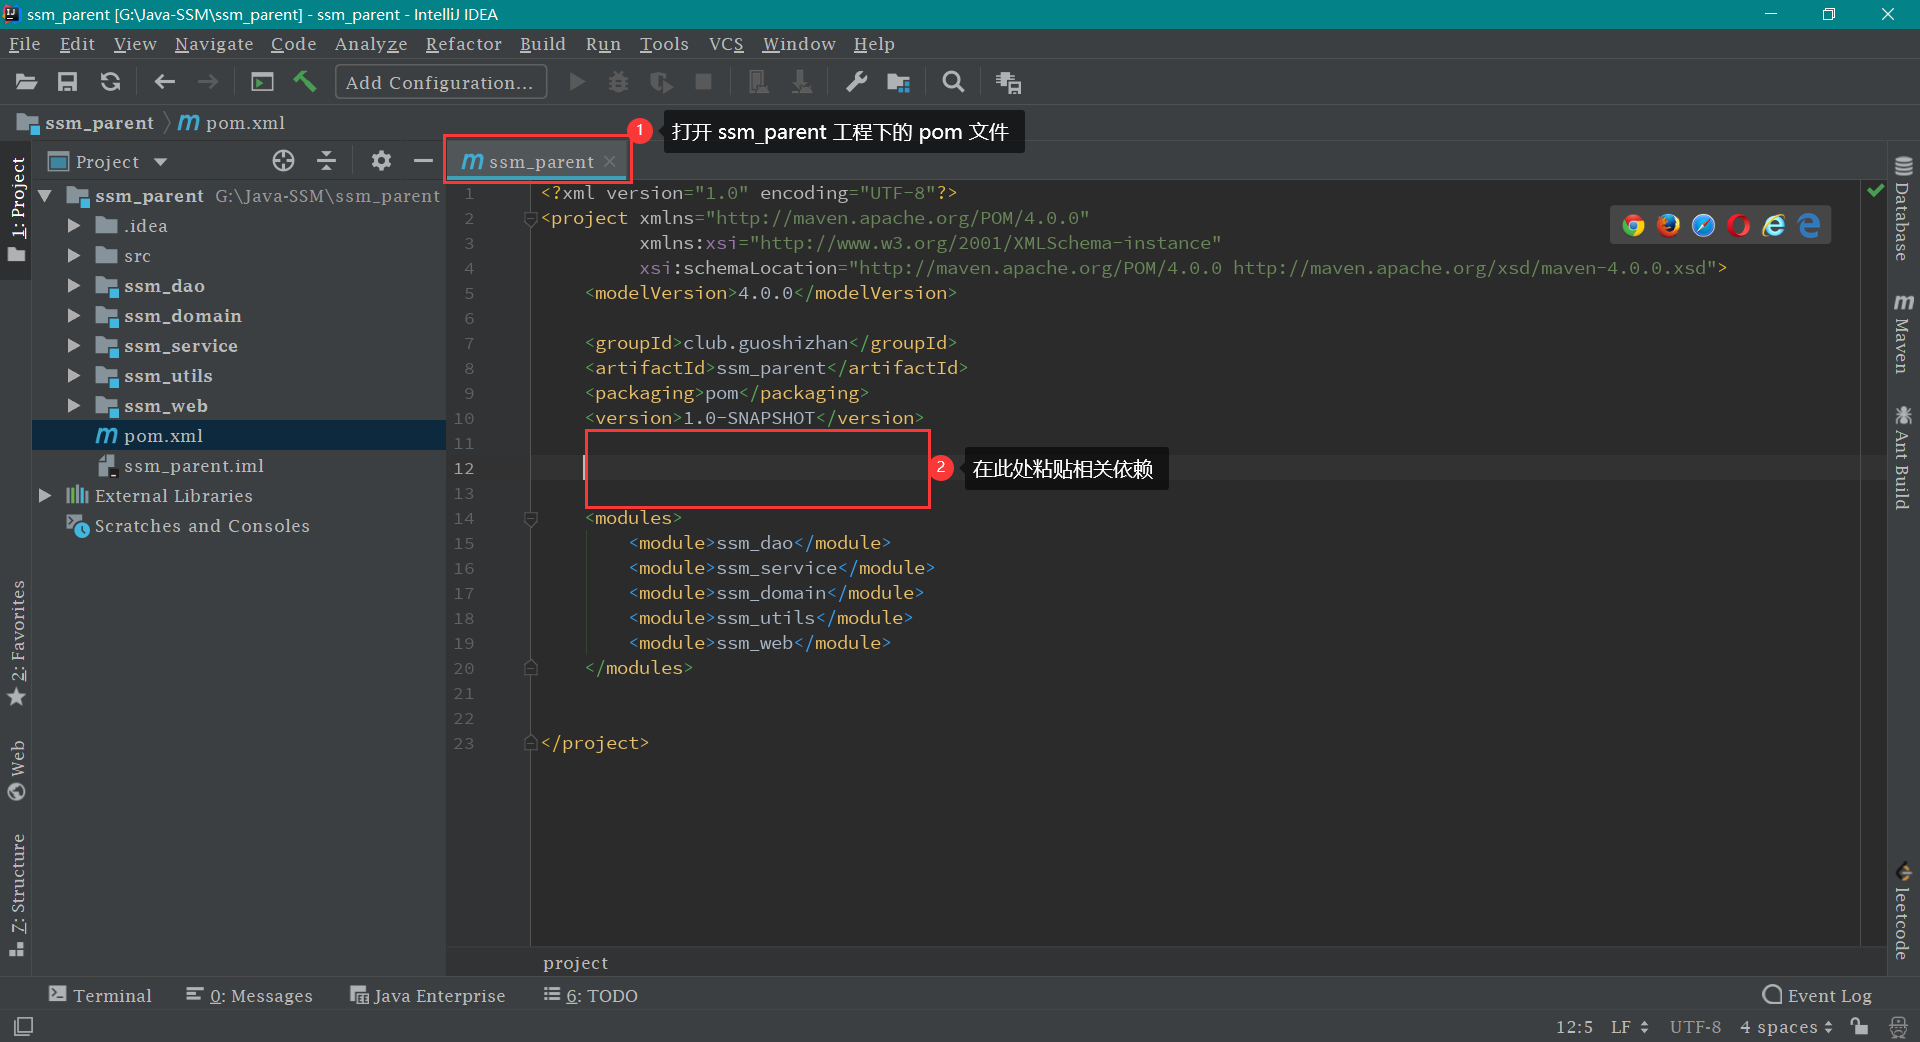
导入依赖 打开 ssm_parent 工程下的 pom.xml
ssm_parent 工程下的 pom.xml
ssm_parent 下的 pom.xml 的相关依赖 1 2 3 4 5 6 7 8 9 10 11 12 13 14 15 16 17 18 19 20 21 22 23 24 25 26 27 28 29 30 31 32 33 34 35 36 37 38 39 40 41 42 43 44 45 46 47 48 49 50 51 52 53 54 55 56 57 58 59 60 61 62 63 64 65 66 67 68 69 70 71 72 73 74 75 76 77 78 79 80 81 82 83 84 85 86 87 88 89 90 91 92 93 94 95 96 97 98 99 100 101 102 103 104 105 106 107 108 109 110 111 112 113 114 115 116 117 118 119 120 121 122 123 124 125 126 127 128 129 130 131 132 133 134 135 136 137 138 139 140 141 142 143 144 145 146 147 148 149 150 151 152 153 154 155 156 157 158 159 160 161 162 163 164 165 166 167 168 169 170 171 172 173 174 175 176 177 <properties > <spring.version > 5.0.2.RELEASE</spring.version > <slf4j.version > 1.6.6</slf4j.version > <log4j.version > 1.2.12</log4j.version > <mybatis.version > 3.4.5</mybatis.version > <spring.security.version > 5.0.1.RELEASE</spring.security.version > </properties > <dependencies > <dependency > <groupId > org.aspectj</groupId > <artifactId > aspectjweaver</artifactId > <version > 1.6.8</version > </dependency > <dependency > <groupId > org.springframework</groupId > <artifactId > spring-aop</artifactId > <version > ${spring.version}</version > </dependency > <dependency > <groupId > org.springframework</groupId > <artifactId > spring-context</artifactId > <version > ${spring.version}</version > </dependency > <dependency > <groupId > org.springframework</groupId > <artifactId > spring-context-support</artifactId > <version > ${spring.version}</version > </dependency > <dependency > <groupId > org.springframework</groupId > <artifactId > spring-web</artifactId > <version > ${spring.version}</version > </dependency > <dependency > <groupId > org.springframework</groupId > <artifactId > spring-orm</artifactId > <version > ${spring.version}</version > </dependency > <dependency > <groupId > org.springframework</groupId > <artifactId > spring-beans</artifactId > <version > ${spring.version}</version > </dependency > <dependency > <groupId > org.springframework</groupId > <artifactId > spring-core</artifactId > <version > ${spring.version}</version > </dependency > <dependency > <groupId > org.springframework</groupId > <artifactId > spring-test</artifactId > <version > ${spring.version}</version > </dependency > <dependency > <groupId > org.springframework</groupId > <artifactId > spring-webmvc</artifactId > <version > ${spring.version}</version > </dependency > <dependency > <groupId > org.springframework</groupId > <artifactId > spring-tx</artifactId > <version > ${spring.version}</version > </dependency > <dependency > <groupId > junit</groupId > <artifactId > junit</artifactId > <version > 4.12</version > <scope > test</scope > </dependency > <dependency > <groupId > javax.servlet</groupId > <artifactId > javax.servlet-api</artifactId > <version > 3.1.0</version > <scope > provided</scope > </dependency > <dependency > <groupId > javax.servlet.jsp</groupId > <artifactId > jsp-api</artifactId > <version > 2.0</version > <scope > provided</scope > </dependency > <dependency > <groupId > jstl</groupId > <artifactId > jstl</artifactId > <version > 1.2</version > </dependency > <dependency > <groupId > log4j</groupId > <artifactId > log4j</artifactId > <version > ${log4j.version}</version > </dependency > <dependency > <groupId > org.slf4j</groupId > <artifactId > slf4j-api</artifactId > <version > ${slf4j.version}</version > </dependency > <dependency > <groupId > org.slf4j</groupId > <artifactId > slf4j-log4j12</artifactId > <version > ${slf4j.version}</version > </dependency > <dependency > <groupId > org.mybatis</groupId > <artifactId > mybatis</artifactId > <version > ${mybatis.version}</version > </dependency > <dependency > <groupId > org.mybatis</groupId > <artifactId > mybatis-spring</artifactId > <version > 1.3.0</version > </dependency > <dependency > <groupId > c3p0</groupId > <artifactId > c3p0</artifactId > <version > 0.9.1.2</version > <type > jar</type > <scope > compile</scope > </dependency > <dependency > <groupId > com.github.pagehelper</groupId > <artifactId > pagehelper</artifactId > <version > 5.1.2</version > </dependency > <dependency > <groupId > org.springframework.security</groupId > <artifactId > spring-security-web</artifactId > <version > ${spring.security.version}</version > </dependency > <dependency > <groupId > org.springframework.security</groupId > <artifactId > spring-security-config</artifactId > <version > ${spring.security.version}</version > </dependency > <dependency > <groupId > org.springframework.security</groupId > <artifactId > spring-security-core</artifactId > <version > ${spring.security.version}</version > </dependency > <dependency > <groupId > org.springframework.security</groupId > <artifactId > spring-security-taglibs</artifactId > <version > ${spring.security.version}</version > </dependency > <dependency > <groupId > com.oracle</groupId > <artifactId > ojdbc14</artifactId > <version > RELEASE</version > </dependency > <dependency > <groupId > javax.annotation</groupId > <artifactId > jsr250-api</artifactId > <version > 1.0</version > </dependency > </dependencies > <build > <pluginManagement > <plugins > <plugin > <groupId > org.apache.maven.plugins</groupId > <artifactId > maven-compiler-plugin</artifactId > <version > 3.2</version > <configuration > <source > 1.8</source > <target > 1.8</target > <encoding > UTF-8</encoding > <showWarnings > true</showWarnings > </configuration > </plugin > </plugins > </pluginManagement > </build >
编写工具类 在 ssm_utils -> src -> main -> java 文件下建立一个 utils 包,选择 java ,点击右键,选择 New -> Package ,输入包名为 club.guoshizhan.utils ,然后再在 utils DateUtils 工具类
DateUtils.java 1 2 3 4 5 6 7 8 9 10 11 12 13 14 15 16 17 18 19 20 21 22 23 24 25 26 27 28 package club.guoshizhan.utils;import java.text.ParseException;import java.text.SimpleDateFormat;import java.util.Date;public class DateUtils public static String date2String (Date date, String patt) SimpleDateFormat sdf = new SimpleDateFormat(patt); String format = sdf.format(date); return format; } public static Date string2Date (String str, String patt) throws ParseException SimpleDateFormat sdf = new SimpleDateFormat(patt); Date parse = sdf.parse(str); return parse; } }
然后再在 utils 包下新建一个与 密码加密 BCryptPasswordEncoderUtils ,代码如下:
BCryptPasswordEncoderUtils.java 1 2 3 4 5 6 7 8 9 10 11 12 13 14 15 16 17 18 19 20 21 22 23 24 25 package club.guoshizhan.utils;import org.springframework.security.crypto.bcrypt.BCryptPasswordEncoder;public class BCryptPasswordEncoderUtils private static BCryptPasswordEncoder bCryptPasswordEncoder = new BCryptPasswordEncoder(); public static String encodePassword (String password) return bCryptPasswordEncoder.encode(password); } public static void main (String[] args) String password = "123" ; String pwd = encodePassword(password); System.out.print(pwd.length()); } }
写完这两个工具类,ssm_utils 模块 就不需要再进行其他修改了。接下来我们 编写实体类
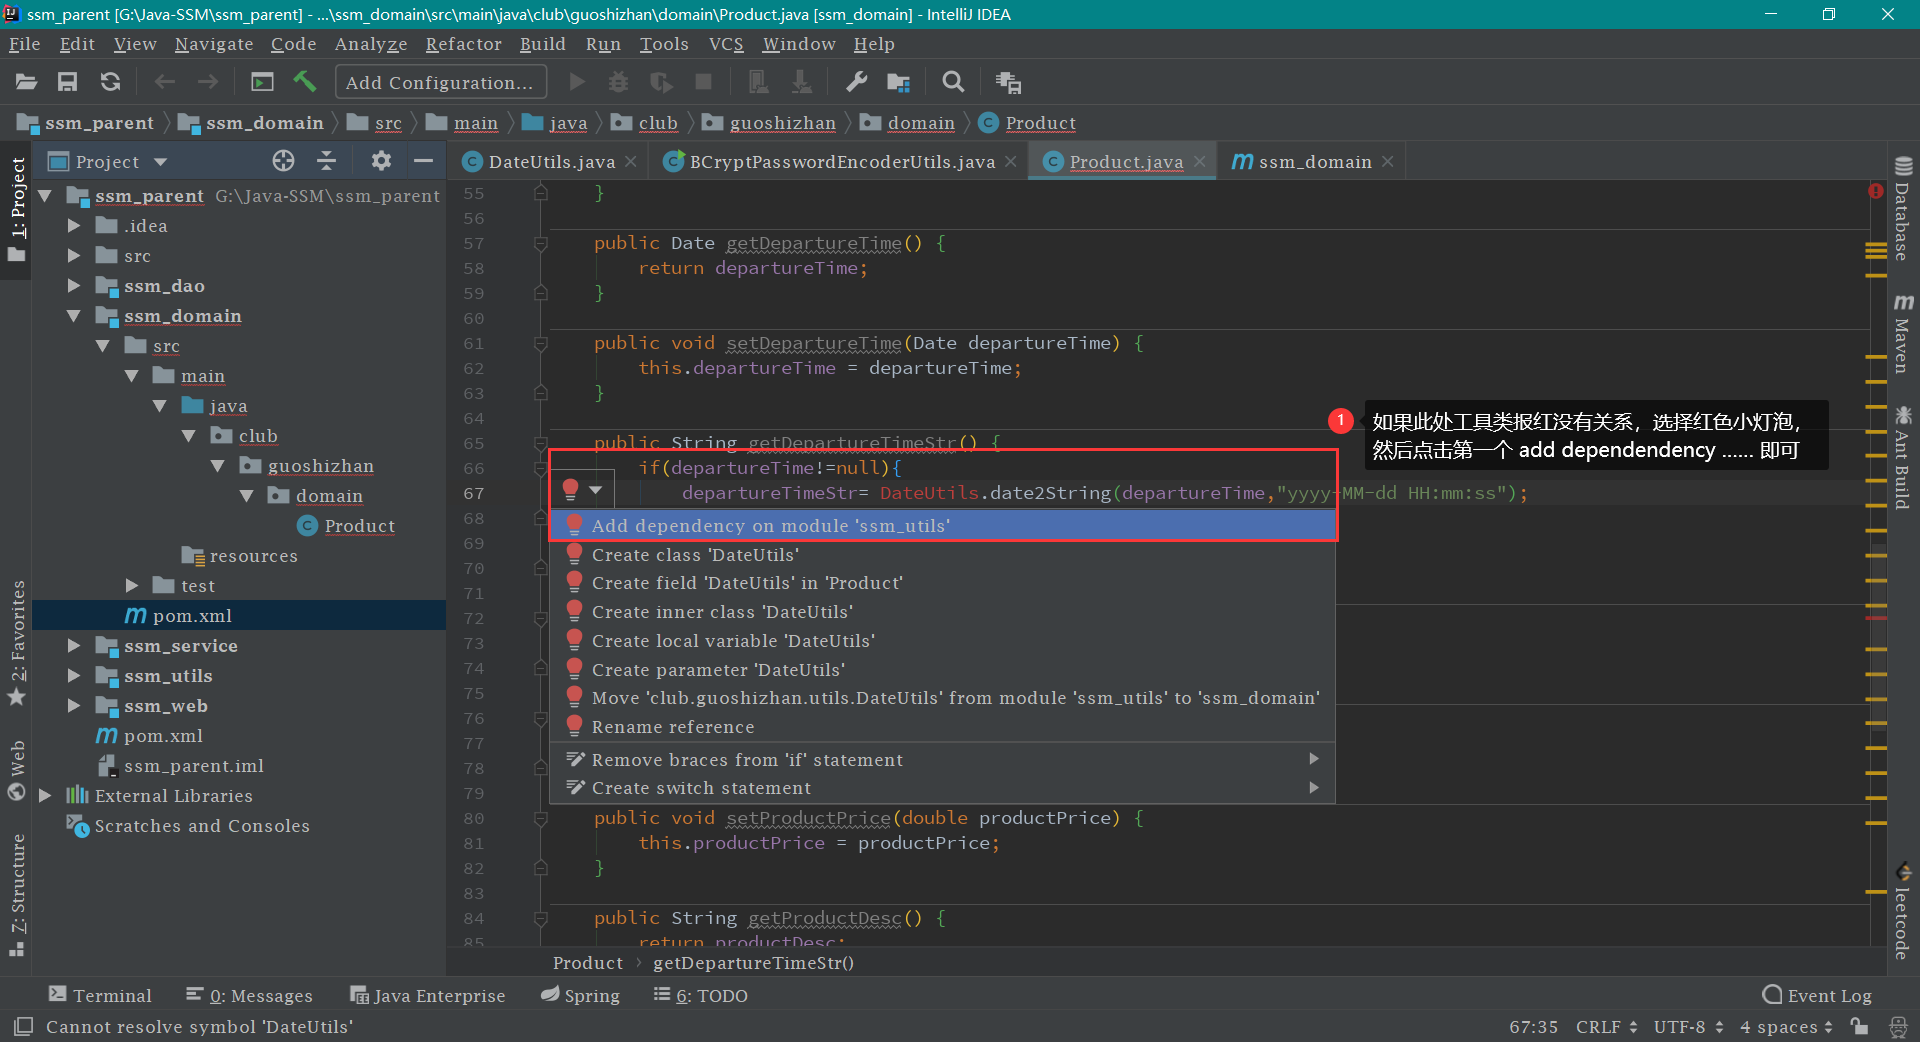
编写实体类 在 ssm_domain -> src -> main -> java 文件下建立一个 domain 包,选择 java ,点击右键,选择 New -> Package ,输入包名为 club.guoshizhan.domain ,然后再在 domain 包下新建 Product 实体类 ,代码内容及见截图如下:
Product.java 1 2 3 4 5 6 7 8 9 10 11 12 13 14 15 16 17 18 19 20 21 22 23 24 25 26 27 28 29 30 31 32 33 34 35 36 37 38 39 40 41 42 43 44 45 46 47 48 49 50 51 52 53 54 55 56 57 58 59 60 61 62 63 64 65 66 67 68 69 70 71 72 73 74 75 76 77 78 79 80 81 82 83 84 85 86 87 88 89 90 91 92 93 94 95 96 97 98 99 100 101 102 103 104 105 106 107 108 109 110 111 112 113 114 115 package club.guoshizhan.domain;import club.guoshizhan.utils.DateUtils;import org.springframework.format.annotation.DateTimeFormat;import java.util.Date;public class Product private String id; private String productNum; private String productName; private String cityName; @DateTimeFormat (pattern="yyyy-MM-dd HH:mm" ) private Date departureTime; private String departureTimeStr; private double productPrice; private String productDesc; private Integer productStatus; private String productStatusStr; public String getId () return id; } public void setId (String id) this .id = id; } public String getProductNum () return productNum; } public void setProductNum (String productNum) this .productNum = productNum; } public String getProductName () return productName; } public void setProductName (String productName) this .productName = productName; } public String getCityName () return cityName; } public void setCityName (String cityName) this .cityName = cityName; } public Date getDepartureTime () return departureTime; } public void setDepartureTime (Date departureTime) this .departureTime = departureTime; } public String getDepartureTimeStr () if (departureTime!=null ){ departureTimeStr= DateUtils.date2String(departureTime,"yyyy-MM-dd HH:mm:ss" ); } return departureTimeStr; } public void setDepartureTimeStr (String departureTimeStr) this .departureTimeStr = departureTimeStr; } public double getProductPrice () return productPrice; } public void setProductPrice (double productPrice) this .productPrice = productPrice; } public String getProductDesc () return productDesc; } public void setProductDesc (String productDesc) this .productDesc = productDesc; } public Integer getProductStatus () return productStatus; } public void setProductStatus (Integer productStatus) this .productStatus = productStatus; } public String getProductStatusStr () if (productStatus != null ) { if (productStatus==0 ) productStatusStr="关闭" ; if (productStatus==1 ) productStatusStr="开启" ; } return productStatusStr; } public void setProductStatusStr (String productStatusStr) this .productStatusStr = productStatusStr; } }
如果遇到 DataUtils 工具类报红
TIPS:
以后如果遇到 模块之间类的调用
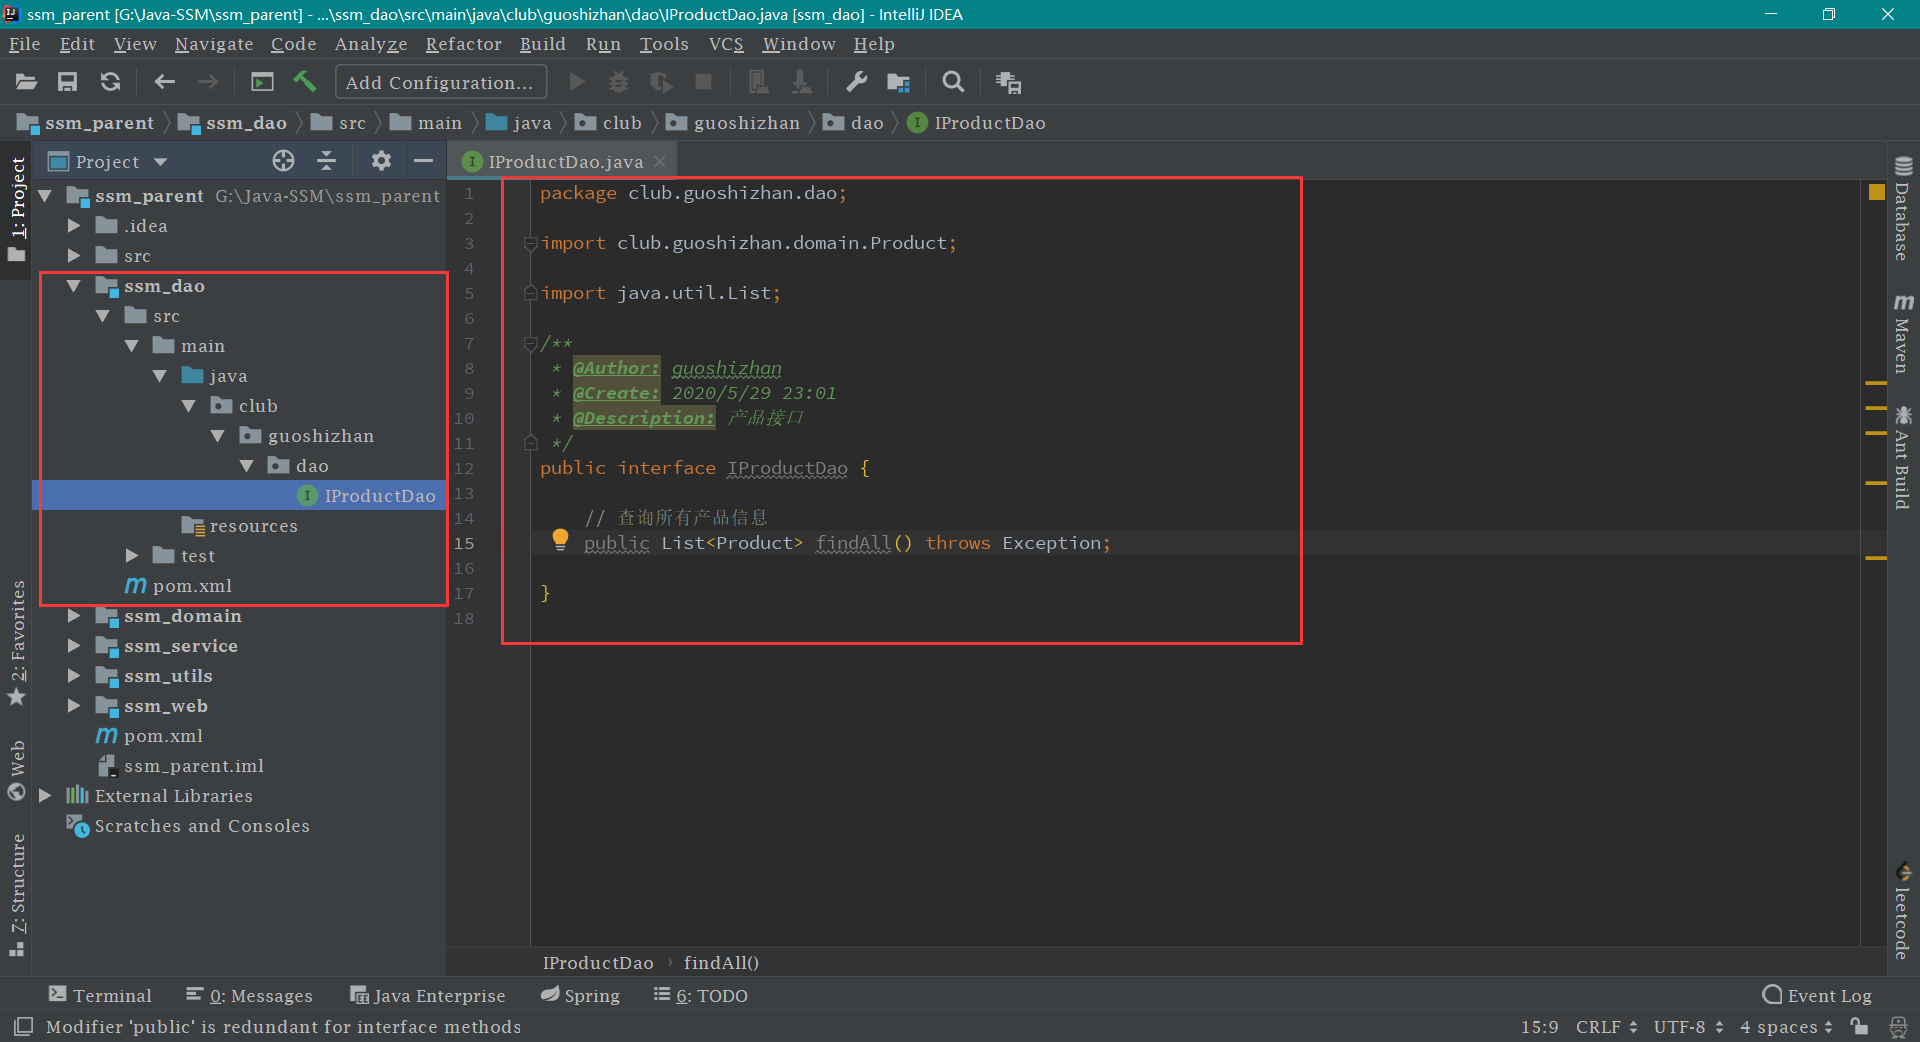
编写 dao 接口 在 ssm_dao -> src -> main -> java 文件下建立一个 dao 包,选择 java ,点击右键,选择 New -> Package ,输入包名为 club.guoshizhan.dao ,然后再在 dao 包下新建 IProductDao 接口 ,代码内容及见截图如下:
IProductDao.java 1 2 3 4 5 6 7 8 9 10 11 12 13 14 15 16 17 18 package club.guoshizhan.dao;import club.guoshizhan.domain.Product;import java.util.List;public interface IProductDao @Select ("select * from product" ) public List<Product> findAll () throws Exception }
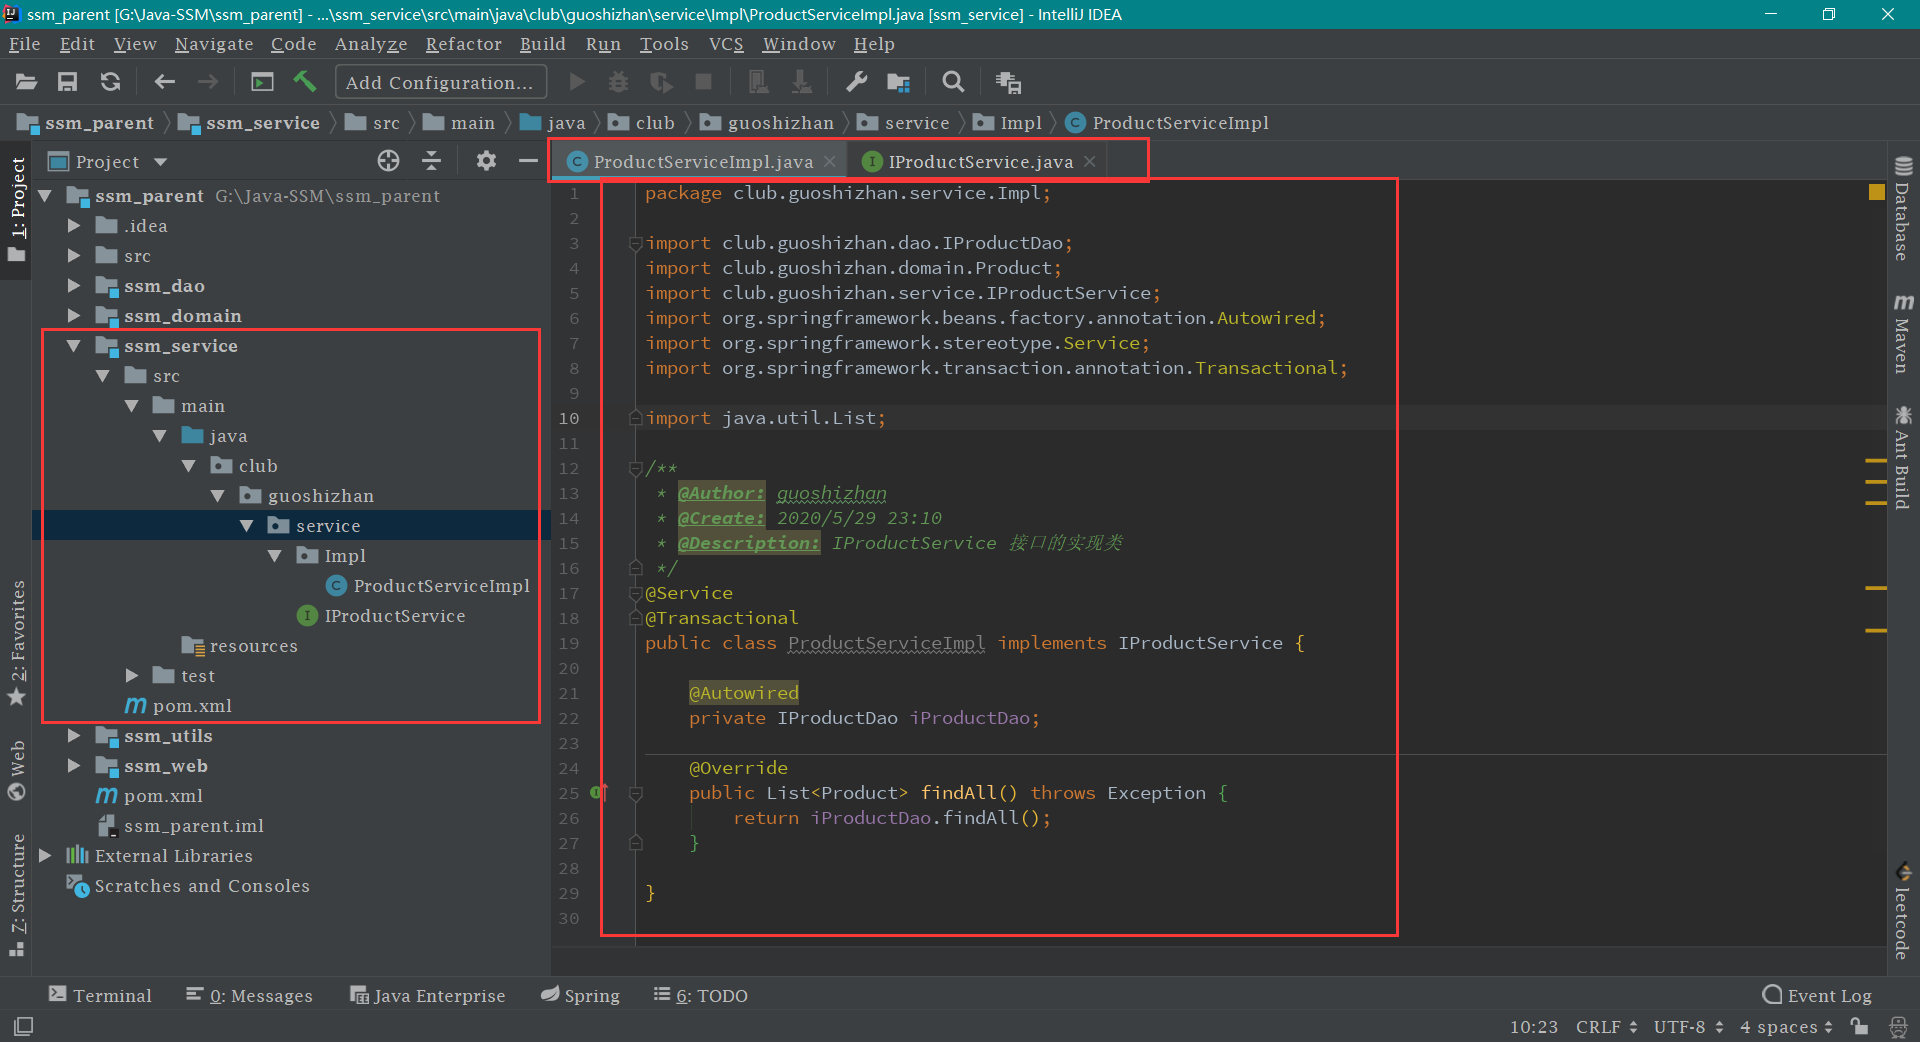
编写 service 业务逻辑 在 ssm_service -> src -> main -> java 文件下建立一个 service 包,选择 java ,点击右键,选择 New -> Package ,输入包名为 club.guoshizhan.service ,然后再在 service 包下新建 IProductService 接口 ,代码内容及见截图如下:
IProductService.java 1 2 3 4 5 6 7 8 9 10 11 12 13 14 15 16 package club.guoshizhan.service;import club.guoshizhan.domain.Product;import java.util.List;public interface IProductService public List<Product> findAll () throws Exception }
然后再在 service Impl 包,接着在 Impl
ProductServiceImpl.java 1 2 3 4 5 6 7 8 9 10 11 12 13 14 15 16 17 18 19 20 21 22 23 24 25 26 27 28 29 package club.guoshizhan.service.Impl;import club.guoshizhan.dao.IProductDao;import club.guoshizhan.domain.Product;import club.guoshizhan.service.IProductService;import org.springframework.beans.factory.annotation.Autowired;import org.springframework.stereotype.Service;import org.springframework.transaction.annotation.Transactional;import java.util.List;@Service @Transactional public class ProductServiceImpl implements IProductService @Autowired private IProductDao iProductDao; @Override public List<Product> findAll () throws Exception return iProductDao.findAll(); } }
编写各种配置文件
新建目录 在 ssm_web 模块 下,选择 src -> main ,点击右键,选择 New -> Directory 。新建 java 和 resources 两个目录,然后按照下图操作即可。如下:
编写配置文件 上述操作完成后,就在 resources 下新建三个配置文件,先看图:
第一步: ssm_web -> src -> main -> resources 下新建 database.properties
database.properties 1 2 3 4 5 6 7 8 9 10 11 jdbc.driver =oracle.jdbc.driver.OracleDriver jdbc.url =jdbc:oracle:thin:@localhost:1521:orcl jdbc.username =SSM jdbc.password =root
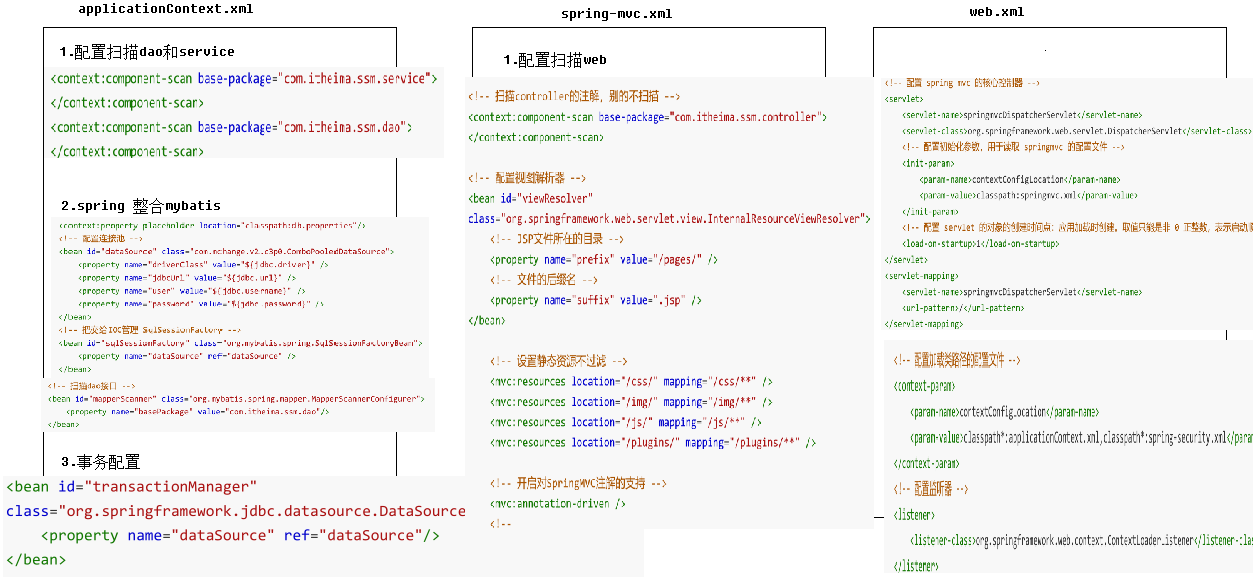
第二步: ssm_web -> src -> main -> resources 下新建 applicationContext.xml
applicationContext.xml 1 2 3 4 5 6 7 8 9 10 11 12 13 14 15 16 17 18 19 20 21 22 23 24 25 26 27 28 29 30 31 32 33 34 35 36 37 38 39 40 41 42 43 44 45 46 47 48 49 50 51 52 53 54 55 56 57 58 59 60 61 62 <?xml version="1.0" encoding="UTF-8"?> <beans xmlns ="http://www.springframework.org/schema/beans" xmlns:xsi ="http://www.w3.org/2001/XMLSchema-instance" xmlns:context ="http://www.springframework.org/schema/context" xmlns:tx ="http://www.springframework.org/schema/tx" xsi:schemaLocation ="http://www.springframework.org/schema/beans http://www.springframework.org/schema/beans/spring-beans.xsd http://www.springframework.org/schema/context http://www.springframework.org/schema/context/spring-context.xsd http://www.springframework.org/schema/tx http://www.springframework.org/schema/tx/spring-tx.xsd" > <context:component-scan base-package ="club.guoshizhan.service" > </context:component-scan > <context:component-scan base-package ="club.guoshizhan.dao" > </context:component-scan > <context:property-placeholder location ="classpath:database.properties" /> <bean id ="dataSource" class ="com.mchange.v2.c3p0.ComboPooledDataSource" > <property name ="driverClass" value ="${jdbc.driver}" /> <property name ="jdbcUrl" value ="${jdbc.url}" /> <property name ="user" value ="${jdbc.username}" /> <property name ="password" value ="${jdbc.password}" /> </bean > <bean id ="sqlSessionFactory" class ="org.mybatis.spring.SqlSessionFactoryBean" > <property name ="dataSource" ref ="dataSource" /> <property name ="plugins" > <array > <bean class ="com.github.pagehelper.PageInterceptor" > <property name ="properties" > <props > <prop key ="helperDialect" > oracle</prop > <prop key ="reasonable" > true</prop > </props > </property > </bean > </array > </property > </bean > <bean id ="mapperScanner" class ="org.mybatis.spring.mapper.MapperScannerConfigurer" > <property name ="basePackage" value ="club.guoshizhan.dao" /> </bean > <bean id ="transactionManager" class ="org.springframework.jdbc.datasource.DataSourceTransactionManager" > <property name ="dataSource" ref ="dataSource" /> </bean > <tx:annotation-driven transaction-manager ="transactionManager" /> </beans >
第三步: ssm_web -> src -> main -> resources 下新建 spring-mvc.xml
spring-mvc.xml 1 2 3 4 5 6 7 8 9 10 11 12 13 14 15 16 17 18 19 20 21 22 23 24 25 26 27 28 29 30 31 32 33 34 35 36 37 38 39 40 41 42 43 44 45 46 47 48 49 50 <?xml version="1.0" encoding="UTF-8"?> <beans xmlns ="http://www.springframework.org/schema/beans" xmlns:mvc ="http://www.springframework.org/schema/mvc" xmlns:context ="http://www.springframework.org/schema/context" xmlns:xsi ="http://www.w3.org/2001/XMLSchema-instance" xmlns:aop ="http://www.springframework.org/schema/aop" xsi:schemaLocation =" http://www.springframework.org/schema/beans http://www.springframework.org/schema/beans/spring-beans.xsd http://www.springframework.org/schema/mvc http://www.springframework.org/schema/mvc/spring-mvc.xsd http://www.springframework.org/schema/context http://www.springframework.org/schema/context/spring-context.xsd http://www.springframework.org/schema/aop http://www.springframework.org/schema/aop/spring-aop.xsd " > <context:component-scan base-package ="club.guoshizhan.controller" > </context:component-scan > <bean id ="viewResolver" class ="org.springframework.web.servlet.view.InternalResourceViewResolver" > <property name ="prefix" value ="/pages/" /> <property name ="suffix" value =".jsp" /> </bean > <mvc:resources location ="/css/" mapping ="/css/**" /> <mvc:resources location ="/img/" mapping ="/img/**" /> <mvc:resources location ="/js/" mapping ="/js/**" /> <mvc:resources location ="/plugins/" mapping ="/plugins/**" /> <mvc:annotation-driven /> <aop:aspectj-autoproxy proxy-target-class ="true" /> </beans >
第四步: ssm_web -> src -> main -> webapp -> WEB-INF 下的 web.xml 注意: 先把 web.xml web.xml
web.xml 1 2 3 4 5 6 7 8 9 10 11 12 13 14 15 16 17 18 19 20 21 22 23 24 25 26 27 28 29 30 31 32 33 34 35 36 37 38 39 40 41 42 43 44 45 46 47 48 49 50 51 52 53 54 55 56 57 58 59 60 <?xml version="1.0" encoding="UTF-8"?> <web-app xmlns:xsi ="http://www.w3.org/2001/XMLSchema-instance" xmlns ="http://xmlns.jcp.org/xml/ns/javaee" xsi:schemaLocation ="http://xmlns.jcp.org/xml/ns/javaee http://xmlns.jcp.org/xml/ns/javaee/web-app_3_1.xsd" version ="3.1" > <context-param > <param-name > contextConfigLocation</param-name > <param-value > classpath*:applicationContext.xml</param-value > </context-param > <listener > <listener-class > org.springframework.web.context.ContextLoaderListener</listener-class > </listener > <filter > <filter-name > characterEncodingFilter</filter-name > <filter-class > org.springframework.web.filter.CharacterEncodingFilter</filter-class > <init-param > <param-name > encoding</param-name > <param-value > UTF-8</param-value > </init-param > </filter > <filter-mapping > <filter-name > characterEncodingFilter</filter-name > <url-pattern > /*</url-pattern > </filter-mapping > <servlet > <servlet-name > dispatcherServlet</servlet-name > <servlet-class > org.springframework.web.servlet.DispatcherServlet</servlet-class > <init-param > <param-name > contextConfigLocation</param-name > <param-value > classpath:spring-mvc.xml</param-value > </init-param > <load-on-startup > 1</load-on-startup > </servlet > <servlet-mapping > <servlet-name > dispatcherServlet</servlet-name > <url-pattern > *.do</url-pattern > </servlet-mapping > <welcome-file-list > <welcome-file > index.html</welcome-file > <welcome-file > index.htm</welcome-file > <welcome-file > index.jsp</welcome-file > <welcome-file > default.html</welcome-file > <welcome-file > default.htm</welcome-file > <welcome-file > default.jsp</welcome-file > </welcome-file-list > </web-app >
编写 controller resources 目录下 ssm_web -> src -> main -> java 目录下新建一个包 club.guoshizhan.controller ,然后在 controller ProductController
ProductController.java 1 2 3 4 5 6 7 8 9 10 11 12 13 14 15 16 17 18 19 20 21 22 23 24 25 26 27 28 29 30 31 32 33 34 35 package club.guoshizhan.controller;import club.guoshizhan.domain.Product;import club.guoshizhan.service.IProductService;import org.springframework.beans.factory.annotation.Autowired;import org.springframework.stereotype.Controller;import org.springframework.web.bind.annotation.RequestMapping;import org.springframework.web.servlet.ModelAndView;import java.util.List;@Controller @RequestMapping ("/product" )public class ProductController @Autowired private IProductService productService; @RequestMapping ("/findAll.do" ) public ModelAndView findAll () throws Exception ModelAndView mv = new ModelAndView(); List<Product> all = productService.findAll(); mv.addObject("all" ,all); mv.setViewName("product-list" ); return mv; } }
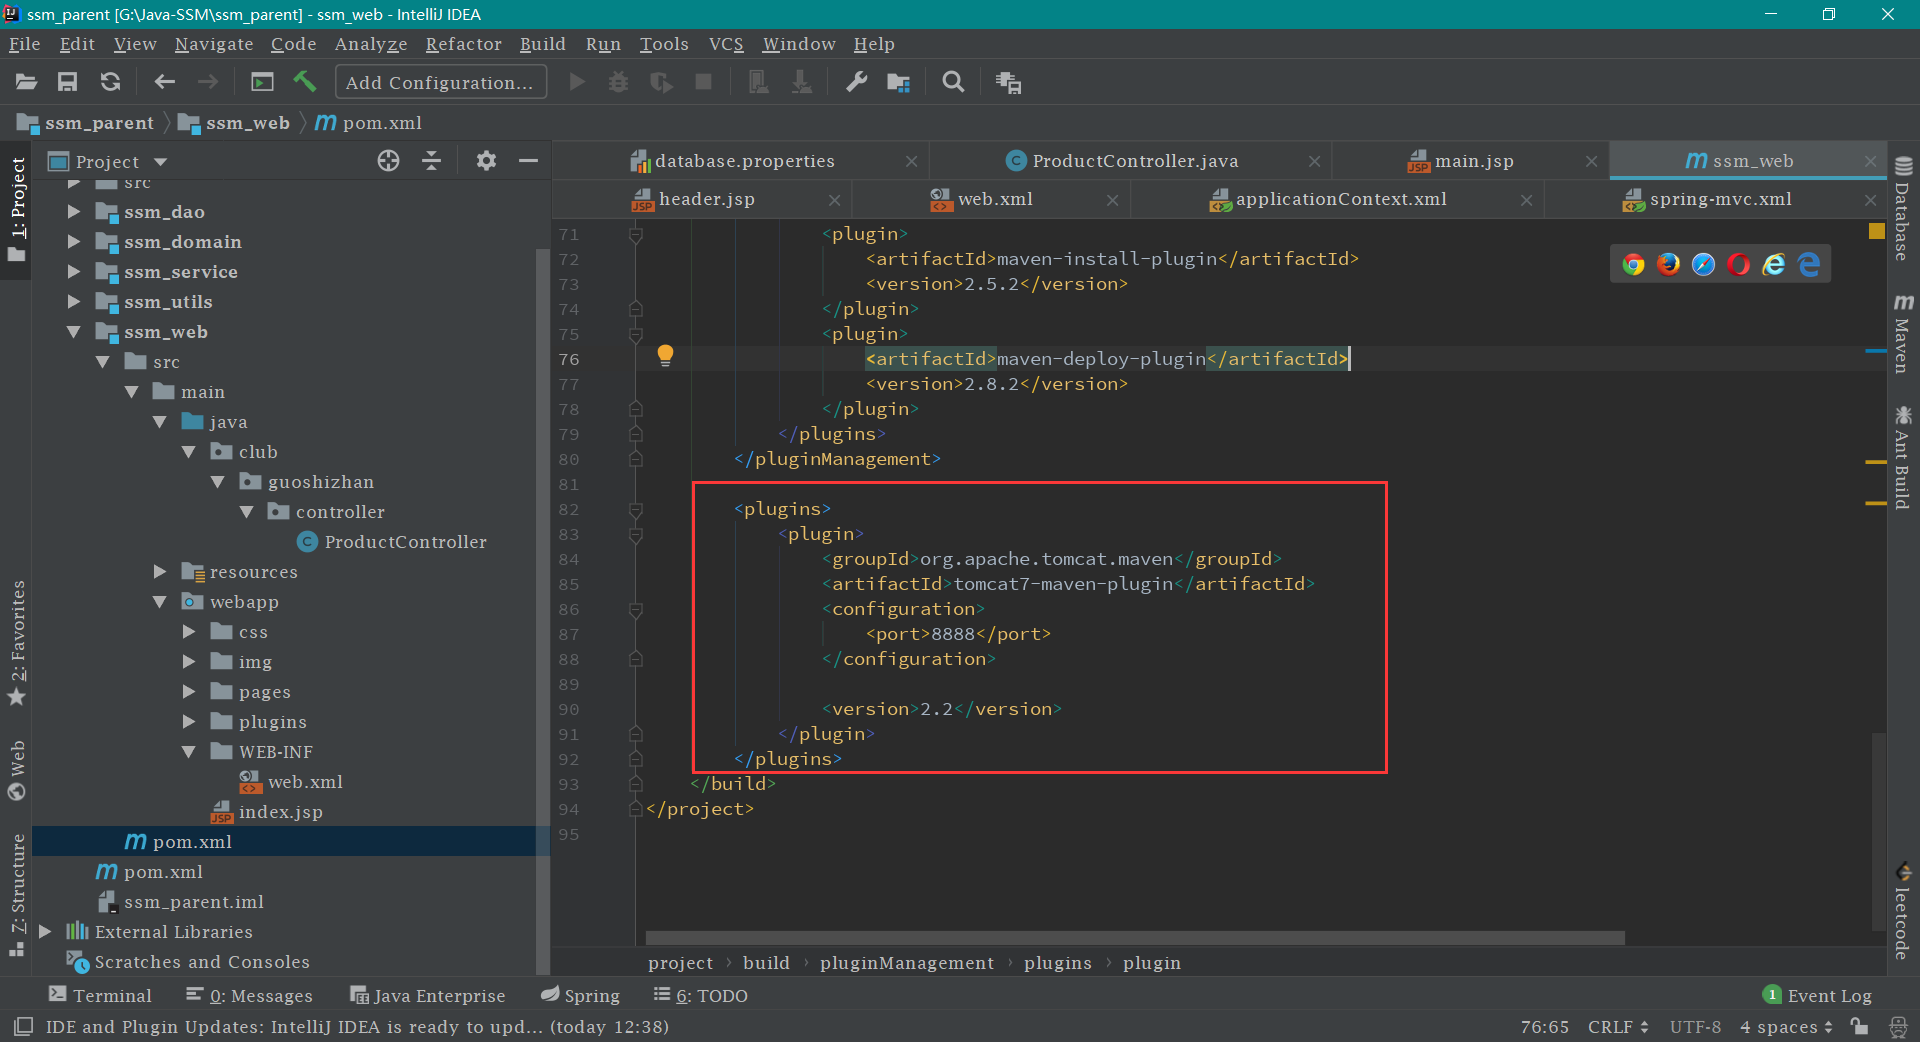
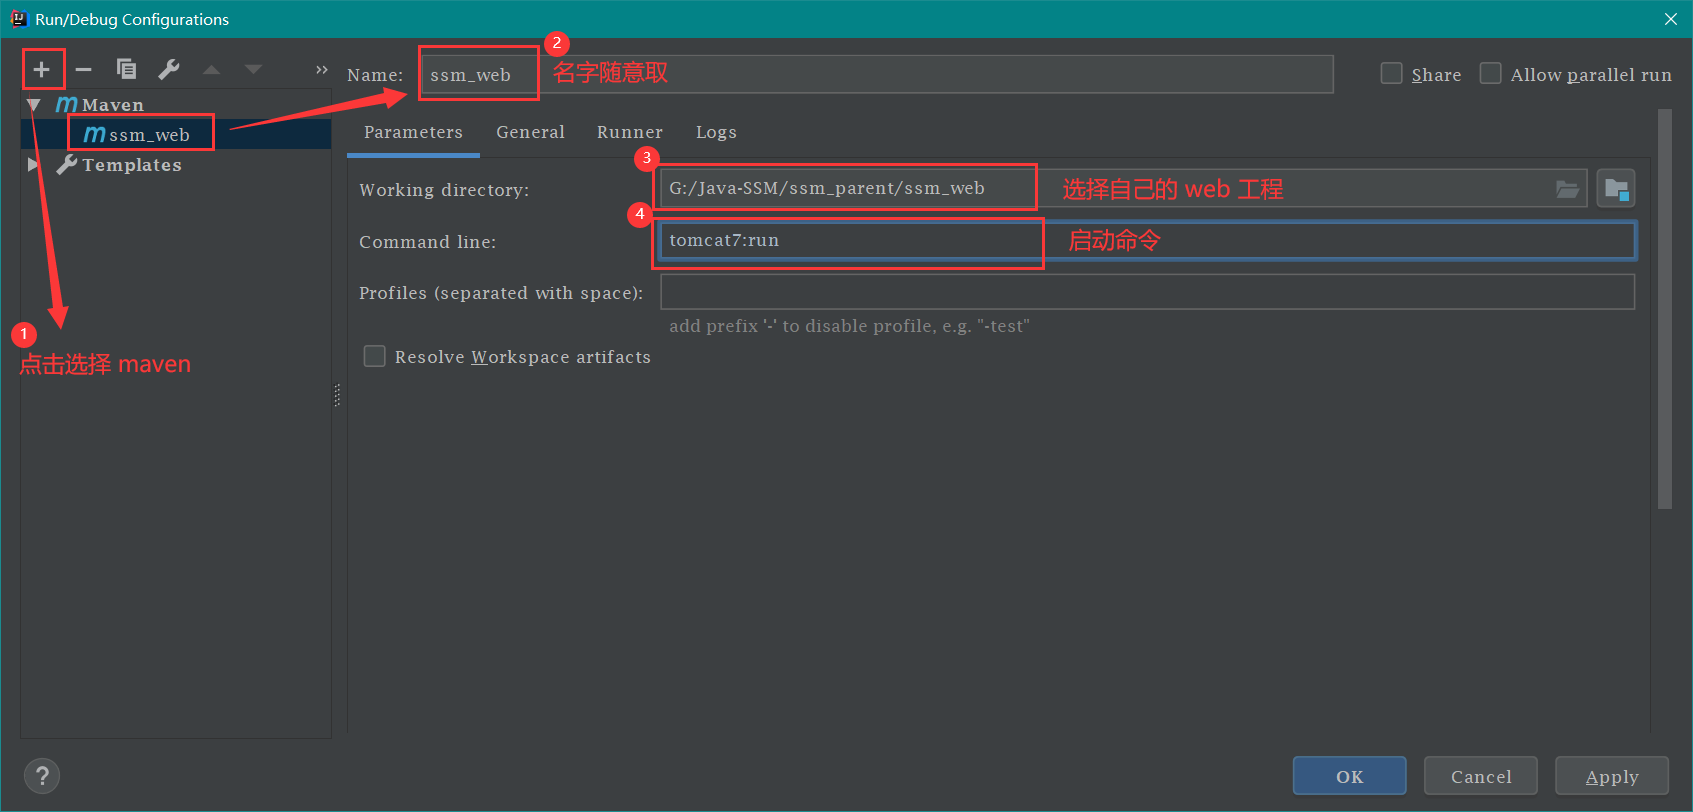
配置 tomcat 打开 ssm_web 模块 下的 pom
1 2 3 4 5 6 7 8 9 10 11 <plugins > <plugin > <groupId > org.apache.tomcat.maven</groupId > <artifactId > tomcat7-maven-plugin</artifactId > <configuration > <port > 8886</port > </configuration > <version > 2.2</version > </plugin > </plugins >
导入前端相关 导入 img css plugins,然后按照如图新建 pages ,加入三个页面即可。如下图;