内容概要:
Spring Boot 入门 Spring Boot 出现的背景 J2EE 笨重的开发、繁多的配置、低下的开发效率、复杂的部署流程、第三方技术集成难度大 Spring Boot 。举个栗子,如果不用 Spring Boot ,平时我们开发一个 Web 应用程序需要以下步骤:
传统 Web 应用开发步骤:
1、新建一个 web 工程
2、引入依赖
3、配置 web.xml 文件
4、配置框架本身的配置文件
5、加入运行容器
6、调试运行
在这些步骤中,可能感触最深的或者最麻烦的就是引入各种依赖和配置各种 xml 文件 有的时候,我们可能只是开发的一个很小的 web 应用,但是搭建环境可能比写业务代码花的时间长 Spring Boot 就诞生了!
Spring Boot简介
相关链接:
Spring 官网: Spring 官网 Spring Boot 官网: Spring Boot 官网 使用文档: Spring boot 使用文档
Spring Boot 是由 Pivotal 团队 设计目的 是用来简化 Spring 应用的初始搭建以及开发过程
Spring Boot 简化了基于 Spring 的应用开发,约定大于配置,去繁从简 ,通过少量的代码就能创建一个独立的、产品级别的 Spring 应用。不仅如此,Spring Boot 为 Spring 平台及第三方库提供 开箱即用 的设置 Spring Boot 的核心思想就是约定大于配置,多数 Spring Boot 应用只需要很少的 Spring 配置
Spring Boot 优缺点
Spring Boot 优点:
1、快速创建独立运行的 Spring 项目以及与主流框架集成
2、使用嵌入式的 Servlet 容器,应用无需打成 WAR 包
3、starters 自动依赖与版本控制
4、大量的自动配置,简化开发,也可修改默认值
5、无需配置 XML,无代码生成,开箱即用
6、准生产环境的运行时应用监控
7、与云计算的天然集成
Spring Boot 缺点:
Spring Boot 唯一的缺点就是入门容易,精通难,只有对 Spring 非常的了解,才能够深度定制 Spring Boot。
Spring Boot 就是:
1、简化 Spring 应用开发的一个框架。
2、整个 Spring 技术栈的一个大整合。
3、J2EE 开发的一站式解决方案。
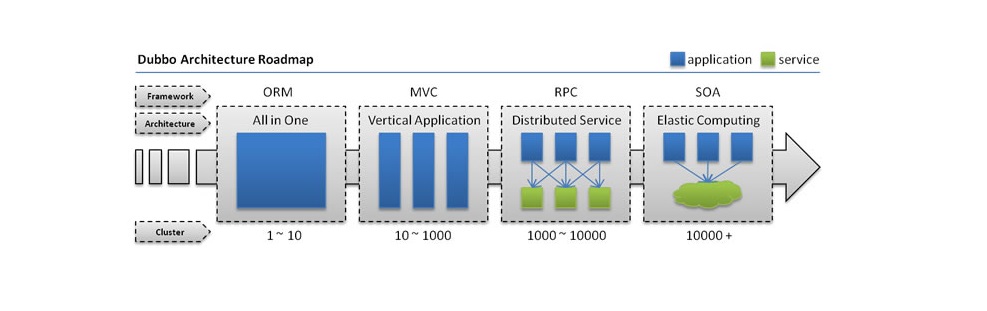
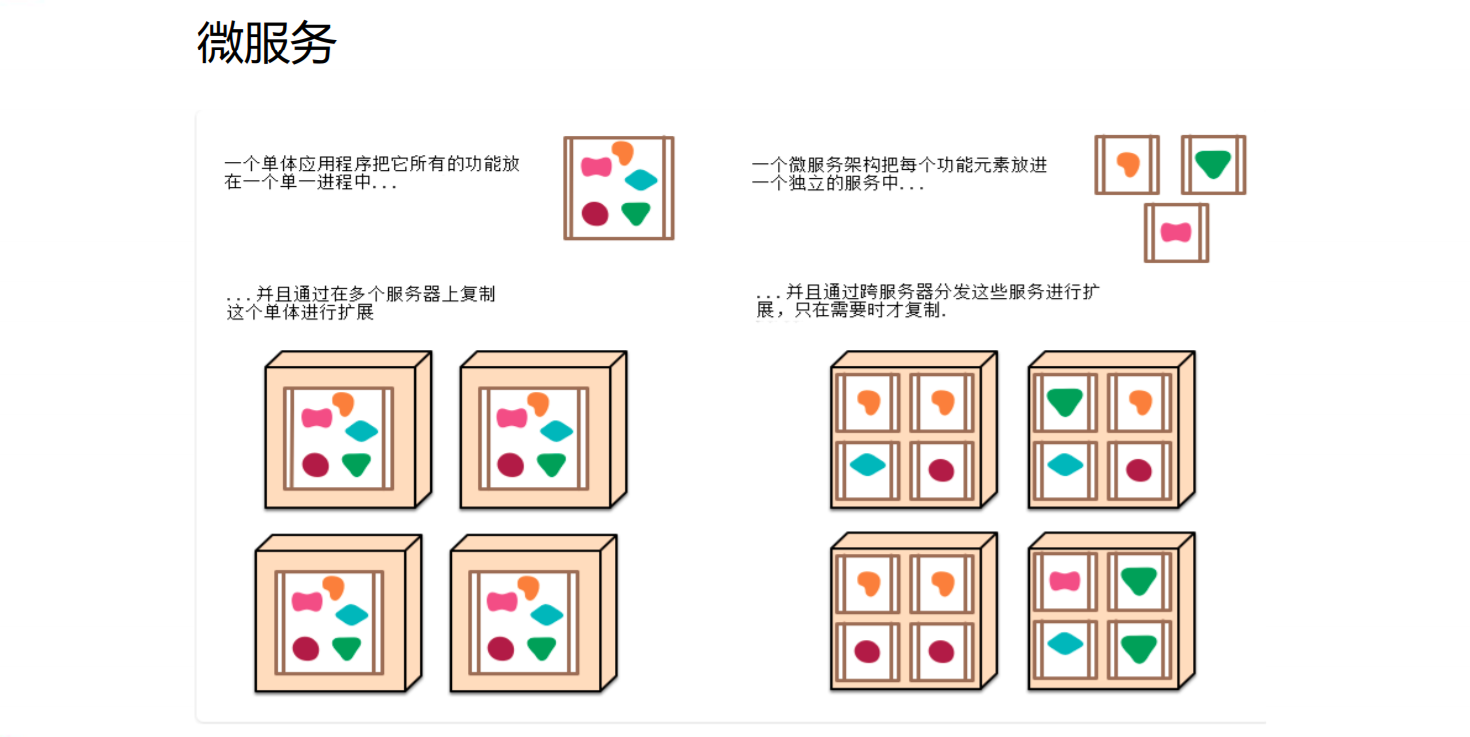
微服务简介 微服务 是一种架构风格,它能够将单一程序开发成一组小型服务的组合,每一个功能元素最终都是一个可独立替换和独立升级的软件单元 这些小型服务可以使用不同的编程语言以及数据存储技术
微服务:
1、始于2014年,
martin fowler 的初始微服务文档
2、微服务其实就是一种架构风格(服务微化)
3、一个应用应该是一组小型服务
4、可以通过 HTTP 的方式进行互通
5、原先的应用称为单体应用:ALL IN ONE
单体应用 微服务
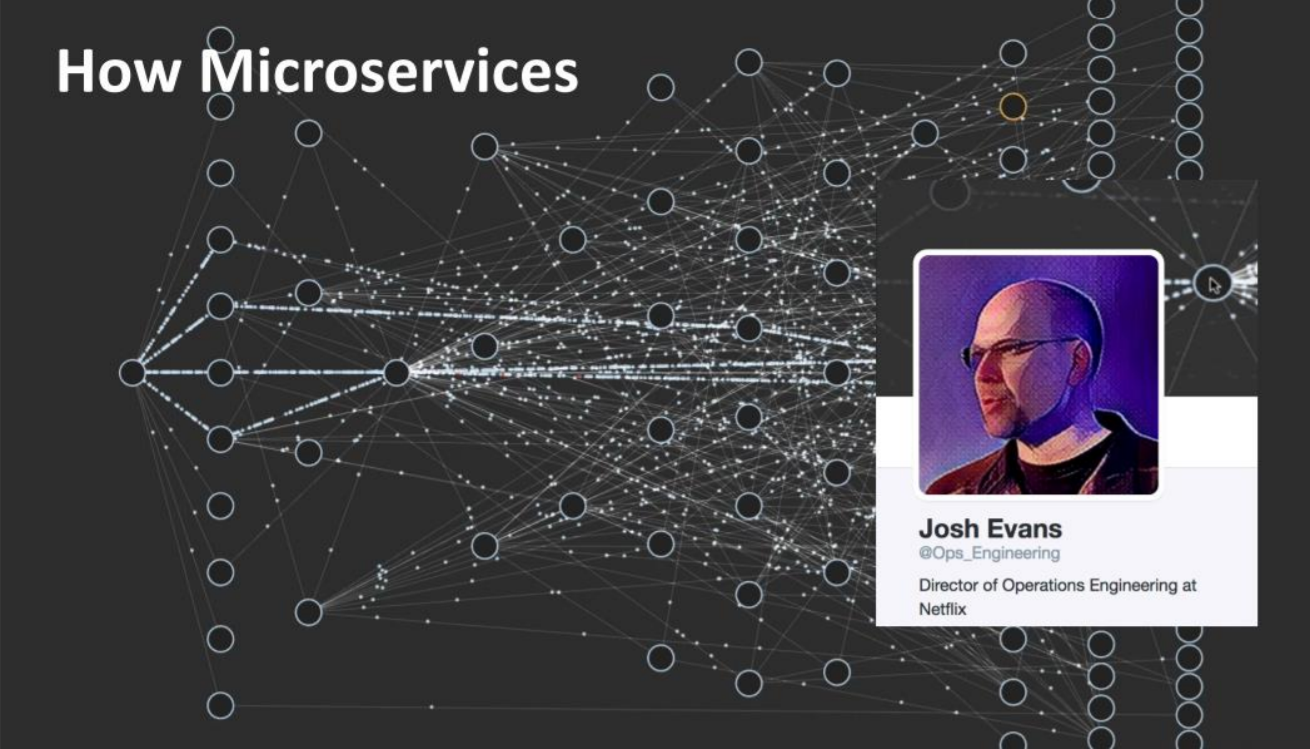
微服务之间的相互调用
Spring Boot 配置 环境准备
学习 Spring Boot 前提:
1、最好学习过 Spring 框架
2、能够使用 Maven 进行项目构建和依赖管理
3、熟悉使用 IDE,如 IDEA 、 Eclipse 或者 STS 等等
环境准备:
1、JDK1.8:Spring Boot 官网推荐 jdk1.7 及以上,个人推荐使用 JDK1.8 或 JDK11
2、Maven3.x:maven 3.3 以上版本
3、IntelliJ IDEA:2017年及以上,可使用 2020 版本,支持中文哦
4、Spring Boot 1.5.9.RELEASE:Spring Boot 官网推荐 1.5.9 及以上,个人推荐 Spring Boot 2.x 以上
Maven 配置 找到 Maven 安装目录下 settings.xml 配置文件的 profiles 标签,然后在 profiles 里面添加下面代码:
D:\01_Programs\02_Java\06_Maven\apache-maven-3.5.2\conf\settings.xml 1 2 3 4 5 6 7 8 9 10 11 12 13 14 <profile > <id > jdk-1.8</id > <activation > <activeByDefault > true</activeByDefault > <jdk > 1.8</jdk > </activation > <properties > <maven.compiler.source > 1.8</maven.compiler.source > <maven.compiler.target > 1.8</maven.compiler.target > <maven.compiler.compilerVersion > 1.8</maven.compiler.compilerVersion > </properties > </profile >
IDEA 配置 按照 File\settings\build,Execution,Deployment\Build Tools\Maven 路径 给 IDEA 配置好 Maven
File\settings\build,Execution,Deployment\Build Tools\Maven 1 2 3 4 5 - Maven home directory - User settings file - Local repository
创建一个简单的 Web 应用 现在就使用 Spring Boot 开发一个小功能:浏览器发送一个 hello 请求 ,服务器接受请求并处理,然后返回相应的结果。那就开始吧!
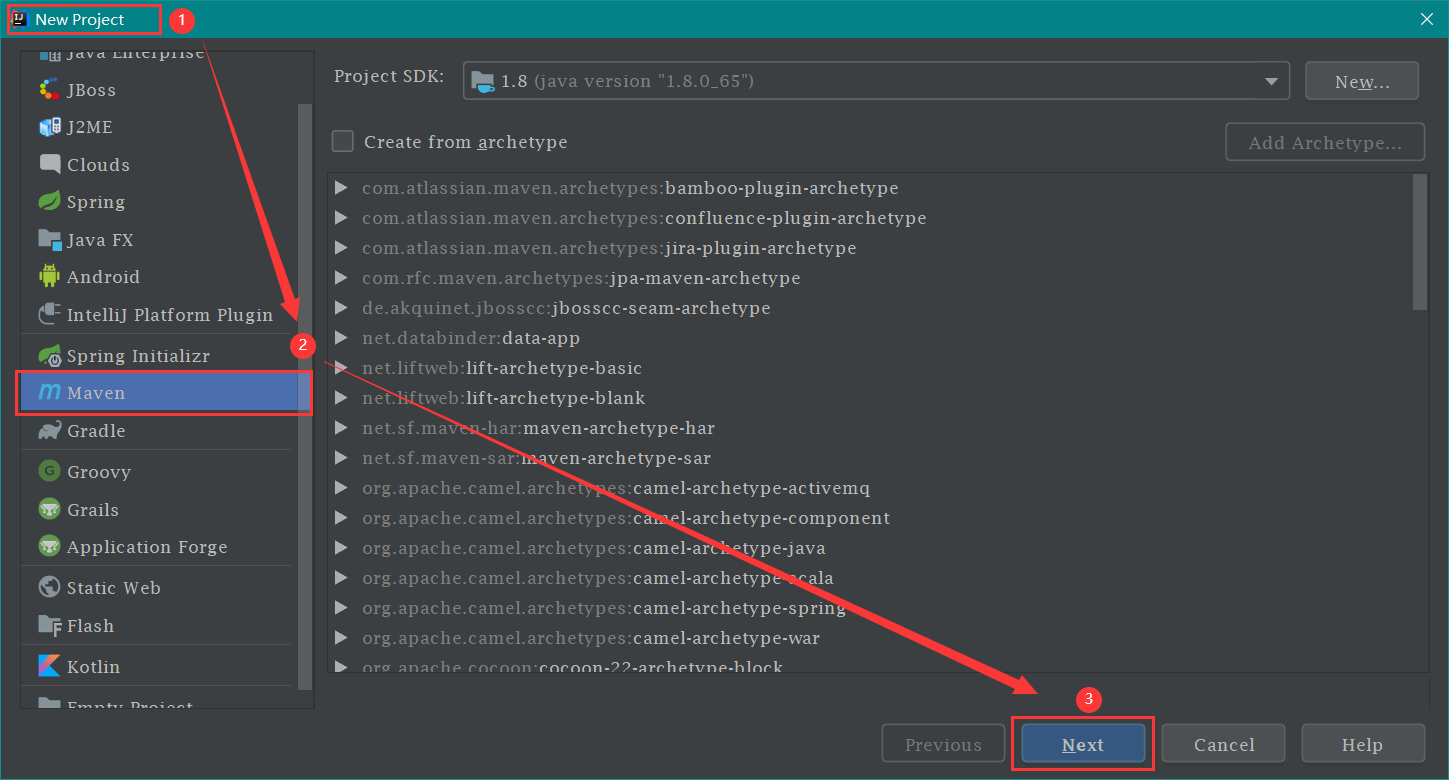
创建 Maven 项目 新建一个 project 或者 module Maven ,然后填写相关信息,一直下一步即可 Finish 就完成了 Maven 项目的创建。我创建的项目工程名是 001-springboot-helloworld,完成后如下图:
导入相关的依赖 打开 Maven 工程下的 pom.xml 文件,把以下代码复制到 pom.xml 文件中:
pom.xml 1 2 3 4 5 6 7 8 9 10 11 <parent > <groupId > org.springframework.boot</groupId > <artifactId > spring-boot-starter-parent</artifactId > <version > 2.0.1.RELEASE</version > </parent > <dependencies > <dependency > <groupId > org.springframework.boot</groupId > <artifactId > spring-boot-starter-web</artifactId > </dependency > </dependencies >
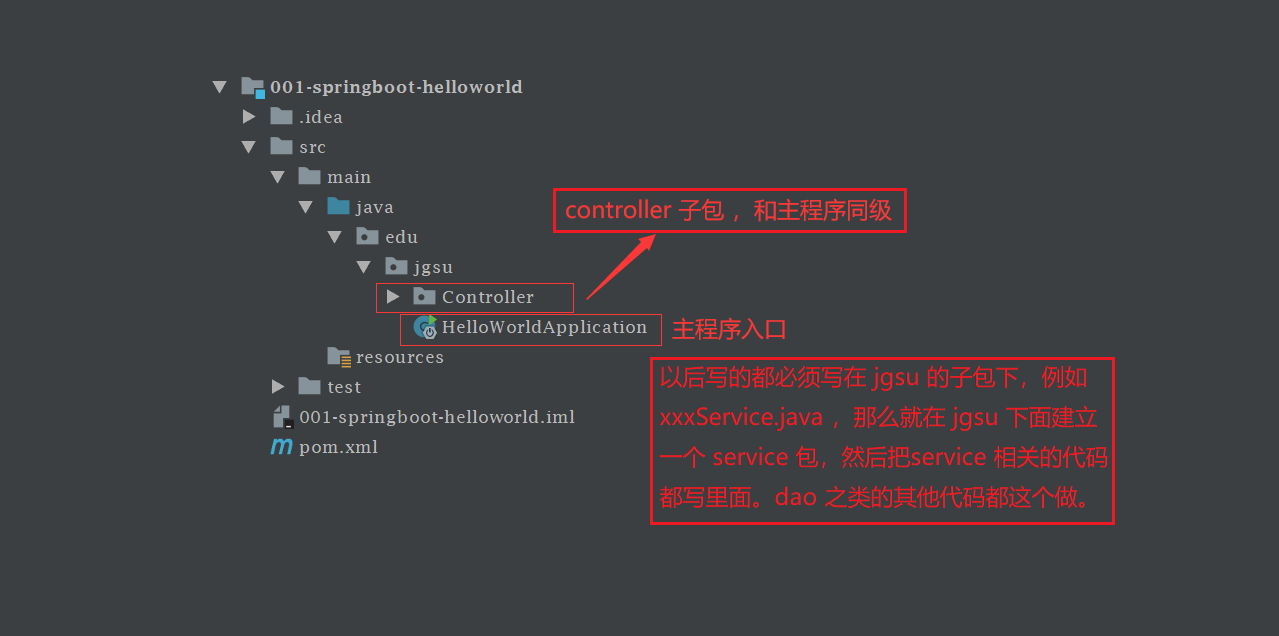
创建主程序 在 Maven 项目的 src\main\java 下面创建 主程序 HelloWorldApplication ,【下方有注意事项】
注意事项:
1、我的包名为 edu.jgsu ,路径是:src\main\java\edu\jgsu
2、HelloWorldApplication 必须放在 jgsu 包里面
3、以后所有包和类必须放在 jgsu 包下面的子包里面,即 jgsu 下面的子包 和 HelloWorldApplication 同级
4、文字描述不够直观,请看下图
001-springboot-helloworld\src\main\java\edu\jgsu\HelloWorldApplication 1 2 3 4 5 6 7 8 9 10 11 12 13 package edu.jgsu;import org.springframework.boot.SpringApplication;import org.springframework.boot.autoconfigure.SpringBootApplication;@SpringBootApplication public class HelloWorldApplication public static void main (String[] args) SpringApplication.run(HelloWorldApplication.class , args ) ; } }
编写 Controller 在 edu\jgsu 下面新建一个 Controller 包 ,然后在 Controller 下编写 HelloController 类 。代码如下:
1 2 3 4 5 6 7 8 9 10 11 12 13 14 15 package edu.jgsu.Controller;import org.springframework.stereotype.Controller;import org.springframework.web.bind.annotation.RequestMapping;import org.springframework.web.bind.annotation.ResponseBody;@Controller public class HelloController @ResponseBody @RequestMapping ("/hello" ) public String Hello () return "Hello,Spring Boot!" ; } }
启动运行 切换到 HelloWorldApplication 类 ,运行其主方法 启动成功
然后在地址栏后面加上 /hello ,/hello 来自于 HelloController 类 @RequestMapping 注解
打包部署 添加打包插件 pom.xml 文件 </project> 上一行中:
1 2 3 4 5 6 7 8 9 <build > <plugins > <plugin > <groupId > org.springframework.boot</groupId > <artifactId > spring-boot-maven-plugin</artifactId > </plugin > </plugins > </build >
选择 Maven ,然后点击 Lifecycle\package 命令即可进行打包。如下图:
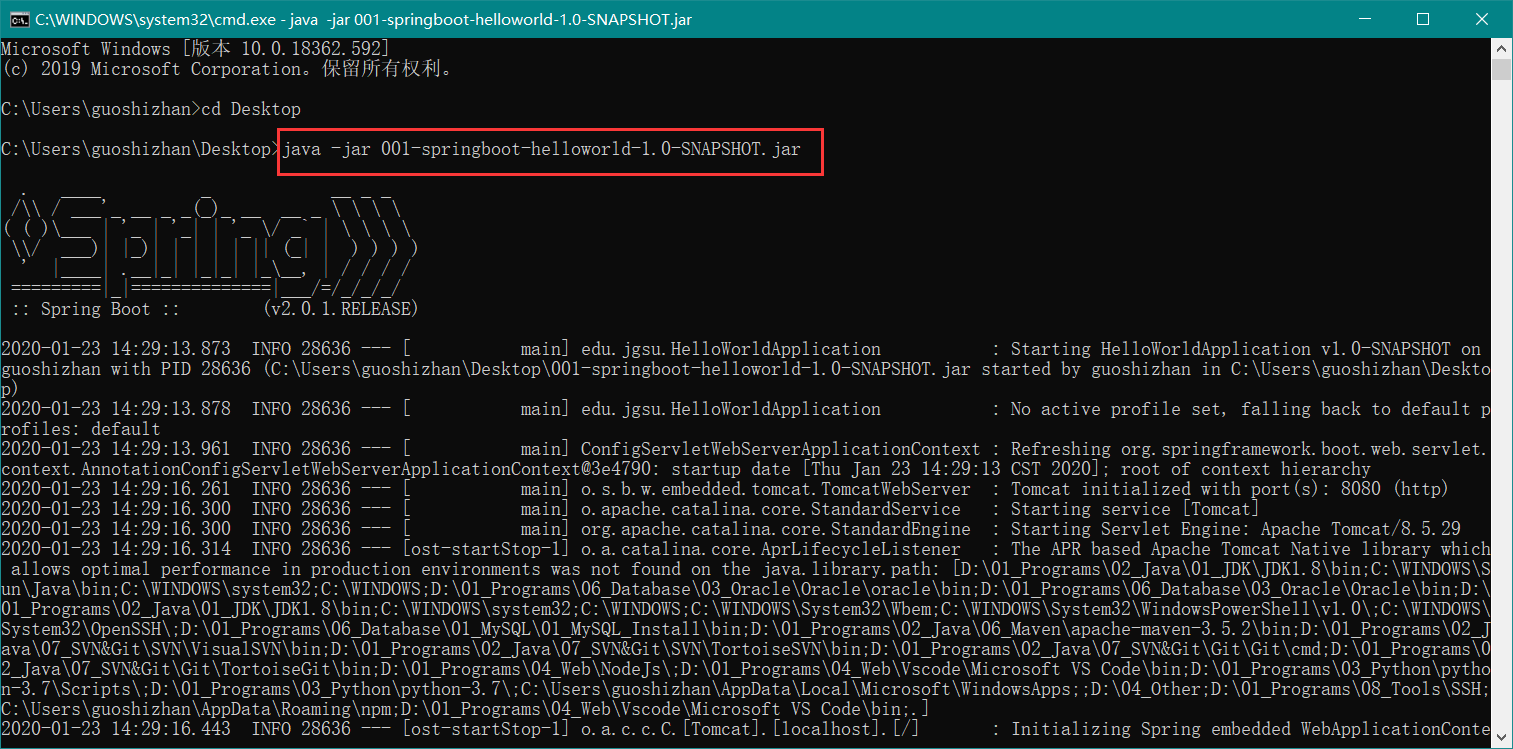
打包完成之后,停止 Maven 项目运行,去 Maven 工程目录下找到 target 文件夹,刚刚打包的 jar 包就放在里面 java -jar xxx.jar 命令来使用 jar 包。这个 jar 包 内嵌 tomcat ,启动成功后仍然可以通过浏览器访问,如下图:
拓展:自定义 banner 我们启动 spring 项目时,默认的 banner 是这样的,如下:
1 2 3 4 5 6 . ____ _ __ _ _ /\\ / ___'_ __ _ _(_)_ __ __ _ \ \ \ \ ( ( )\___ | '_ | ' _| | '_ \/ _` | \ \ \ \ \\/ ___)| |_)| | | | | || (_| | ) ) ) ) ' |____| .__|_| |_|_| |_\__, | / / / / =========|_|==============|___/=/_/_/_/
如果我想把 banner 换成其他的文字可以吗?当然可以,以下是步骤:
替换步骤:
1、搜索引擎搜索:spring boot banner 。个人推荐网站:
https://www.bootschool.net/ascii
2、输入自己喜欢的文字,然后生成,最后拷贝结果。或者点击 ASCll 艺术字,然后寻找到自己喜欢的 banner 并拷贝结果。
3、回到 IDEA ,在 src/main/resources/ 下新建 banner.txt 文本,把拷贝结果复制到里面即可。
4、重新启动项目,即可看到结果,示例如下:
1 2 3 4 5 6 7 8 9 10 11 12 13 14 15 16 17 18 19 20 21 22 23 24 //////////////////////////////////////////////////////////////////// // _ooOoo_ // // o8888888o // // 88 " . " 88 // // (| ^_^ |) // // O\ = /O // // ____/`---'\____ // // .' \\| |// `. // // / \\||| : |||// \ // // / _||||| -:- |||||- \ // // | | \\\ - /// | | // // | \_| '' \---/'' | | // // \ .-\__ `-` ___/-. / // // ___`. .' /--.--\ `. . ___ // // ."" '< `.___\_<|>_/___.' >'"". // // | | : `- \`.;`\ _ /`;.`/ - ` : | | // // \ \ `-. \_ __\ /__ _/ .-` / / // // ========`-.____`-.___\_____/___.-`____.-'======== // // `=---=' // // ^^^^^^^^^^^^^^^^^^^^^^^^^^^^^^^^^^^^^^^^^^^^^^^^^^ // // 佛祖保佑 永不宕机 永无BUG // ////////////////////////////////////////////////////////////////////
TIPS: 到这里为止,一个通过 Maven 构建的 Spring Boot 应用 就完成了。接下来将对这个应用进行剖析。
hello world 应用剖析 为什么 Spring Boot 能够如此简单的实现一个 Web 应用?为什么 Spring Boot 不需要配置繁琐的 tomcat 服务器?*这就要归功于 Spring Boot 的各种启动器 * 。先阅读以下依赖并分析:
1 2 3 4 5 6 7 8 9 10 11 <parent > <groupId > org.springframework.boot</groupId > <artifactId > spring-boot-starter-parent</artifactId > <version > 2.0.1.RELEASE</version > </parent > <dependency > <groupId > org.springframework.boot</groupId > <artifactId > spring-boot-starter-web</artifactId > </dependency >
spring-boot-starter 称之为 场景启动器 ,它能够帮我们导入了各种模块正常运行所依赖的组件 starters(启动器) ,只需要在项目里面引入这些 starter ,那么相关场景的所有依赖都会导入进来 邮件 ,那就导入 spring-boot-starter-mail 启动器。具体用哪一个版本可参考官网的某一个详细版本。如 版本2.12 。接下来,我们再来看看下面的依赖:
1 2 3 4 5 6 <parent > <groupId > org.springframework.boot</groupId > <artifactId > spring-boot-dependencies</artifactId > <version > 2.0.1.RELEASE</version > <relativePath > ../../spring-boot-dependencies</relativePath > </parent >
spring-boot-starter-parent 是 spring-boot-starter-web spring-boot-dependencies 是 spring-boot-starter-parent Spring Boot 的版本仲裁中心 。以后我们导入依赖,默认是不需要写版本的。【除非没有在 dependencies 里面管理的依赖,才需要声明版本号】
自动配置原理 让我们先来看看 Spring Boot 的主程序类 HelloWorldApplication ,也就是 Spring Boot 应用的入口,代码如下:
001-springboot-helloworld\src\main\java\edu\jgsu\HelloWorldApplication 1 2 3 4 5 6 7 8 9 10 11 12 13 package edu.jgsu;import org.springframework.boot.SpringApplication;import org.springframework.boot.autoconfigure.SpringBootApplication;@SpringBootApplication public class HelloWorldApplication public static void main (String[] args) SpringApplication.run(HelloWorldApplication.class , args ) ; } }
@SpringBootApplication 注解是用来说明这个类是 Spring Boot 的主配置类 ,Spring Boot 就应该运行这个类的 main 方法来启动 Spring Boot 应用 @SpringBootApplication 看一下:
1 2 3 4 5 6 7 8 9 10 11 12 13 14 15 16 17 18 19 20 @Target ({ElementType.TYPE})@Retention (RetentionPolicy.RUNTIME)@Documented @Inherited @SpringBootConfiguration @EnableAutoConfiguration @ComponentScan ( excludeFilters = {@Filter ( type = FilterType.CUSTOM, classes = {TypeExcludeFilter.class } ), @Filter ( type = FilterType.CUSTOM, classes = {AutoConfigurationExcludeFilter.class } )} ) public @interface SpringBootApplication @AliasFor ( annotation = EnableAutoConfiguration.class ) ...
@SpringBootConfiguration 是 Spring Boot 的配置类注解,用于标注在某个类上,表示这是一个 Spring Boot 的配置类 @Configuration 注解,这个注解用于配置类,是 Spring 底层注解。Spring Boot 中的配置类和 Spring 中的配置文件是等价的 @Component 注解表示配置类也是容器中的一个组件。
以前我们需要手动配置的东西,现在 Spring Boot 帮我们自动配置。@EnableAutoConfiguration 这个注解的作用就是 告诉 Spring Boot 开启自动配置功能
1 2 3 4 5 6 7 8 9 @Target ({ElementType.TYPE})@Retention (RetentionPolicy.RUNTIME)@Documented @Inherited @AutoConfigurationPackage @Import ({AutoConfigurationImportSelector.class }) public @interface EnableAutoConfiguration String ENABLED_OVERRIDE_PROPERTY = "spring.boot.enableautoconfiguration" ; ...
在上面代码中,有两个注解很重要,@AutoConfigurationPackage 和 @Import 。@AutoConfigurationPackage 注解 :自动配置包,将主配置类【@SpringBootApplication 标注的类】的所在包及下面所有子包里面的所有组件扫描到 Spring 容器 Controller 包下面的 HelloController 类 edu 包下,此时,这个类不在扫描的范围之内,那么 HelloController 类将无法被访问,那么当我们访问 /Hello 时,报错 404 。下面,我们跟进这个注解看一下:
1 2 3 4 5 6 7 Target({ElementType.TYPE}) @Retention (RetentionPolicy.RUNTIME)@Documented @Inherited @Import ({Registrar.class }) public @interface AutoConfigurationPackage }
Spring 的底层注解 @Import ,给容器中导入一个组件,导入的组件为 Registrar.class
那么到这里为止,我们清楚了 自动配置注解的功能 就是给容器中导入非常多的自动配置类【xxxAutoConfiguration】,就是给容器中导入某个场景需要的所有组件,并配置好这些组件
Spring Boot 在启动的时候从 类路径下 META-INF/spring.factories 中获取 EnableAutoConfiguration 注解所指定的值 spring-boot-autoconfigure-2.0.1.RELEASE.jar 。
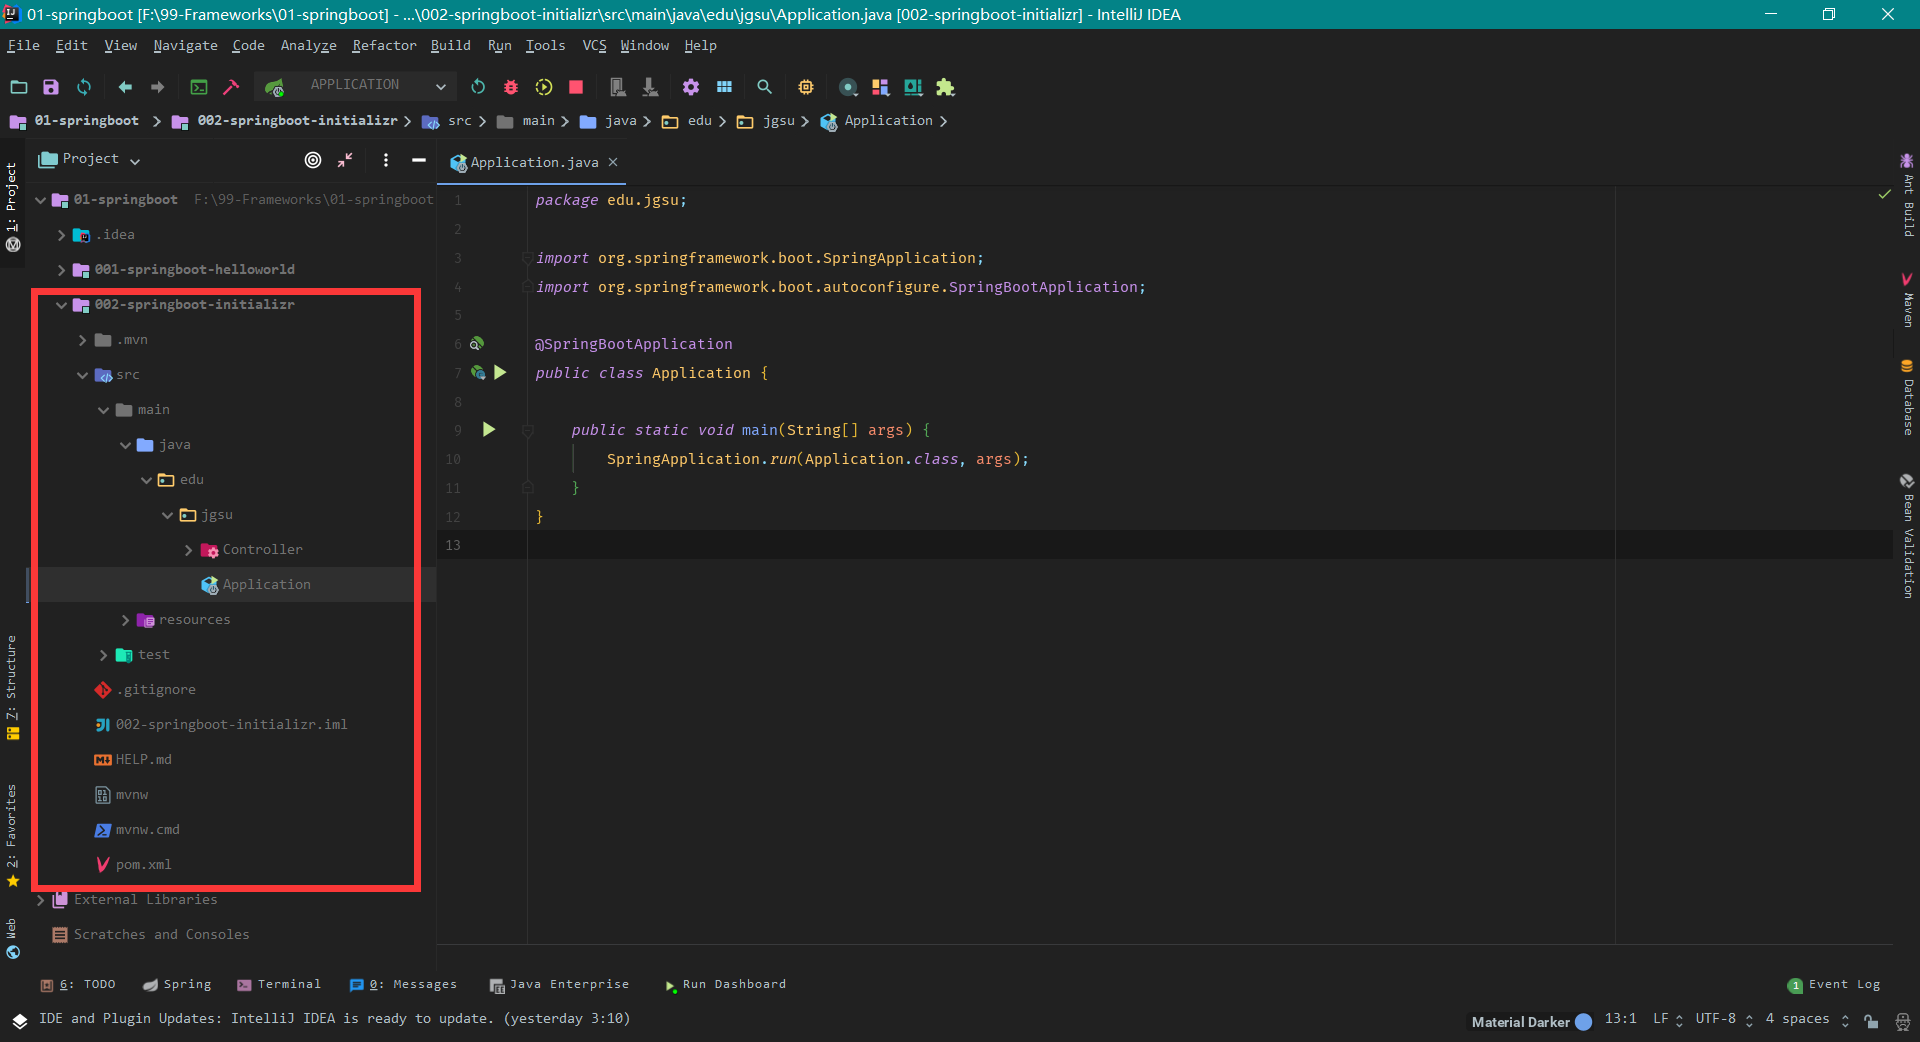
快速创建 Spring Boot 应用 使用 Spring Initializr 快速创建 Spring Boot 应用。首先 Spring Initializr ,然后点击下一步,如下图:
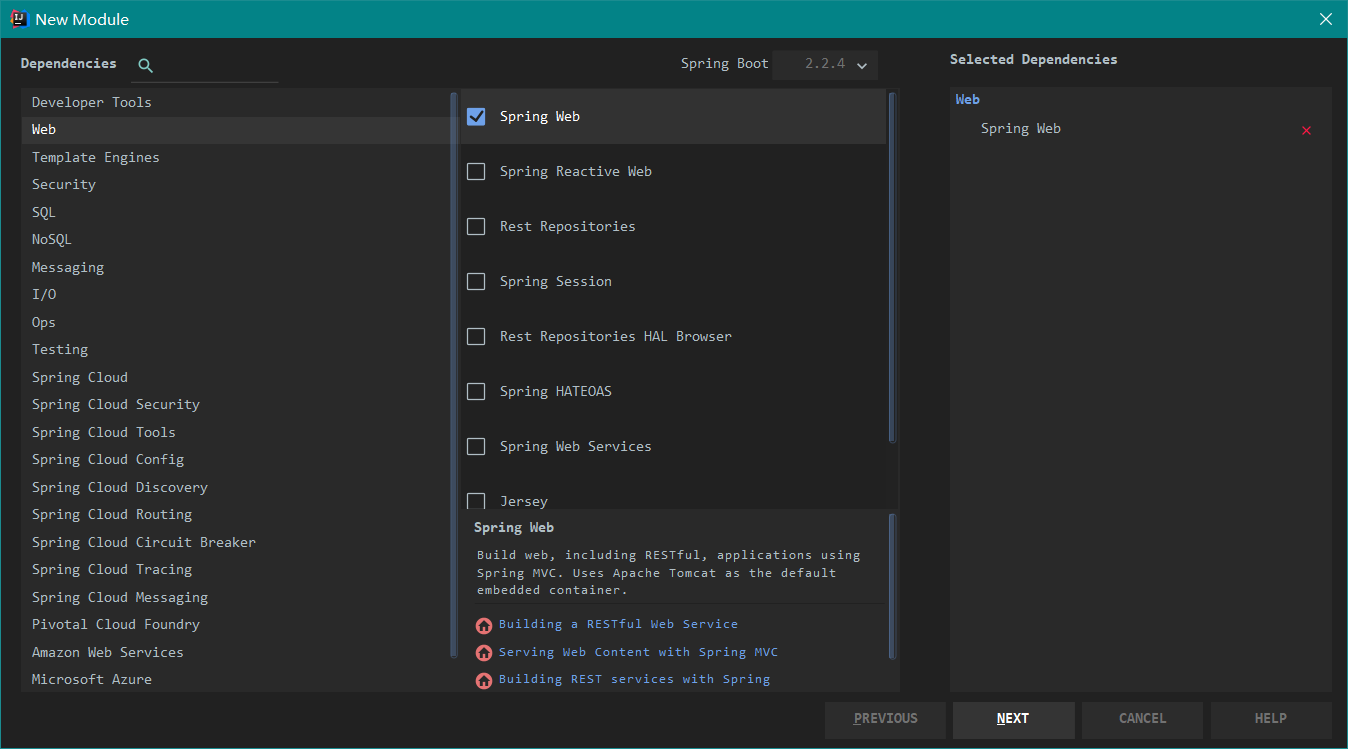
然后填好相关信息,点击下一步 依赖选择页面 ,选择好你要依赖,例如你要做 Web 开发,那么你就选择左侧的 Web ,中间选择你要的依赖,我选的是 Spring Web 。如果你还要用到数据库,那就选择数据库相关的即可。下图仅供参考:
选择好以后,点击完成即可。这里要 注意一点 :选择我们需要的模块之后,向导会联网创建 Spring Boot 项目 【一定要联网】 。创建完成之后项目结构如下图。然后自己编写 Controller 类,再去浏览器访问
项目创建成功后,默认生成的内容有哪些呢?如下:
默认生成的内容:
1、主程序 Application 已经生成好了,我们只需要编写业务逻辑即可
2、resources 文件夹中目录结构
1、static:保存所有的静态资源:如 js、css、images 等等
2、templates:保存所有的模板页面
3、application.properties:Spring Boot 应用的配置文件,可以修改一些默认设置
3、Spring Boot 默认 jar 包使用嵌入式的 Tomcat,默认不支持 JSP 页面,所以要使用模板引擎(freemarker、thymeleaf)
Spring Boot 的配置文件 Spring Boot 使用一个全局的配置文件,配置文件名是固定的 application ,但是 后缀却有两种写法 properties 和 yaml 。 例如:application.properties 、 application.yml 或者 application.yaml 。其实有很多配置 pring Boot 在底层都给我们自动配置好了,而配置文件的作用 就是修改 Spring Boot 自动配置的默认值
YAML 配置文件 .yml 或 .yaml 是 YAML(YAML Ain’t Markup Language) 以数据为中心,比 json、xml 等更适合做配置文件 http://www.yaml.org/ 。
YAML Ain't Markup Language 的解释:
1、YAML A Markup Language:是一个标记语言
2、YAML isn't Markup Language:不是一个标记语言
标记语言对比
以前的配置文件大多都使用的是 xxxx.xml 文件,而 xml 大量的数据浪费在了标签的开闭上。
YAML 文件以数据为中心,比 json、xml 等更适合做配置文件具体对比如下
1 2 3 4 5 6 7 8 9 10 11 12 13 server.port=8080 server: port: 8080 <server> <port>8080</port> </server>
YAML 基本语法 YAML 基本语法格式 key:(空格)value 。例如:port: 8080 。表示一对键值对(空格必须有)。以 空格的缩进 左对齐 属性和值也是大小写敏感 PORT 和 port 、 PATH 和 path
1 2 3 4 5 server: port: 8081 PORT: 8082 path: /hello PORT: /world
YAML 值的写法 第一种写法: 字面量:普通的值(数字,字符串,布尔)。字面量格式 key: value 。字面直接来写,字符串默认不用加上单引号或者双引号,加上有不同意义 加上双引号: 不会转义字符串里面的特殊字符,特殊字符会作为本身想表示的意思。例如:name: “zhangsan \n lisi” 输出:zhangsan 换行 lisi 加上单引号: 会转义特殊字符,特殊字符最终只是一个普通的字符串数据。例如:name: ‘zhangsan \n lisi’ 输出:zhangsan \n lisi
1 2 3 name: zhangsan age: 23 address: HangZhou
第二种写法: 对象、Map【属性和值】【键值对】 key: value 在下一行来写对象的属性和值的关系。注意事项: 缩进对象还是 key: value 的方式
1 2 3 4 5 6 7 8 friends: name: zhangsan hobby: chess friends: {name: zhangsan,hobby: chess}
第三种写法: 数组(List、Set) ' - ' 来表示数组中的一个元素,写法如下:
1 2 3 4 5 6 7 8 9 pets: - cat - dog - pig pets: [cat,dog,pig]
配置文件值的注入 yaml 配置文件 如下,那么 如何把配置文件里面的值注入到 Java 代码里呢
1 2 3 4 5 6 7 8 9 10 11 12 13 14 15 yamlperson: lastName: guo age: 22 boss: false birth: 2018 /12/3 maps: {key1: value1,key2: value2} lists: - key1 - key2 - key3 dog: name: milk-bottle age: 7
首先编写 YamlPerson 类 ,代码如下:
1 2 3 4 5 6 7 8 9 10 11 12 13 14 15 16 17 18 19 20 21 22 23 24 25 26 27 28 29 30 31 32 33 34 35 36 37 38 39 40 41 42 43 44 45 46 47 48 49 50 51 52 53 54 55 56 57 58 59 60 61 62 63 64 65 66 67 68 69 70 71 72 73 74 75 76 77 78 79 80 81 82 83 84 85 86 87 88 89 90 91 92 93 94 95 96 97 98 99 100 101 102 103 104 105 106 107 108 109 110 111 112 113 114 115 116 117 118 119 120 121 122 123 124 125 126 127 128 129 130 131 132 133 package edu.jgsu.bean;import java.util.List;import org.hibernate.validator.constraints.Email;import org.springframework.beans.factory.annotation.Value;import org.springframework.boot.context.properties.ConfigurationProperties;import org.springframework.context.annotation.PropertySource;import org.springframework.stereotype.Component;import org.springframework.validation.annotation.Validated;import javax.validation.constraints.Null;import java.util.Date;import java.util.List;import java.util.Map;@Component @ConfigurationProperties (prefix = "yamlperson" ) public class YamlPerson private String lastName; private Integer age; private Boolean boss; private Date birth; private Map<String,Object> maps; private List<Object> lists; private Dog dog; @Override public String toString () return "Person{" + "lastName='" + lastName + '\'' + ", age=" + age + ", boss=" + boss + ", birth=" + birth + ", maps=" + maps + ", lists=" + lists + ", dog=" + dog + '}' ; } public String getLastName () return lastName; } public void setLastName (String lastName) this .lastName = lastName; } public Integer getAge () return age; } public void setAge (Integer age) this .age = age; } public Boolean getBoss () return boss; } public void setBoss (Boolean boss) this .boss = boss; } public Date getBirth () return birth; } public void setBirth (Date birth) this .birth = birth; } public Map<String, Object> getMaps () return maps; } public void setMaps (Map<String, Object> maps) this .maps = maps; } public List<Object> getLists () return lists; } public void setLists (List<Object> lists) this .lists = lists; } public Dog getDog () return dog; } public void setDog (Dog dog) this .dog = dog; } } class Dog private String name; private Integer age; @Override public String toString () return "Dog{" + "name='" + name + '\'' + ", age=" + age + '}' ; } public String getName () return name; } public void setName (String name) this .name = name; } public Integer getAge () return age; } public void setAge (Integer age) this .age = age; } }
然后编写 ApplicationTests 测试类 就可以看到效果了,代码如下:
1 2 3 4 5 6 7 8 9 10 11 12 13 14 15 16 17 18 19 20 21 package edu.jgsu;import edu.jgsu.bean.YamlPerson;import org.junit.Test;import org.junit.runner.RunWith;import org.springframework.beans.factory.annotation.Autowired;import org.springframework.boot.test.context.SpringBootTest;import org.springframework.test.context.junit4.SpringRunner;@RunWith (SpringRunner.class ) @SpringBootTest public class ApplicationTests @Autowired YamlPerson yamlPerson; @Test public void test1 () System.out.println(yamlPerson); } }
测试结果如下:
1 2 3 2020 -02 -02 23 :25 :46.436 INFO 1472 --- [ main] edu.jgsu.ApplicationTests : Started ApplicationTests in 3.729 seconds (JVM running for 5.654 )Person{lastName='guo' , age=22 , boss=false , birth=Mon Dec 03 00 :00 :00 CST 2018 , maps={key1=value1, key2=value2}, lists=[key1, key2, key3], dog=Dog{name='milk-bottle' , age=7 }} 2020 -02 -02 23 :25 :46.579 INFO 1472 --- [ Thread-2 ] o.s.w.c.s.GenericWebApplicationContext : Closing org.springframework.web.context.support.GenericWebApplicationContext@18 d604b: startup date [Sun Feb 02 23 :25 :43 CST 2020 ]; root of context hierarchy
我们还可以 导入配置文件处理器 pom.xml 文件中加入以下代码:
1 2 3 4 5 6 7 <dependency > <groupId > org.springframework.boot</groupId > <artifactId > spring-boot-configuration-processor</artifactId > <optional > true</optional > </dependency >
TIPS: yaml 文件中 lastName == last-name 。在编写属性时提示 last-name 就不用大惊小怪了。
现在来看一下上面 yaml 配置文件在 properties 配置文件 中的编写:
1 2 3 4 5 6 7 8 9 10 yamlperson.last-name =guo yamlperson.age =22 yamlperson.boss =false yamlperson.birth =2018/12/3 yamlperson.maps.key1 =value1 yamlperson.maps.key2 =value2 yamlperson.maps.key3 =value3 yamlperson.lists =key1,key2,key3 yamlperson.dog.name =milk-bottle yamlperson.dog.age =7
注意事项:
有的时候属性值为中文,那么可能出现乱码 解决办法: 去 File | Settings | Editor | File Encodings 配置 utf-8 ,然后把 转成 ASCll 的那个选项勾上即可
现在,我们来看一下 配置文件和实体类进行映射的第二种姿势 @Value 注解,部分代码如下:
1 2 3 4 5 6 7 8 9 10 11 12 13 14 @Component public class YamlPerson @Value ("${yamlperson.last-name}" ) private String lastName; @Value ("#{11*2}" ) private Integer age; @Value ("true" ) private Boolean boss; ...
映射后的结果如下:
1 2 3 2020 -02 -03 00 :30 :41.800 INFO 13740 --- [ main] edu.jgsu.ApplicationTests : Started ApplicationTests in 3.816 seconds (JVM running for 5.752 )Person{lastName='guo' , age=22 , boss=true , birth=null , maps=null , lists=null , dog=null } 2020 -02 -03 00 :30 :42.080 INFO 13740 --- [ Thread-2 ] o.s.w.c.s.GenericWebApplicationContext : Closing org.springframework.web.context.support.GenericWebApplicationContext@3 cf2ba: startup date [Mon Feb 03 00 :30 :38 CST 2020 ]; root of context hierarchy
@Value 获取值和 @ConfigurationProperties 获取值比较,如下表:
获取值的两种方式
@ConfigurationProperties
@Value
功能
批量注入配置文件中的属性
一个个指定
松散绑定(松散语法)
支持
不支持
SpEL
不支持
支持
JSR303数据校验
支持
不支持
复杂类型封装
支持
不支持
配置文件 yml 还是 properties 它们都能获取到值。那么开发的时候用哪一个好呢?
1、如果说,我们只是在某个业务逻辑中需要 获取一下配置文件中的某项值 @Value 。@ConfigurationProperties 。
@PropertySource 、 @ImportResource 和 @Bean 三个注解对比。首先介绍 @PropertySource ,这个注解 用于加载指定的配置文件,即自己定义的配置文件 person.properties ,代码如下:
custom.properties 1 2 yamlperson.last-name =典韦 yamlperson.age =22
实体类部分代码如下:
1 2 3 4 5 6 7 8 9 10 11 12 @PropertySource (value = {"classpath:person.properties" })@Component @ConfigurationProperties (prefix = "yamlperson" ) public class YamlPerson private String lastName; private Integer age; ...
最终返回结果:
1 2 3 2020 -02 -03 10 :27 :30.260 INFO 22524 --- [ main] edu.jgsu.ApplicationTests : Started ApplicationTests in 3.158 seconds (JVM running for 4.347 )Person{lastName='典韦' , age=22 , boss=null , birth=null , maps=null , lists=null , dog=null } 2020 -02 -03 10 :27 :30.415 INFO 22524 --- [ Thread-2 ] o.s.w.c.s.GenericWebApplicationContext : Closing org.springframework.web.context.support.GenericWebApplicationContext@11001e5 : startup date [Mon Feb 03 10 :27 :27 CST 2020 ]; root of context hierarchy
接着介绍 @ImportResource ,这个注解 用于导入 Spring 的配置文件 bean.xml ,代码如下:
bean.xml 1 2 3 4 5 6 7 <?xml version="1.0" encoding="UTF-8"?> <beans xmlns ="http://www.springframework.org/schema/beans" xmlns:xsi ="http://www.w3.org/2001/XMLSchema-instance" xsi:schemaLocation ="http://www.springframework.org/schema/beans http://www.springframework.org/schema/beans/spring-beans.xsd" > <bean id ="helloService" class ="edu.jgsu.service.HelloService" > </bean > </beans >
然后 在测试类添加下列代码 helloService 这个对象,代码如下:
1 2 3 4 5 6 7 @Autowired ApplicationContext ioc; @Test public void test2 () System.out.println(ioc.containsBean("helloService" )); }
最终返回结果:
1 2 3 2020 -02 -03 11 :02 :28.466 INFO 13836 --- [ main] edu.jgsu.ApplicationTests : Started ApplicationTests in 3.041 seconds (JVM running for 4.307 )false 2020 -02 -03 11 :02 :28.611 INFO 13836 --- [ Thread-2 ] o.s.w.c.s.GenericWebApplicationContext : Closing org.springframework.web.context.support.GenericWebApplicationContext@8f f24: startup date [Mon Feb 03 11 :02 :25 CST 2020 ]; root of context hierarchy
上面的实验说明,Spring Boot 里面没有 Spring 的配置文件,我们自己编写的配置文件 bean.xml也不能被自动识别 在 Spring Boot 启动类中 @ImportResource 注解,代码如下:
1 2 3 4 5 6 7 8 9 10 11 12 13 14 15 package edu.jgsu;import org.springframework.boot.SpringApplication;import org.springframework.boot.autoconfigure.SpringBootApplication;import org.springframework.context.annotation.ImportResource;@ImportResource (locations = {"classpath:bean.xml" }) @SpringBootApplication public class Application public static void main (String[] args) SpringApplication.run(Application.class , args ) ; } }
然后再去测试类测试,最终结果:
1 2 3 2020 -02 -03 11 :08 :00.350 INFO 9568 --- [ main] edu.jgsu.ApplicationTests : Started ApplicationTests in 3.61 seconds (JVM running for 5.002 )true 2020 -02 -03 11 :08 :00.526 INFO 9568 --- [ Thread-2 ] o.s.w.c.s.GenericWebApplicationContext : Closing org.springframework.web.context.support.GenericWebApplicationContext@ed 52de: startup date [Mon Feb 03 11 :07 :57 CST 2020 ]; root of context hierarchy
在开发中,不会这样做,自己写配置文件,然后加载进来,这样太麻烦。接下来介绍 Spring Boot 推荐给容器中添加组件的方式:不编写 Spring 的配置文件,使用全注解的方式。首先,我们编写一个配置类:
MyConfig.java 1 2 3 4 5 6 7 8 9 10 11 12 13 14 15 16 17 18 19 20 21 22 23 package edu.jgsu.config;import edu.jgsu.service.HelloService;import org.springframework.context.annotation.Bean;import org.springframework.context.annotation.Configuration;@Configuration public class MyConfig @Bean public HelloService helloService02 () System.out.println("配置类给 IOC 容器中添加组件了..." ); return new HelloService(); } }
然后回到测试类 test2 方法进行测试,返回结果如下:
1 2 3 4 5 6 7 8 9 10 11 12 2020-02-03 11:31:41.352 INFO 5760 --- [ main] o.s.b.f.xml.XmlBeanDefinitionReader : Loading XML bean definitions from class path resource [bean.xml] 配置类给 IOC 容器中添加组件了... 2020 -02 -03 11 :31 :42.229 INFO 5760 --- [ main] o.s.w.s.handler.SimpleUrlHandlerMapping : Mapped URL path [
如果把配置类的方法 helloService 方法改为 helloService02 ,那么返回结果就为 false 了。这个我就不贴代码了。
配置文件占位符 先来看配置文件:
application.properties 1 2 3 4 5 6 7 8 9 10 yamlperson.last-name =guo${random.uuid} yamlperson.age =${random.int} yamlperson.boss =false yamlperson.birth =2018/12/3 yamlperson.maps.key1 =value1 yamlperson.maps.key2 =value2 yamlperson.maps.key3 =value3 yamlperson.lists =key1,key2,key3 yamlperson.dog.name =${yamlperson.last-name}-milk-bottle yamlperson.dog.age =7
然后去测试类测试,返回结果如下:
1 2 3 2020 -02 -03 11 :50 :18.934 INFO 24560 --- [ main] edu.jgsu.ApplicationTests : Started ApplicationTests in 2.958 seconds (JVM running for 4.29 )Person{lastName='guoa1e7ef2b-0e1f-41de-a9fa-16dce9687809' , age=1319770232 , boss=false , birth=Mon Dec 03 00 :00 :00 CST 2018 , maps={key1=value1, key2=value2, key3=value3}, lists=[key1, key2, key3], dog=Dog{name='guoe6b21bd7-bd07-4af5-92eb-915f435eb465-milk-bottle' , age=7 }} 2020 -02 -03 11 :50 :19.074 INFO 24560 --- [ Thread-2 ] o.s.w.c.s.GenericWebApplicationContext : Closing org.springframework.web.context.support.GenericWebApplicationContext@19 df09a: startup date [Mon Feb 03 11 :50 :16 CST 2020 ]; root of context hierarchy
占位符获取的是原先配置好了的值,如果没有配置,可以是用 “: “ 来指定默认值。例如:
1 yamlperson.hello =${yamlperson.hello:world}-java
我的代码了并没有 hello 这个属性,所以它会使用 world 这个被指定的值。所以结果为: world-java 。那么,如果代码是这样的:
1 yamlperson.hello =${yamlperson.hello}-java
这里既没有 hello 属性,也没有指定值,那么返回结果为: ${yamlperson.hello}-java 。
1 2 ${random.value}、${random.int }、${random.long } ${random.int (10 )}、${random.int [1024 ,65536 ]}
Profile Profile 是 Spring 对不同环境提供不同配置功能的支持,可以通过激活、指定参数等方式快速切换环境。
多Profile文件 我们在主配置文件编写的时候,文件名可以是 application-{profile}.properties/yml,实例代码如下:
默认的配置文件的端口application.properties
开发的配置文件端口application-dev.properties
测试的配置文件端口application-test.properties
上面那么多配置文件,该使用哪一个呢?Spring Boot 默认使用 application.properties 的配置。
激活指定 Profile
在 properties 配置文件中激活指定,代码如下:
application.properties 1 2 server.port =8080 spring.profiles.active =dev
激活完成后,那么端口不是 8080 了,而是 dev 的端口 8081 。
命令行中激活指定:把已经打成 jar 包的文件可以在命令行中再次激活 Profile
1 java -jar spring-boot-02 -config-0 .0 .1 -SNAPSHOT.jar --spring.profiles.active=dev
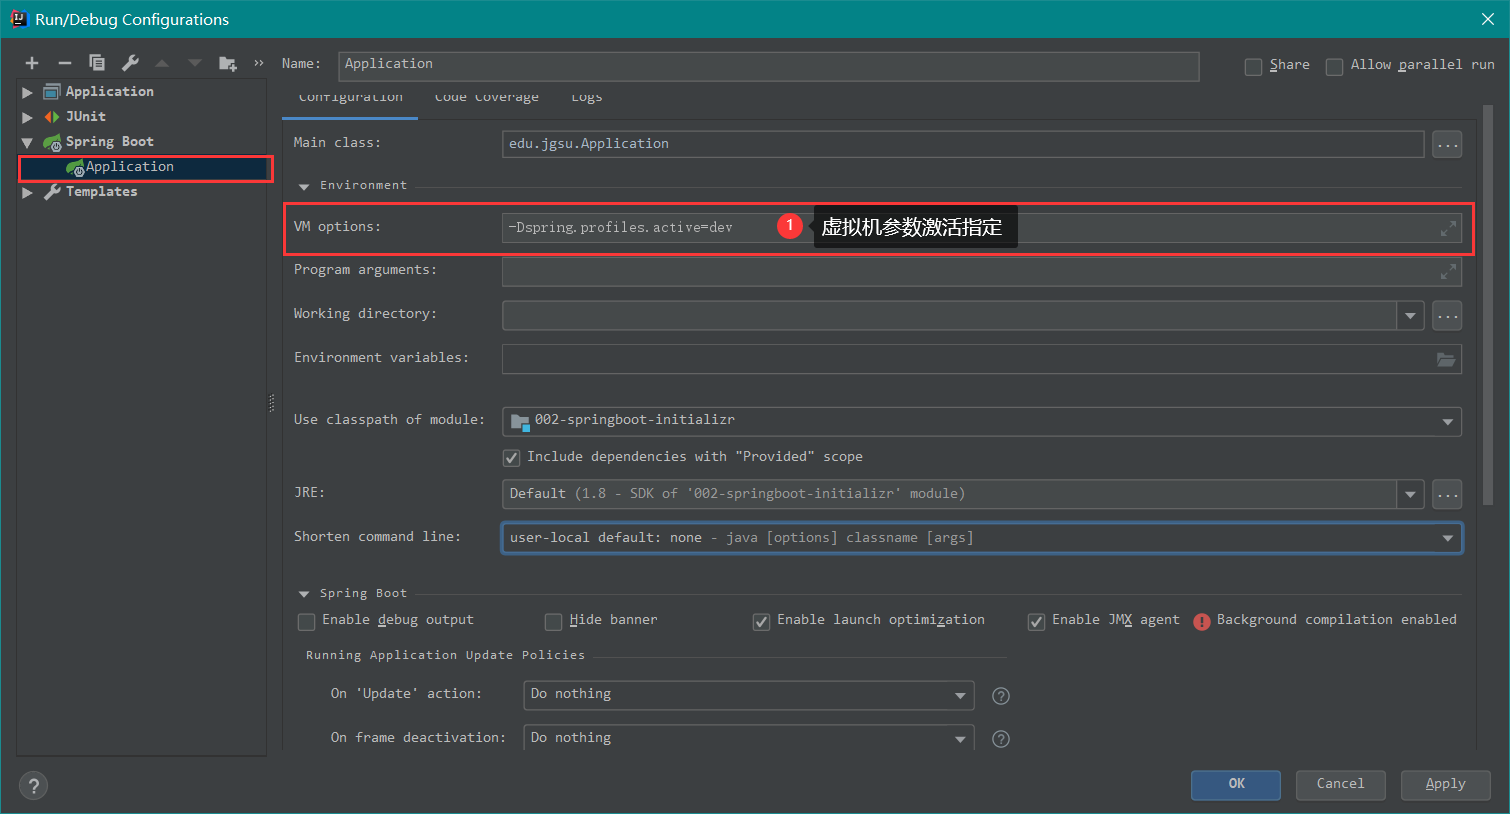
也可以直接在测试的时候,配置中传入命令行参数,如下图:
虚拟机参数激活指定,如下图:
1 -Dspring.profiles.active=dev
yml 支持多文档块方式激活指定 Profile,比 properties 更简单。格式:使用下面代码中的小短线将 yaml 文件分成几个文档块,如下代码:
1 2 3 4 5 6 7 8 9 10 11 12 13 14 15 server: port: 8080 spring: profiles: active: test --- server: port: 8081 spring: profiles: dev --- server: port: 8082 spring: profiles: test
配置文件加载位置 Spring Boot 启动会扫描以下位置的 application.properties 或者 application.yml 文件作为 Spring Boot 的默认配置文件。那么 Spring Boot 是从哪里去找这些配置文件呢?现在告诉你,它从下面四个位置去找:
1 2 3 4 5 6 7 8 9 10 11 – file:./config/ – file:./ – classpath:/config/ – classpath:/
以上是 按照优先级 从高到低 即上述所有位置的文件都会被加载,高优先级配置内容会覆盖低优先级配置内容 互补配置 。我们还可以通过 spring.config.location 来改变默认的配置文件位置。项目打包好以后,我们可以使用命令行参数的形式,启动项目的时候来指定配置文件的新位置;指定配置文件和默认加载的这些配置文件共同起作用形成互补配置。例如下面代码,加载了 G 盘的配置文件:
1 java -jar spring-boot-02 -config-02 -0.0 .1 -SNAPSHOT.jar --spring.config.location=G:/application.properties
外部配置加载顺序 SpringBoot也可以从以下位置加载配置:优先级从高到低,高优先级的配置覆盖低优先级的配置,所有的配置会形成互补配置。顺序如下:
命令行参数 【重要】 1 java -jar spring-boot-config-02 -0 .0 .1 -SNAPSHOT.jar --server.port=8087 --server.context-path =/abc
来自 java:comp/env 的 JNDI 属性
Java 系统属性(System.getProperties())
操作系统环境变量
RandomValuePropertySource 配置的 random.* 属性值
配置文件查顺序:由jar包外向jar包内进行寻找。优先加载带profile,然后再来加载不带profile。
jar包外部的application-{profile}.properties或application.yml(带spring.profile)配置文件 【重要】
jar包内部的application-{profile}.properties或application.yml(带spring.profile)配置文件 【重要】
jar包外部的application.properties或application.yml(不带spring.profile)配置文件 【重要】
jar包内部的application.properties或application.yml(不带spring.profile)配置文件 【重要】
@Configuration注解类上的@PropertySource
通过SpringApplication.setDefaultProperties指定的默认属性
所有支持的配置加载来源:参考官方文档
自动配置原理 配置文件到底能写什么?怎么写?请参照文档:配置文件能配置的属性参照
1 2 3 4 5 List<String> configurations = getCandidateConfigurations(annotationMetadata, attributes);
将类路径下 META-INF/spring.factories 里面配置的所有 EnableAutoConfiguration 的值加入到了容器中:
1 2 3 4 5 6 7 8 9 10 11 12 13 14 15 16 17 18 19 20 21 22 23 24 25 26 27 28 29 30 31 32 33 34 35 36 37 38 39 40 41 42 43 44 45 46 47 48 49 50 51 52 53 54 55 56 57 58 59 60 61 62 63 64 65 66 67 68 69 70 71 72 73 74 75 76 77 78 79 80 81 82 83 84 85 86 87 88 89 90 91 92 93 94 95 96 97 98 org.springframework.boot.autoconfigure.EnableAutoConfiguration=\ org.springframework.boot.autoconfigure.admin.SpringApplicationAdminJmxAutoConfiguration,\ org.springframework.boot.autoconfigure.aop.AopAutoConfiguration,\ org.springframework.boot.autoconfigure.amqp.RabbitAutoConfiguration,\ org.springframework.boot.autoconfigure.batch.BatchAutoConfiguration,\ org.springframework.boot.autoconfigure.cache.CacheAutoConfiguration,\ org.springframework.boot.autoconfigure.cassandra.CassandraAutoConfiguration,\ org.springframework.boot.autoconfigure.cloud.CloudAutoConfiguration,\ org.springframework.boot.autoconfigure.context.ConfigurationPropertiesAutoConfiguration,\ org.springframework.boot.autoconfigure.context.MessageSourceAutoConfiguration,\ org.springframework.boot.autoconfigure.context.PropertyPlaceholderAutoConfiguration,\ org.springframework.boot.autoconfigure.couchbase.CouchbaseAutoConfiguration,\ org.springframework.boot.autoconfigure.dao.PersistenceExceptionTranslationAutoConfiguration,\ org.springframework.boot.autoconfigure.data.cassandra.CassandraDataAutoConfiguration,\ org.springframework.boot.autoconfigure.data.cassandra.CassandraRepositoriesAutoConfiguration,\ org.springframework.boot.autoconfigure.data.couchbase.CouchbaseDataAutoConfiguration,\ org.springframework.boot.autoconfigure.data.couchbase.CouchbaseRepositoriesAutoConfiguration,\ org.springframework.boot.autoconfigure.data.elasticsearch.ElasticsearchAutoConfiguration,\ org.springframework.boot.autoconfigure.data.elasticsearch.ElasticsearchDataAutoConfiguration,\ org.springframework.boot.autoconfigure.data.elasticsearch.ElasticsearchRepositoriesAutoConfiguration,\ org.springframework.boot.autoconfigure.data.jpa.JpaRepositoriesAutoConfiguration,\ org.springframework.boot.autoconfigure.data.ldap.LdapDataAutoConfiguration,\ org.springframework.boot.autoconfigure.data.ldap.LdapRepositoriesAutoConfiguration,\ org.springframework.boot.autoconfigure.data.mongo.MongoDataAutoConfiguration,\ org.springframework.boot.autoconfigure.data.mongo.MongoRepositoriesAutoConfiguration,\ org.springframework.boot.autoconfigure.data.neo4j.Neo4jDataAutoConfiguration,\ org.springframework.boot.autoconfigure.data.neo4j.Neo4jRepositoriesAutoConfiguration,\ org.springframework.boot.autoconfigure.data.solr.SolrRepositoriesAutoConfiguration,\ org.springframework.boot.autoconfigure.data.redis.RedisAutoConfiguration,\ org.springframework.boot.autoconfigure.data.redis.RedisRepositoriesAutoConfiguration,\ org.springframework.boot.autoconfigure.data.rest.RepositoryRestMvcAutoConfiguration,\ org.springframework.boot.autoconfigure.data.web.SpringDataWebAutoConfiguration,\ org.springframework.boot.autoconfigure.elasticsearch.jest.JestAutoConfiguration,\ org.springframework.boot.autoconfigure.freemarker.FreeMarkerAutoConfiguration,\ org.springframework.boot.autoconfigure.gson.GsonAutoConfiguration,\ org.springframework.boot.autoconfigure.h2.H2ConsoleAutoConfiguration,\ org.springframework.boot.autoconfigure.hateoas.HypermediaAutoConfiguration,\ org.springframework.boot.autoconfigure.hazelcast.HazelcastAutoConfiguration,\ org.springframework.boot.autoconfigure.hazelcast.HazelcastJpaDependencyAutoConfiguration,\ org.springframework.boot.autoconfigure.info.ProjectInfoAutoConfiguration,\ org.springframework.boot.autoconfigure.integration.IntegrationAutoConfiguration,\ org.springframework.boot.autoconfigure.jackson.JacksonAutoConfiguration,\ org.springframework.boot.autoconfigure.jdbc.DataSourceAutoConfiguration,\ org.springframework.boot.autoconfigure.jdbc.JdbcTemplateAutoConfiguration,\ org.springframework.boot.autoconfigure.jdbc.JndiDataSourceAutoConfiguration,\ org.springframework.boot.autoconfigure.jdbc.XADataSourceAutoConfiguration,\ org.springframework.boot.autoconfigure.jdbc.DataSourceTransactionManagerAutoConfiguration,\ org.springframework.boot.autoconfigure.jms.JmsAutoConfiguration,\ org.springframework.boot.autoconfigure.jmx.JmxAutoConfiguration,\ org.springframework.boot.autoconfigure.jms.JndiConnectionFactoryAutoConfiguration,\ org.springframework.boot.autoconfigure.jms.activemq.ActiveMQAutoConfiguration,\ org.springframework.boot.autoconfigure.jms.artemis.ArtemisAutoConfiguration,\ org.springframework.boot.autoconfigure.flyway.FlywayAutoConfiguration,\ org.springframework.boot.autoconfigure.groovy.template.GroovyTemplateAutoConfiguration,\ org.springframework.boot.autoconfigure.jersey.JerseyAutoConfiguration,\ org.springframework.boot.autoconfigure.jooq.JooqAutoConfiguration,\ org.springframework.boot.autoconfigure.kafka.KafkaAutoConfiguration,\ org.springframework.boot.autoconfigure.ldap.embedded.EmbeddedLdapAutoConfiguration,\ org.springframework.boot.autoconfigure.ldap.LdapAutoConfiguration,\ org.springframework.boot.autoconfigure.liquibase.LiquibaseAutoConfiguration,\ org.springframework.boot.autoconfigure.mail.MailSenderAutoConfiguration,\ org.springframework.boot.autoconfigure.mail.MailSenderValidatorAutoConfiguration,\ org.springframework.boot.autoconfigure.mobile.DeviceResolverAutoConfiguration,\ org.springframework.boot.autoconfigure.mobile.DeviceDelegatingViewResolverAutoConfiguration,\ org.springframework.boot.autoconfigure.mobile.SitePreferenceAutoConfiguration,\ org.springframework.boot.autoconfigure.mongo.embedded.EmbeddedMongoAutoConfiguration,\ org.springframework.boot.autoconfigure.mongo.MongoAutoConfiguration,\ org.springframework.boot.autoconfigure.mustache.MustacheAutoConfiguration,\ org.springframework.boot.autoconfigure.orm.jpa.HibernateJpaAutoConfiguration,\ org.springframework.boot.autoconfigure.reactor.ReactorAutoConfiguration,\ org.springframework.boot.autoconfigure.security.SecurityAutoConfiguration,\ org.springframework.boot.autoconfigure.security.SecurityFilterAutoConfiguration,\ org.springframework.boot.autoconfigure.security.FallbackWebSecurityAutoConfiguration,\ org.springframework.boot.autoconfigure.security.oauth2.OAuth2AutoConfiguration,\ org.springframework.boot.autoconfigure.sendgrid.SendGridAutoConfiguration,\ org.springframework.boot.autoconfigure.session.SessionAutoConfiguration,\ org.springframework.boot.autoconfigure.social.SocialWebAutoConfiguration,\ org.springframework.boot.autoconfigure.social.FacebookAutoConfiguration,\ org.springframework.boot.autoconfigure.social.LinkedInAutoConfiguration,\ org.springframework.boot.autoconfigure.social.TwitterAutoConfiguration,\ org.springframework.boot.autoconfigure.solr.SolrAutoConfiguration,\ org.springframework.boot.autoconfigure.thymeleaf.ThymeleafAutoConfiguration,\ org.springframework.boot.autoconfigure.transaction.TransactionAutoConfiguration,\ org.springframework.boot.autoconfigure.transaction.jta.JtaAutoConfiguration,\ org.springframework.boot.autoconfigure.validation.ValidationAutoConfiguration,\ org.springframework.boot.autoconfigure.web.DispatcherServletAutoConfiguration,\ org.springframework.boot.autoconfigure.web.EmbeddedServletContainerAutoConfiguration,\ org.springframework.boot.autoconfigure.web.ErrorMvcAutoConfiguration,\ org.springframework.boot.autoconfigure.web.HttpEncodingAutoConfiguration,\ org.springframework.boot.autoconfigure.web.HttpMessageConvertersAutoConfiguration,\ org.springframework.boot.autoconfigure.web.MultipartAutoConfiguration,\ org.springframework.boot.autoconfigure.web.ServerPropertiesAutoConfiguration,\ org.springframework.boot.autoconfigure.web.WebClientAutoConfiguration,\ org.springframework.boot.autoconfigure.web.WebMvcAutoConfiguration,\ org.springframework.boot.autoconfigure.websocket.WebSocketAutoConfiguration,\ org.springframework.boot.autoconfigure.websocket.WebSocketMessagingAutoConfiguration,\ org.springframework.boot.autoconfigure.webservices.WebServicesAutoConfiguration
每一个这样的 xxxAutoConfiguration 类都是容器中的一个组件,都加入到容器中,用他们来做自动配置。那么每一个自动配置类是如何进行自动配置功能呢?以 HttpEncodingAutoConfiguration(Http编码自动配置) 为例解释自动配置原理。
1 2 3 4 5 6 7 8 9 10 11 12 13 14 15 16 17 18 19 20 21 22 23 24 25 26 27 28 29 30 31 32 33 34 @Configuration @EnableConfigurationProperties (HttpEncodingProperties.class ) ;@ConditionalOnWebApplication @ConditionalOnClass (CharacterEncodingFilter.class ) ;@ConditionalOnProperty (prefix = "spring.http.encoding" , value = "enabled" , matchIfMissing = true )public class HttpEncodingAutoConfiguration private final HttpEncodingProperties properties; public HttpEncodingAutoConfiguration (HttpEncodingProperties properties) this .properties = properties; } @Bean @ConditionalOnMissingBean (CharacterEncodingFilter.class ) //判断容器没有这个组件? public CharacterEncodingFilter characterEncodingFilter () { CharacterEncodingFilter filter = new OrderedCharacterEncodingFilter(); filter.setEncoding(this .properties.getCharset().name()); filter.setForceRequestEncoding(this .properties.shouldForce(Type.REQUEST)); filter.setForceResponseEncoding(this .properties.shouldForce(Type.RESPONSE)); return filter; }
根据当前不同的条件判断,决定这个配置类是否生效。一但这个配置类生效,这个配置类就会给容器中添加各种组件,这些组件的属性是从对应的 properties 类中获取的,这些类里面的每一个属性又是和配置文件绑定的。所有在配置文件中能配置的属性都是在 xxxxProperties 类中封装者,配置文件能配置什么就可以参照某个功能对应的这个属性类。
1 2 3 4 @ConfigurationProperties (prefix = "spring.http.encoding" ) public class HttpEncodingProperties public static final Charset DEFAULT_CHARSET = Charset.forName("UTF-8" );
自动配置的精髓
Spring Boot 启动会加载大量的自动配置类
我们看我们需要的功能有没有 Spring Boot 默认写好的自动配置类
我们再来看这个自动配置类中到底配置了哪些组件【只要我们要用的组件有,我们就不需要再来配置了】
给容器中自动配置类添加组件的时候,会从 properties 类中获取某些属性。我们就可以在配置文件中指定这些属性的值
xxxxAutoConfigurartion:自动配置类,给容器中添加组件
xxxxProperties:封装配置文件中相关属性
@Conditional派生注解
@Conditional扩展注解
作用(判断是否满足当前指定条件)
@ConditionalOnJava
系统的java版本是否符合要求
@ConditionalOnBean
容器中存在指定Bean;
@ConditionalOnMissingBean
容器中不存在指定Bean;
@ConditionalOnExpression
满足SpEL表达式指定
@ConditionalOnClass
系统中有指定的类
@ConditionalOnMissingClass
系统中没有指定的类
@ConditionalOnSingleCandidate
容器中只有一个指定的Bean,或者这个Bean是首选Bean
@ConditionalOnProperty
系统中指定的属性是否有指定的值
@ConditionalOnResource
类路径下是否存在指定资源文件
@ConditionalOnWebApplication
当前是web环境
@ConditionalOnNotWebApplication
当前不是web环境
@ConditionalOnJndi
JNDI存在指定项
自动配置类必须在一定的条件下才能生效,点进某一个自动配置类,查看这个类生效所需要的条件:如下面的 aop 自动配置类:
1 2 3 4 5 6 7 8 9 10 11 12 13 14 15 16 17 18 19 20 21 22 23 24 25 26 27 28 29 30 31 32 33 34 35 36 37 38 39 40 41 42 43 44 45 46 47 48 49 50 51 52 53 54 55 56 57 58 59 package org.springframework.boot.autoconfigure.aop;import org.aspectj.lang.annotation.Aspect;import org.aspectj.lang.reflect.Advice;import org.aspectj.weaver.AnnotatedElement;import org.springframework.boot.autoconfigure.condition.ConditionalOnClass;import org.springframework.boot.autoconfigure.condition.ConditionalOnProperty;import org.springframework.context.annotation.Configuration;import org.springframework.context.annotation.EnableAspectJAutoProxy;@Configuration @ConditionalOnClass ({EnableAspectJAutoProxy.class , Aspect .class , Advice .class , AnnotatedElement .class }) @ConditionalOnProperty ( prefix = "spring.aop" , name = {"auto" }, havingValue = "true" , matchIfMissing = true ) public class AopAutoConfiguration public AopAutoConfiguration () } @Configuration @EnableAspectJAutoProxy ( proxyTargetClass = true ) @ConditionalOnProperty ( prefix = "spring.aop" , name = {"proxy-target-class" }, havingValue = "true" , matchIfMissing = true ) public static class CglibAutoProxyConfiguration public CglibAutoProxyConfiguration () } } @Configuration @EnableAspectJAutoProxy ( proxyTargetClass = false ) @ConditionalOnProperty ( prefix = "spring.aop" , name = {"proxy-target-class" }, havingValue = "false" , matchIfMissing = false ) public static class JdkDynamicAutoProxyConfiguration public JdkDynamicAutoProxyConfiguration () } } }
我们怎么知道哪些自动配置类生效了,哪些没有生效呢?我们可以通过启用 debug=true 属性,来让控制台打印自动配置报告,这样我们就可以很方便的知道自动配置类是否生效了。
先在配置文件中加入下列代码:
application.properties 然后运行 Spring Boot 主程序,就可看到控制台的自动配置报告,部分代码如下:
1 2 3 4 5 6 7 8 9 10 11 12 13 14 15 16 17 18 19 20 21 22 23 24 25 26 27 28 29 30 31 32 33 34 35 36 37 38 39 40 41 42 43 44 2020 -02 -04 12 :05 :38.905 DEBUG 25984 --- [ main] ConditionEvaluationReportLoggingListener : ============================ CONDITIONS EVALUATION REPORT ============================ Positive matches: ----------------- CodecsAutoConfiguration matched: - @ConditionalOnClass found required class 'org .springframework .http .codec .CodecConfigurer '@ConditionalOnMissingClass did not find unwanted class (OnClassCondition) CodecsAutoConfiguration.JacksonCodecConfiguration matched: - @ConditionalOnClass found required class 'com.fasterxml.jackson.databind.ObjectMapper' ; @ConditionalOnMissingClass did not find unwanted class (OnClassCondition) CodecsAutoConfiguration.JacksonCodecConfiguration#jacksonCodecCustomizer matched: - @ConditionalOnBean (types: com.fasterxml.jackson.databind.ObjectMapper; SearchStrategy: all) found bean 'jacksonObjectMapper' (OnBeanCondition) DispatcherServletAutoConfiguration matched: - @ConditionalOnClass found required class 'org.springframework.web.servlet.DispatcherServlet' ; @ConditionalOnMissingClass did not find unwanted class (OnClassCondition) - found ConfigurableWebEnvironment (OnWebApplicationCondition) . . . Negative matches: ----------------- ActiveMQAutoConfiguration: Did not match: - @ConditionalOnClass did not find required classes 'javax.jms.ConnectionFactory', 'org.apache.activemq.ActiveMQConnectionFactory' (OnClassCondition) AopAutoConfiguration: Did not match: - @ConditionalOnClass did not find required classes 'org.aspectj.lang.annotation.Aspect', 'org.aspectj.lang.reflect.Advice', 'org.aspectj.weaver.AnnotatedElement' (OnClassCondition) ArtemisAutoConfiguration: Did not match: - @ConditionalOnClass did not find required classes 'javax.jms.ConnectionFactory', 'org.apache.activemq.artemis.jms.client.ActiveMQConnectionFactory' (OnClassCondition) BatchAutoConfiguration: Did not match: - @ConditionalOnClass did not find required classes 'org.springframework.batch.core.launch.JobLauncher', 'org.springframework.jdbc.core.JdbcOperations' (OnClassCondition) ...
到此为止, Spring Boot 的配置学习就结束,记得常回来温习,巩固知识。接下来介绍 Spring Boot 与日志。
Spring Boot 日志 市面上的日志框架 JUL、JCL、Jboss-logging、logback、log4j、log4j2、slf4j ….
日志门面 (日志的抽象层)
日志实现
SLF4j(Simple Logging Facade for Java) jboss-loggingJCL(Jakarta Commons Logging)
Log4j JUL(java.util.logging) Log4j2 Logback
SLF4j 、 Log4j 、Logback 都是出自同一个人之手。现在我们从左边选一个门面(抽象层)、右边来选一个实现,最佳的搭配如下。【不使用Log4j ,是因为 Logback 比它更好,而且作者为同一人。不使用 JUL ,因为诞生就是和 Log4j 进行市场竞争的,所以没有后来的 Logback 好。不选择 Log4j2 的理由就是 它做的太好了,还不能和框架适配起来。就像计算机网络中的 OSI 七层协议和 OSI 五层协议 一样,七层太好了,还不能适配,五层并非官方,市场上却用的最多】
Spring Boot 的底层是 Spring 框架,Spring 框架默认是用 JCL(Jakarta Commons Logging) 作为日志框架。而 Spring Boot 选用 SLF4j 和 logback 作为日志框架。
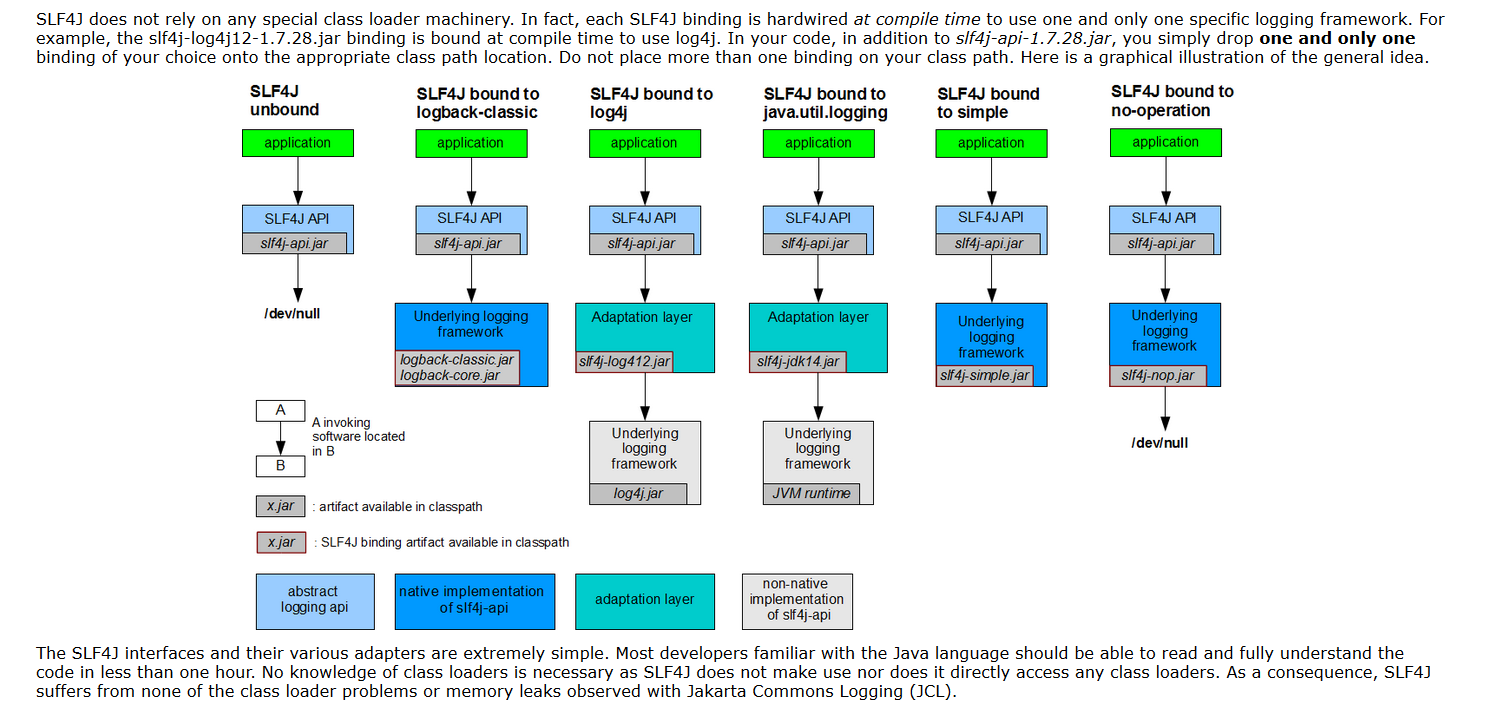
SLF4j 的使用 那我们如何在系统中使用 SLF4j 呢?参考官网: https://www.slf4j.org 。如下图示:
我们以后在开发的时候,日志记录方法的调用,不应该来直接调用日志的实现类,而是调用日志抽象层里面的方法。首先就要给系统里面导入 slf4j 的 jar 和 logback 的实现 jar 。
1 2 3 4 5 6 7 8 9 import org.slf4j.Logger;import org.slf4j.LoggerFactory;public class HelloWorld public static void main (String[] args) Logger logger = LoggerFactory.getLogger(HelloWorld.class ) ; logger.info("Hello World" ); } }
每一个日志的实现框架都有自己的配置文件,使用 slf4j 以后,配置文件还是做成日志实现框架自己本身的配置文件。如果你是用 logback 实现的,那就做成 logback 的配置文件。
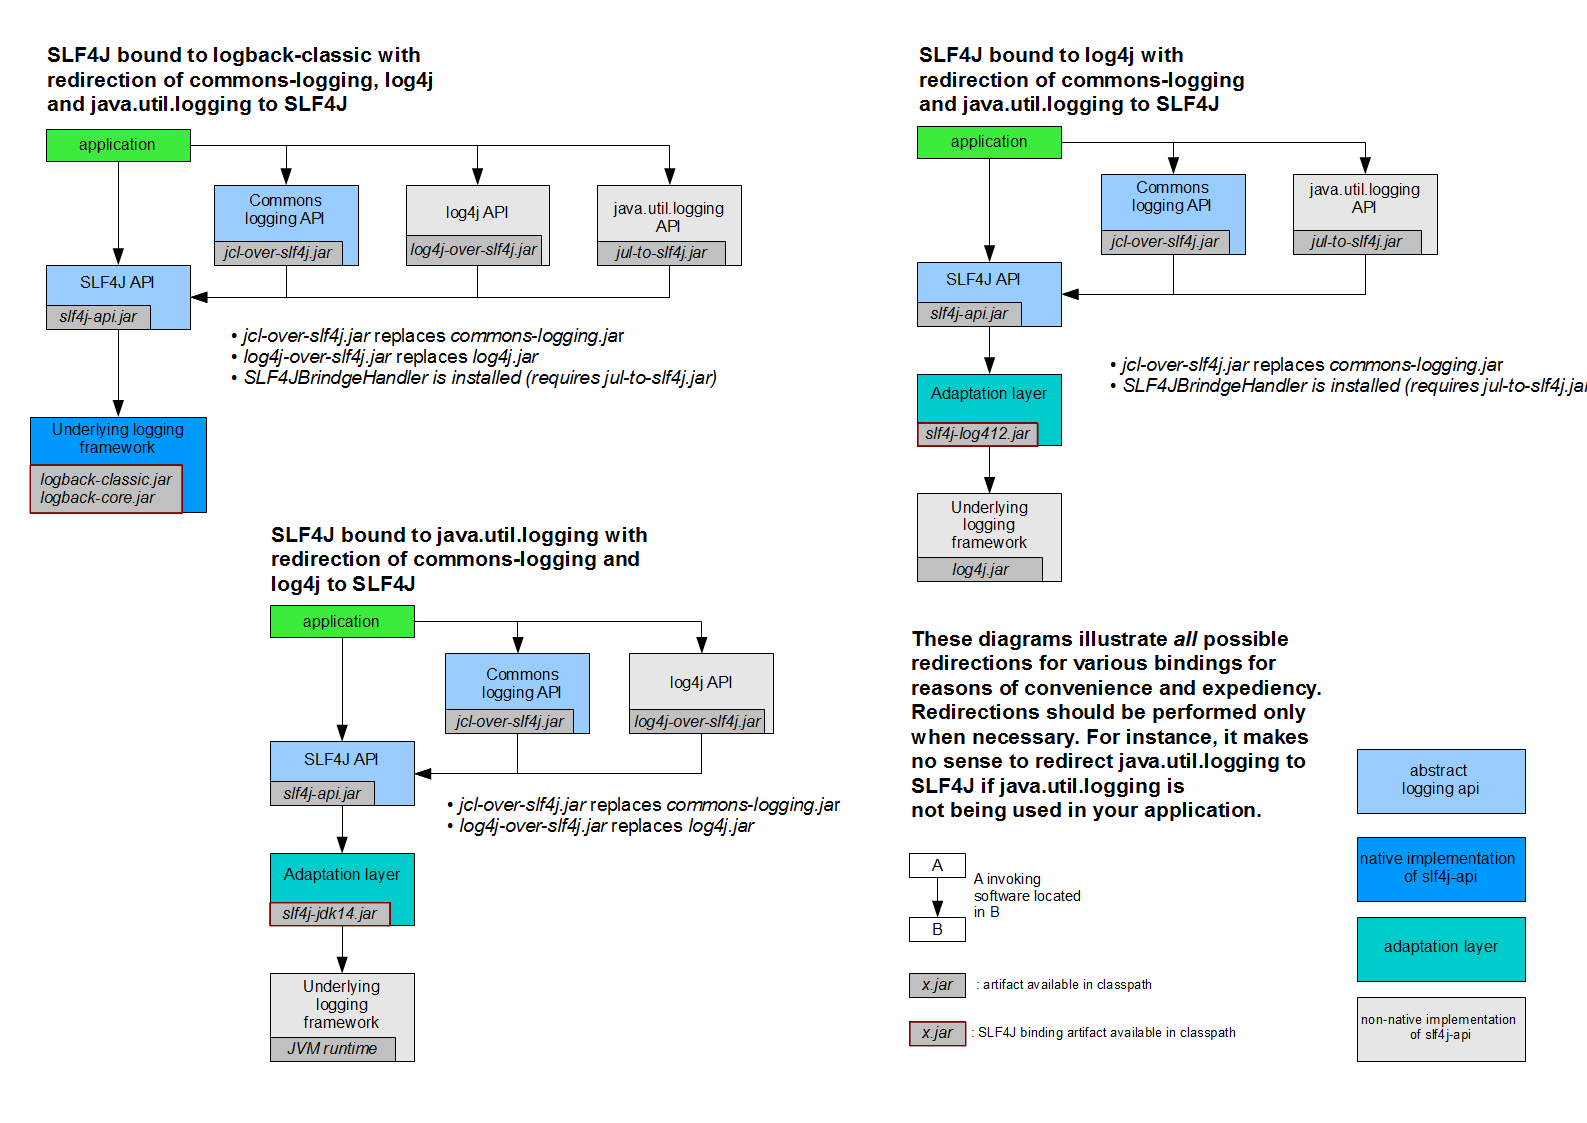
遗留问题 打个比方,开发 A 系统时使用的是 slf4j + logback 日志框架,又用到了Spring(commons-logging)、Hibernate(jboss-logging)、MyBatis 等等各种 JavaEE 框架,那么就会出现好多日志框架,导致冲突。那么我们就要统一日志记录,即要求别的框架统一使用 slf4j 进行输出。那么该如何做呢?该如何让系统中所有的日志都统一到 slf4j 呢?
将系统中其他日志框架先排除出去 用中间包来替换原有的日志框架 我们导入slf4j其他的实现
下图是官方的解决方案图:
Spring Boot 日志关系 1 2 3 4 <dependency> <groupId>org.springframework.boot</groupId> <artifactId>spring-boot-starter</artifactId> </dependency>
Spring Boot 使用它来做日志功能
1 2 3 4 <dependency> <groupId>org.springframework.boot</groupId> <artifactId>spring-boot-starter-logging</artifactId> </dependency>
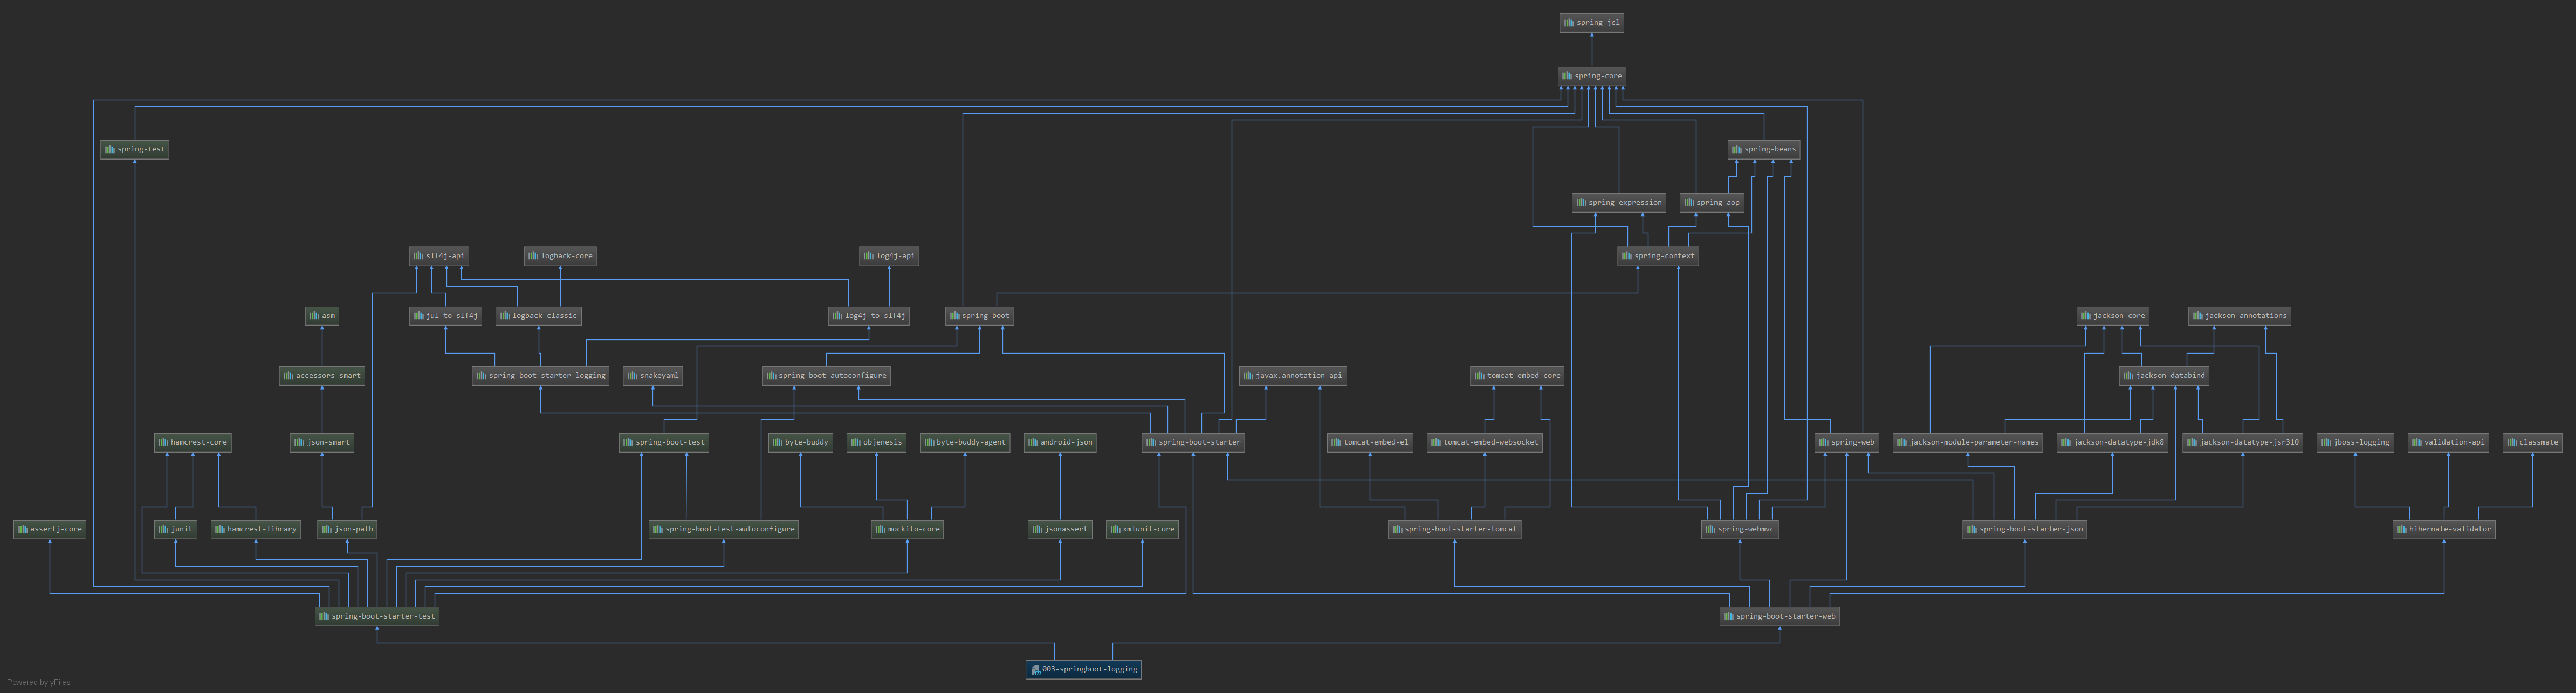
Spring Boot 日志底层依赖关系,如下图:
Spring Boot 日志总结:
Spring Boot 底层也是使用 slf4j + logback 的方式进行日志记录
Spring Boot 也把其他的日志都替换成了 slf4j
中间替换包,log4j 的底层仍然使用 Slf4j ,如下面代码所示,其他的中间替换包原理都一样。1 2 3 4 5 6 @SuppressWarnings ("rawtypes" )public abstract class LogFactory static String UNSUPPORTED_OPERATION_IN_JCL_OVER_SLF4J = "http://www.slf4j.org/codes.html#unsupported_operation_in_jcl_over_slf4j" ; static LogFactory logFactory = new SLF4JLogFactory();
如果我们要引入其他框架,一定要把这个框架的默认日志依赖移除掉
日志使用 Spring Boot 默认帮我们配置好了日志,只要我们运行程序,控制台便会有日志输出,测试程序如下:
1 2 3 4 5 6 7 8 9 10 11 12 13 14 15 16 17 18 19 20 21 22 23 24 25 26 27 28 29 package edu.jgsu;import org.junit.Test;import org.junit.runner.RunWith;import org.slf4j.Logger;import org.slf4j.LoggerFactory;import org.springframework.boot.test.context.SpringBootTest;import org.springframework.test.context.junit4.SpringRunner;@RunWith (SpringRunner.class ) @SpringBootTest public class ApplicationTests Logger logger = LoggerFactory.getLogger(getClass()); @Test public void contextLoads () logger.trace("这是trace日志..." ); logger.debug("这是debug日志..." ); logger.info("这是info日志..." ); logger.warn("这是warn日志..." ); logger.error("这是error日志..." ); } }
控制台输出的结果如下:
1 2 3 4 5 2020 -02 -04 22 :27 :01.312 INFO 22432 --- [ main] edu.jgsu.ApplicationTests : Started ApplicationTests in 4.233 seconds (JVM running for 8.279 )2020 -02 -04 22 :27 :01.488 INFO 22432 --- [ main] edu.jgsu.ApplicationTests : 这是info日志...2020 -02 -04 22 :27 :01.488 WARN 22432 --- [ main] edu.jgsu.ApplicationTests : 这是warn日志...2020 -02 -04 22 :27 :01.488 ERROR 22432 --- [ main] edu.jgsu.ApplicationTests : 这是error日志...2020 -02 -04 22 :27 :01.501 INFO 22432 --- [ Thread-2 ] o.s.w.c.s.GenericWebApplicationContext : Closing org.springframework.web.context.support.GenericWebApplicationContext@aba 8be: startup date [Tue Feb 04 22 :26 :57 CST 2020 ]; root of context hierarchy
现在要改变日志级别,在配置文件中加入下列代码:
1 logging.level.edu.jgsu =trace
然后控制台输出的结果就改变了,如下:
1 2 3 4 5 6 7 2020 -02 -04 22 :29 :48.232 INFO 2368 --- [ main] edu.jgsu.ApplicationTests : Started ApplicationTests in 3.614 seconds (JVM running for 5.138 )2020 -02 -04 22 :29 :48.369 TRACE 2368 --- [ main] edu.jgsu.ApplicationTests : 这是trace日志...2020 -02 -04 22 :29 :48.369 DEBUG 2368 --- [ main] edu.jgsu.ApplicationTests : 这是debug日志...2020 -02 -04 22 :29 :48.370 INFO 2368 --- [ main] edu.jgsu.ApplicationTests : 这是info日志...2020 -02 -04 22 :29 :48.370 WARN 2368 --- [ main] edu.jgsu.ApplicationTests : 这是warn日志...2020 -02 -04 22 :29 :48.370 ERROR 2368 --- [ main] edu.jgsu.ApplicationTests : 这是error日志...2020 -02 -04 22 :29 :48.377 INFO 2368 --- [ Thread-2 ] o.s.w.c.s.GenericWebApplicationContext : Closing org.springframework.web.context.support.GenericWebApplicationContext@d 9b808: startup date [Tue Feb 04 22 :29 :45 CST 2020 ]; root of context hierarchy
根据以下代码,可修改 Spring Boot 日志的默认配置:
1 2 3 4 5 6 7 8 9 10 11 12 13 14 logging.level.edu.jgsu =trace logging.file =c:/springboot.log logging.pattern.console =%d{yyyy-MM-dd} [%thread] %-5level %logger{50} - %msg%n logging.pattern.file =%d{yyyy-MM-dd} === [%thread] === %-5level === %logger{50} ==== %msg%n
在这里,我们区分一下 logging.file 和 logging.path :
logging.file
logging.path
Example
Description
(none)
(none)
只在控制台输出
指定文件名
(none)
my.log
输出日志到my.log文件
(none)
指定目录
/var/log
输出到指定目录的 spring.log 文件中
配置好之后,执行测试类,然后就会在 D 盘生成 springboot.log 文件,里面的日志与格式如下:
1 2 3 4 5 6 7 8 9 10 11 12 13 14 15 16 17 2020 -02 -04 === [main] === INFO === edu.jgsu.ApplicationTests ==== Starting ApplicationTests on guoshizhan with PID 1984 (started by guoshizhan in F:\99 -Frameworks\01 -springboot\003 -springboot-logging)2020 -02 -04 === [main] === DEBUG === edu.jgsu.ApplicationTests ==== Running with Spring Boot v2.0 .1 .RELEASE, Spring v5.0 .5 .RELEASE2020 -02 -04 === [main] === INFO === edu.jgsu.ApplicationTests ==== No active profile set, falling back to default profiles: default 2020 -02 -04 === [main] === INFO === o.s.w.context.support.GenericWebApplicationContext ==== Refreshing org.springframework.web.context.support.GenericWebApplicationContext@2f f096: startup date [Tue Feb 04 22 :57 :02 CST 2020 ]; root of context hierarchy2020 -02 -04 === [main] === INFO === o.s.web.servlet.handler.SimpleUrlHandlerMapping ==== Mapped URL path [
与 D 盘的 springboot.log 文件里的日志相比,控制台的日志与格式如下:
1 2 3 4 5 6 7 8 9 10 11 12 13 14 15 16 17 2020 -02 -04 [main] INFO edu.jgsu.ApplicationTests - Starting ApplicationTests on guoshizhan with PID 1984 (started by guoshizhan in F:\99 -Frameworks\01 -springboot\003 -springboot-logging)2020 -02 -04 [main] DEBUG edu.jgsu.ApplicationTests - Running with Spring Boot v2.0 .1 .RELEASE, Spring v5.0 .5 .RELEASE2020 -02 -04 [main] INFO edu.jgsu.ApplicationTests - No active profile set, falling back to default profiles: default 2020 -02 -04 [main] INFO o.s.w.context.support.GenericWebApplicationContext - Refreshing org.springframework.web.context.support.GenericWebApplicationContext@2f f096: startup date [Tue Feb 04 22 :57 :02 CST 2020 ]; root of context hierarchy2020 -02 -04 [main] INFO o.s.web.servlet.handler.SimpleUrlHandlerMapping - Mapped URL path [
上面的两种日志格式就是 properties 配置文件中配置的格式。现在来说一下日志格式中那些字符的含义:
1 2 3 4 5 6 7 8 9 10 日志输出格式: %d 表示日期时间, %thread 表示线程名, %-5level 级别从左显示5个字符宽度 %logger{50} 表示logger名字最长50个字符,否则按照句点分割。 %msg 日志消息 %n 是换行符 %d{yyyy-MM-dd HH:mm:ss.SSS} [%thread] %-5level %logger{50} - %msg%n
使用自定义日志配置文件 如何使用自定义的日志文件呢?给类路径下即 resources 下放上每个日志框架自己的配置文件即可,【这个日志配置文件要自己编写,在最后我会提供一份日志配置,仅供参考】Spring Boot 就不使用它自己的默认配置了。但是自定义的日志配置文件的名字必须在下面表格 Customization 中的其中一个。
Logging System
Customization
Logback
logback-spring.xml, logback-spring.groovy, logback.xml or logback.groovy
Log4j2
log4j2-spring.xml or log4j2.xml
JDK (Java Util Logging)
logging.properties
建议不要用 logback.xml 这个名字,因为 logback.xml 直接就被日志框架识别了,所以无法使用高级功能。建议使用 logback-spring.xml 这个名字,日志框架就不能直接加载日志的配置项,所以就由 Spring Boot 来解析日志配置,从而可以使用 Spring Boot 的高级 Profile 功能。
下面标签里面可以指定某段配置只在某个环境下生效:
1 2 3 <springProfile name ="staging" > </springProfile >
下面代码自定义了开发环境日志格式和非开发环境日志格式:
1 2 3 4 5 6 7 8 9 10 11 12 <appender name ="stdout" class ="ch.qos.logback.core.ConsoleAppender" > <layout class ="ch.qos.logback.classic.PatternLayout" > <springProfile name ="dev" > <pattern > %d{yyyy-MM-dd HH:mm:ss.SSS} ----> [%thread] ---> %-5level %logger{50} - %msg%n</pattern > </springProfile > <springProfile name ="!dev" > <pattern > %d{yyyy-MM-dd HH:mm:ss.SSS} ==== [%thread] ==== %-5level %logger{50} - %msg%n</pattern > </springProfile > </layout > </appender >
如果使用 logback.xml 作为日志配置文件,还要配置使用 Profile 功能,会出现以下错误:
1 no applicable action for [springProfile]
切换日志框架 Spring Boot 默认使用的日志框架是 Slf4j + logback ,那么如果我要切换其他的日志框架,那该怎么做呢?可以按照 slf4j 的日志适配图【上一张图片】,进行相关的切换。例如:我们要把原先的 slf4j + logback 切换为 slf4j + log4j 的方式,那该这么做呢?首先,我们根据日志适配图排除不需要的日志依赖,然后新增我们需要的日志依赖:
1 2 3 4 5 6 7 8 9 10 11 12 13 14 15 16 17 18 19 <dependency > <groupId > org.springframework.boot</groupId > <artifactId > spring-boot-starter-web</artifactId > <exclusions > <exclusion > <artifactId > logback-classic</artifactId > <groupId > ch.qos.logback</groupId > </exclusion > <exclusion > <artifactId > log4j-over-slf4j</artifactId > <groupId > org.slf4j</groupId > </exclusion > </exclusions > </dependency > <dependency > <groupId > org.slf4j</groupId > <artifactId > slf4j-log4j12</artifactId > </dependency >
切换为 log4j2
1 2 3 4 5 6 7 8 9 10 11 12 13 14 15 <dependency > <groupId > org.springframework.boot</groupId > <artifactId > spring-boot-starter-web</artifactId > <exclusions > <exclusion > <artifactId > spring-boot-starter-logging</artifactId > <groupId > org.springframework.boot</groupId > </exclusion > </exclusions > </dependency > <dependency > <groupId > org.springframework.boot</groupId > <artifactId > spring-boot-starter-log4j2</artifactId > </dependency >
到这里,Spring Boot 的日志就结束了,这一章节我感觉后面日志切换有点难,也写的不好,还没有贴代码。后期有时间的话,我会以更好的表达来重新写过。那么,接下来就是 Spring Boot 的重点内容,Spring Boot 与 Web 开发。